The first major confrontation between British and German capital ships in the First World War, fought on 24th January 1915 off the coast of England; where the Royal Navy missed a trick and the Imperial German Navy learnt some important lessons on ship safety
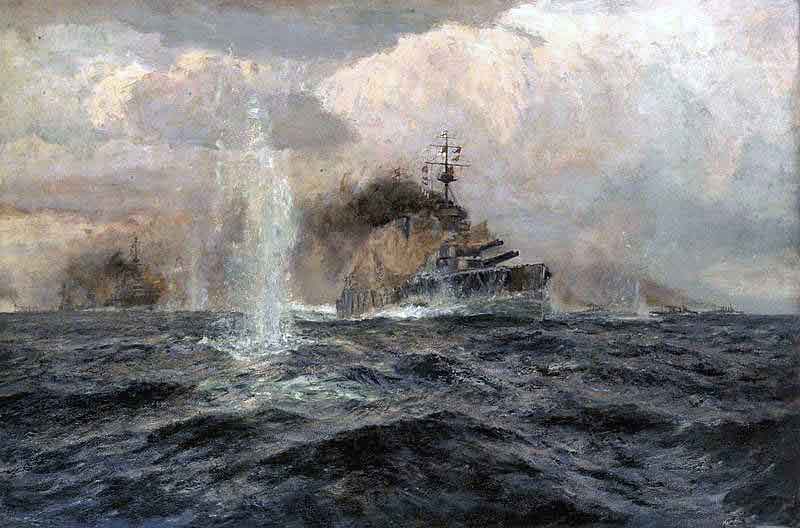
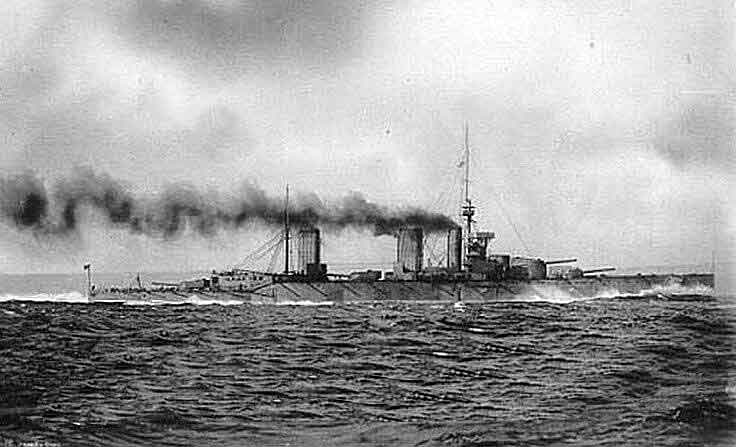
Admiral Beatty’s flagship HMS Lion at the Battle of Dogger Bank on 24th January 1915 in the First World War: picture by Arthur Burgess
The previous battle in the First World War is the Battle of the Falkland Islands
The next battle in the First World War is Gallipoli Campaign: Part I the Naval Attack on the Dardanelles
Battle: Dogger Bank
Date of the Battle of the Dogger Bank: 24th January 1915
Place of the Battle of the Dogger Bank: In the North Sea to the north-east of the Dogger Bank
War: The First World War also known as ‘The Great War’.
Contestants in the Battle of the Dogger Bank: The British Royal Navy against the Imperial German Navy.
Ships involved in the Battle of the Dogger Bank:
The Royal Navy:
1st Battle Cruiser Squadron (Vice Admiral Sir David Beatty):
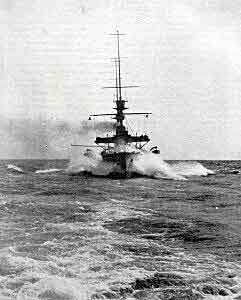
HMS Lion (Captain A. E. M. Chatfield with Vice Admiral Beatty’s flag) battle cruiser: commissioned 1910 – 27,000 tons – Armament 8 X 13.5 inch guns and 16 X 4 inch guns – 28 knots – crew: 1,092 officers and men.
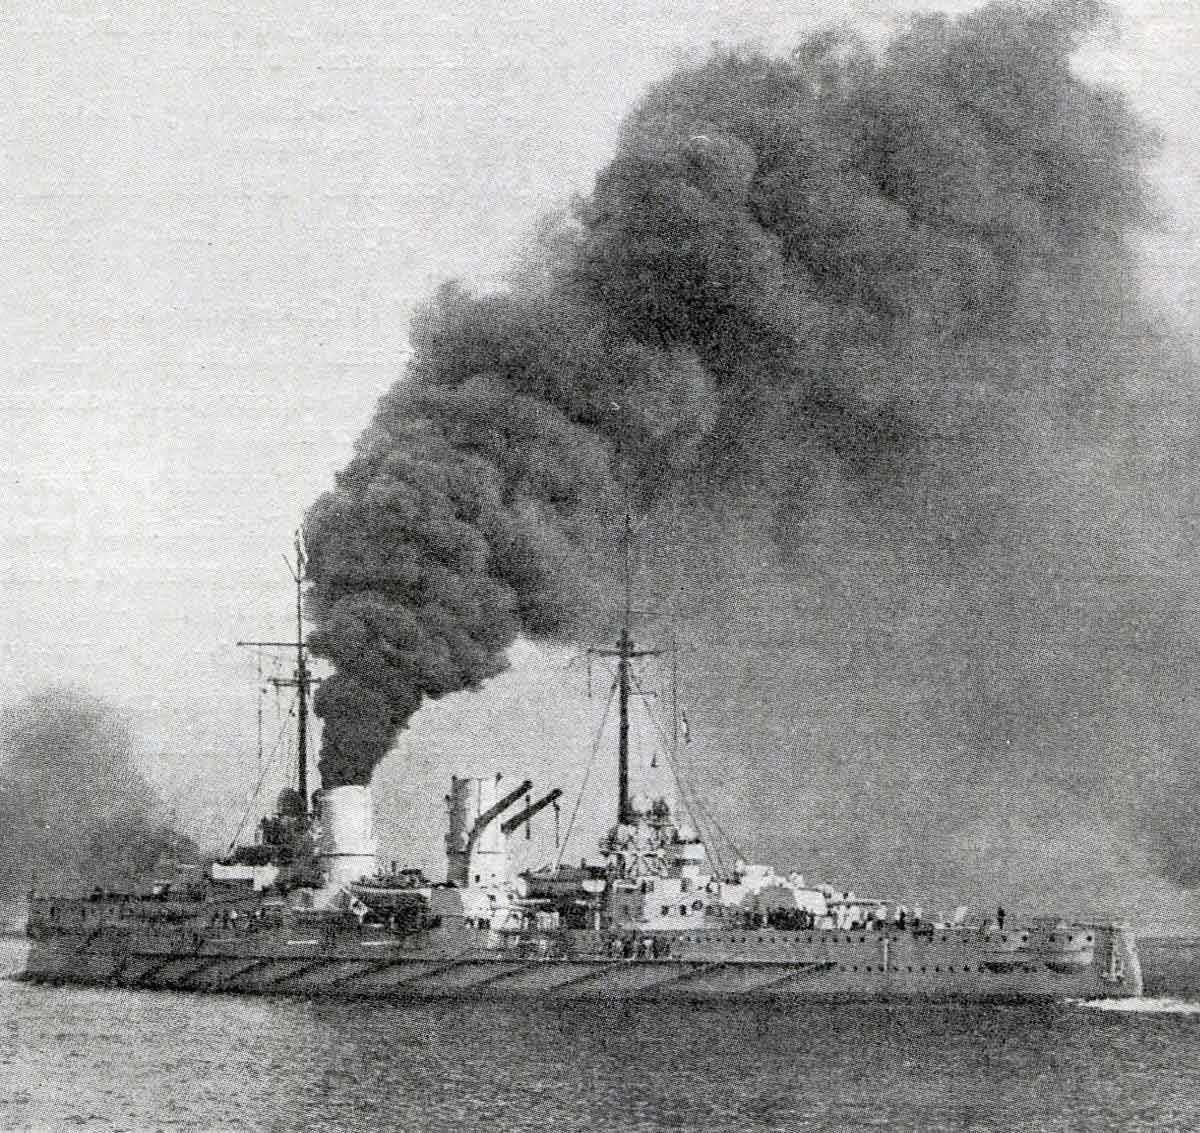
Admiral Beatty’s flag ship HMS Lion going into action at the Battle of Dogger Bank on 24th January 1915 in the First World War
HMS Tiger (Captain H. B. Pelly) battle cruiser: commissioned 1914 – 29,000 tons – Armament 8 X 13.5 inch guns and 12 X 6 inch guns – 28 knots – crew: 1,112 officers and men.
HMS Princess Royal (Captain O. de B. Brock) battle cruiser: commissioned 1912 – 27,000 tons – Armament 8 X 13.5 inch guns and 16 X 4 inch guns – 28 knots – crew: 985 officers and men.
2nd Battle Cruiser Squadron (Rear Admiral Sir Archibald Moore):
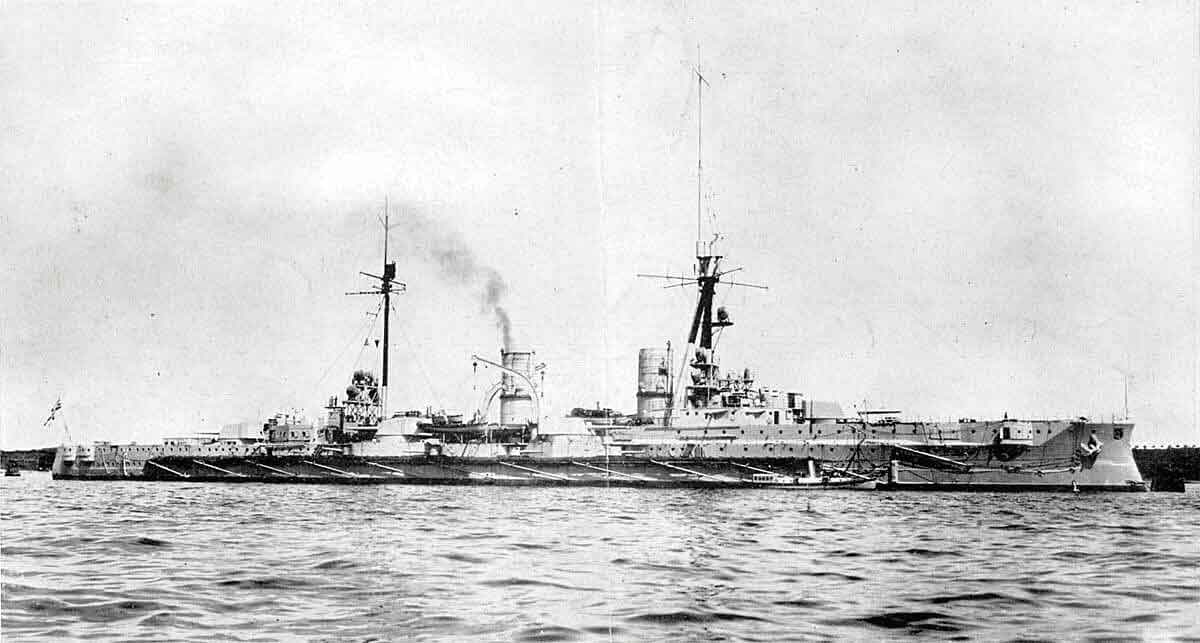
HMS New Zealand (Captain L. Halsey with Rear-Admiral Moore’s flag) battle cruiser: commissioned 1912 – 19,000 tons – Armament 8 X 12 inch guns and 16 X 4 inch guns – 25 knots – crew: 1,000 officers and men.
HMS Indomitable (Captain F. W. Kennedy) battle cruiser: commissioned 1908 – 18,000 tons – Armament 8 X 12 inch guns and 16 X 4 inch guns – 25.5 knots – crew: 1,000 officers and men.
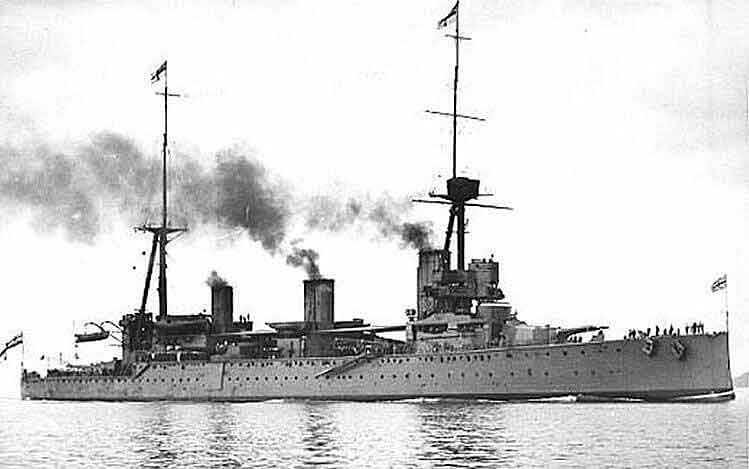
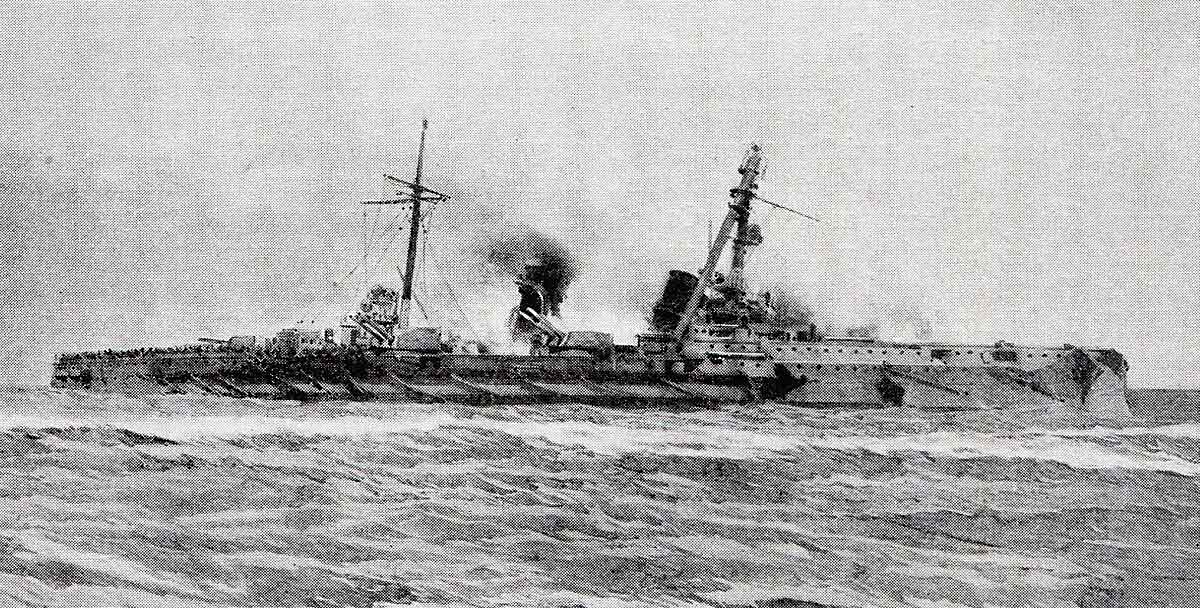
British battle cruiser HMS Indomitable one of the ships in Admiral Beatty’s force at the Battle of Dogger Bank on 24th January 1915 in the First World War
1st Light Cruiser Squadron (commanded by Commodore Goodenough): HMS Southampton, Birmingham, Nottingham and Lowestoft.
Harwich Force:
Destroyer Flotillas (Commodore Reginald Y. Tyrwhitt):
Light cruisers: HMS Arethusa (broad pennant) and HMS Aurora.
First Flotilla:
HMS Fearless (light cruiser), HMS Meteor and 20 destroyers.
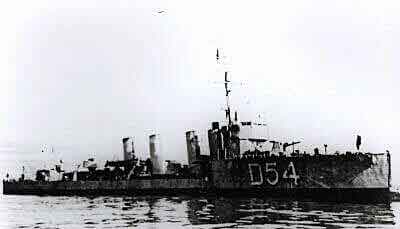
British destroyer HMS Meteor, one of the ships in Admiral Beatty’s force at the Battle of Dogger Bank on 24th January 1915 in the First World War
Second Flotilla:
HMS Undaunted (light cruiser), HMS Miranda and 20 destroyers. Also attached 8 ‘M’ class destroyers.
The light cruisers were armed with 6 inch guns and capable of around 30 knots.
The destroyers were armed with two or three 4 inch guns and capable of around 29 knots with the ‘M’ Class destroyers capable of around 35 knots.
Oversea Submarine Flotilla (Commodore Roger J B Keyes):
Destroyers HMS Firedrake and Lurcher and 21 submarines
German Imperial Navy:
SMS Seydlitz: battle cruiser – commissioned 1913 – 24,600 tons – Armament 10 X 11 inch guns (1 turret facing forward, 2 turrets facing aft with 2 turrets amidships) and 12 X 5.9 inch guns – 26.5 knots – crew: 1,068 officers and men.
SMS Moltke: battle cruiser – commissioned 1911 – 24,600 tons – Armament 10 X 11 inch guns (1 turret facing forward, 2 turrets facing aft with 2 turrets amidships) and 12 X 5.9 inch guns – 25.5 knots – crew: 1,350 officers and men.
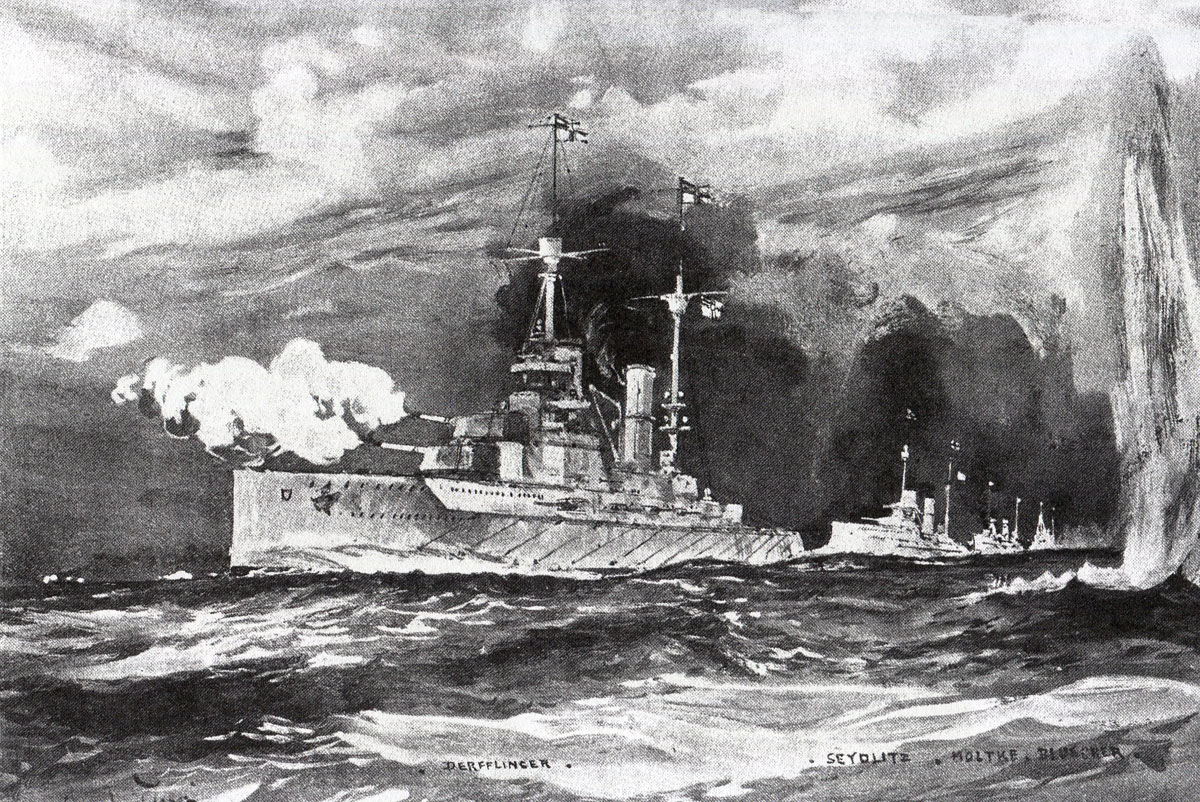
SMS Derfflinger: battle cruiser – commissioned 1914 – 26,000 tons – Armament 8 X 12 inch guns (2 turrets facing forward and 2 turrets facing aft) and 12 X 5.9 inch guns – 26.5 knots – crew: 44 officers and 1,068 officers men.
German battle cruiser SMS Derfflinger one of Admiral Hipper’s ships at the Battle of Dogger Bank on 24th January 1915 in the First World War
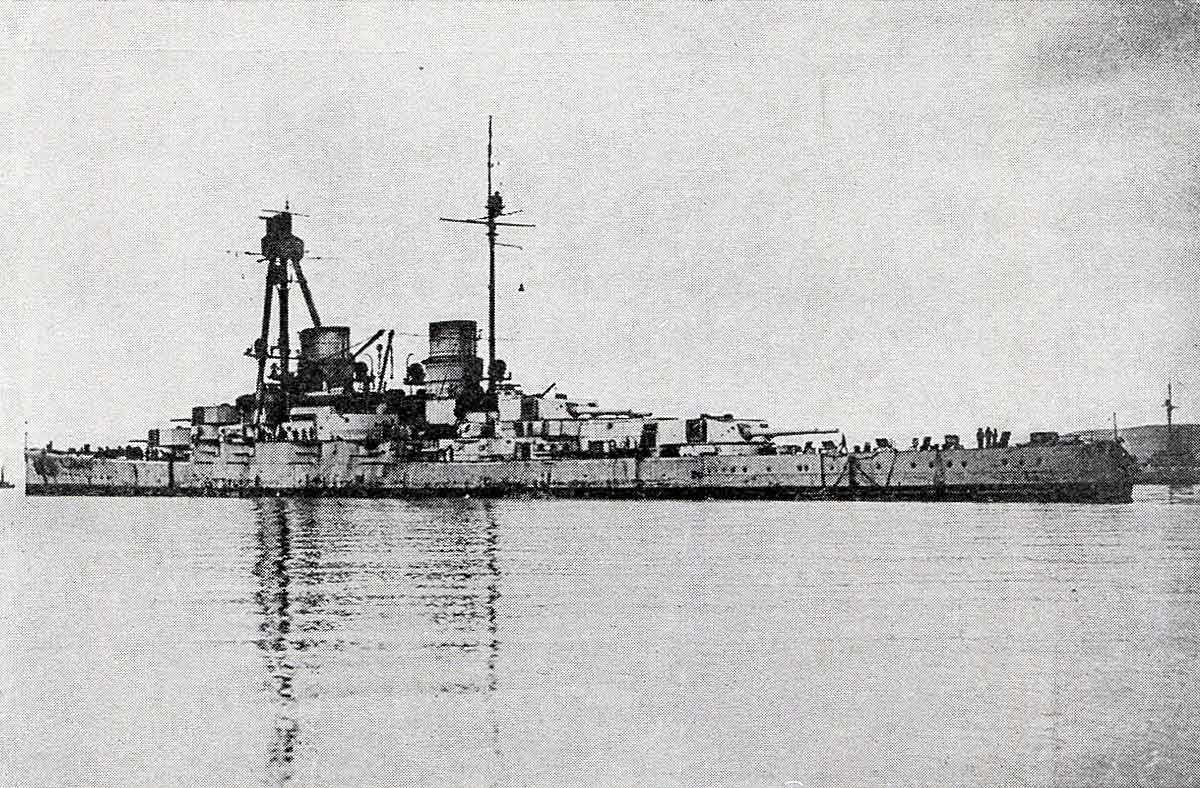
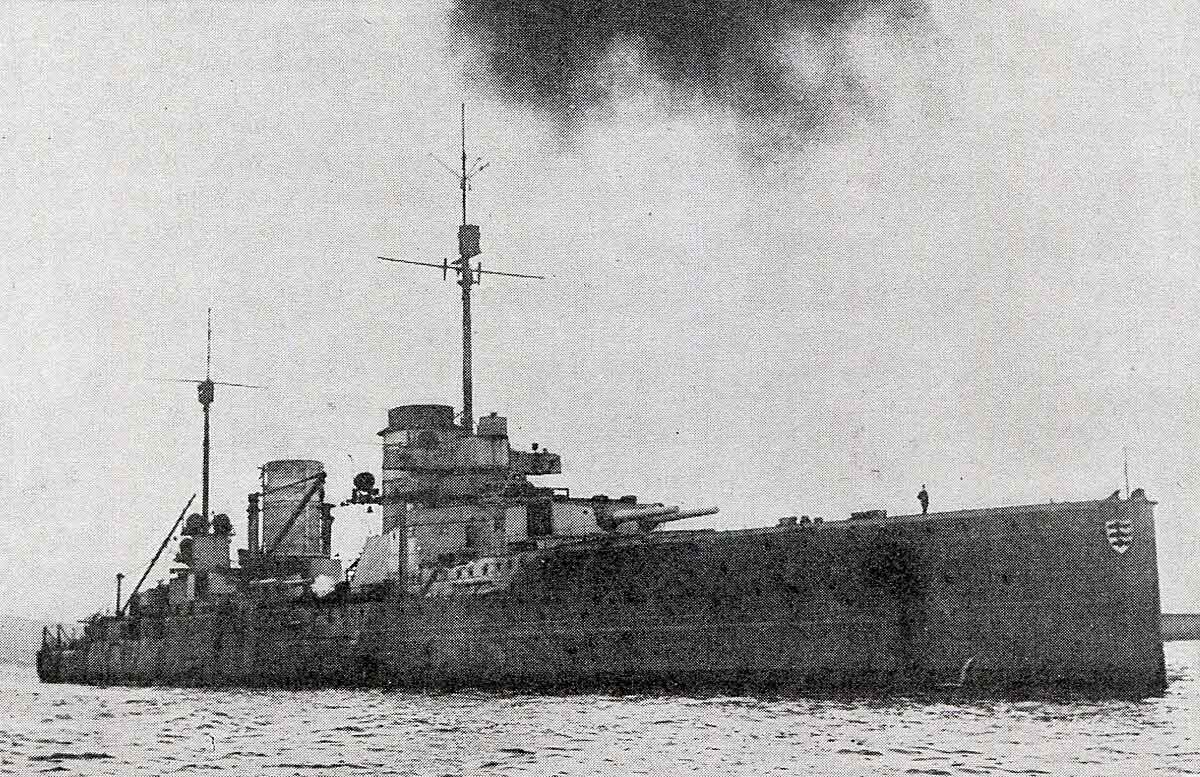
SMS Blucher: armoured cruiser – commissioned 1909 – 16,000 tons – Armament 12 X 8.3 inch guns (1 turret facing forward, 1 turret facing aft with 4 turrets amidships, 2 on each beam) and 16 X 3.4 inch guns – 25.5 knots – crew: 41 officers and 812 men.
The figures for crew members of the four German major ships were the established crews. At Dogger Bank each ship was carrying around 200 extra crew members from ships such as the von der Tann which remained in port.
Light Cruisers; SMS Stralsund, Rostock, Kolberg and Graudenz, and 22 destroyers;
All the ships in the Action carried torpedo tubes.
Vice Admiral Sir David Beatty commander of the British naval force at the Battle of Dogger Bank on 24th January 1915 in the First World War
Admirals at the Battle of the Dogger Bank: Vice Admiral Sir David Beatty and Rear Admiral Sir Archibald Moore commanded the British Squadron against Rear Admiral Hipper and Rear Admiral Funke who commanded the German Squadron.
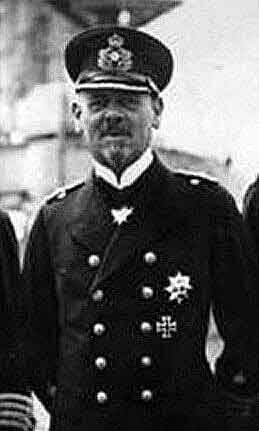
Rear Admiral Franz von Hipper, commander of the German squadron in the Battle of Dogger Bank on 24th January 1915 in the First World War
Winner of the Battle of the Dogger Bank: The German Squadron left the area of the action at speed heading for its home ports leaving the SMS Blucher sinking. Following the action the Kaiser issued strict instructions that major surface warships were not again to be risked and sacked the commander-in-chief of the German High Seas Fleet. The Germans lost the action.
Background to the Battle of the Dogger Bank:
The strategic position of the British and German navies in Europe remained the same throughout the First World War. Other than occasional forays to test the mettle of the Royal Navy the powerful German High Seas Fleet stayed in its cluster of bases on Germany’s short strip of north facing North Sea coast, while Germany’s submarines and surface raiders attempted to disrupt Britain’s trade across the world. The Action north of the Dogger Bank on 24th January 1915 was one such foray and followed the series of raids on English northern coastal towns.
The Nature of the the Battle of the Dogger Bank:
The battle was essentially a ‘Stern Chase’, the British pursuing the Germans, with the ships of each side going ‘flat out’ for much of the time.
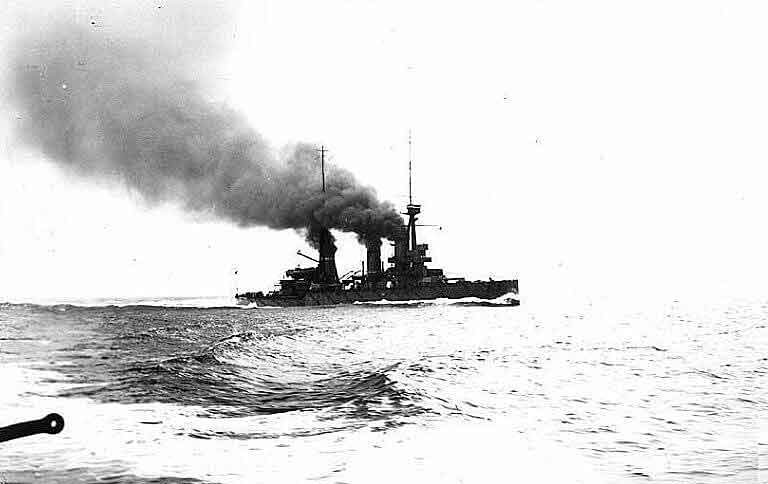
British battleship in the North Sea in 1914 in the First World War
Dramatic improvements in their design and manufacture at the end of the 19th and beginning of the 20th Centuries enabled naval guns to deliver an immense explosive shell more frequently, accurately and over a greater distance than before.
The German preference was to fire at ranges around 7,000 yards (4 miles). Before the war the Royal Navy’s capital ships practised firing at 14,000 yards (8 miles). At Dogger Bank Beatty’s battle cruisers opened fire at 20,000 yards (11 miles).
Fire direction was carried out by observation. At the beginning of the Great War the Royal Navy was installing a new central fire direction system in its capital ships. The Germans continued to use individual turret control based on information from a range finder in the ship’s upper works.
Where a number of ships was in action it was often difficult for gunnery control officers to identify their own shots in order to correct range and deflection.
The standing orders for the British fleet were that in battle every German ship was to be engaged to ensure that no German ship was left to carry on its gunnery uninterrupted by British fire. The German practice was to engage the British ship in the ‘van’ to disrupt the handling of the opposing fleet.
All major ships carried wireless but there was still substantial reliance on signals by flag, flown from a ship’s halyards, by semaphore and by lantern.
While the most modern ships were oil burning (the Queen Elizabeth class of battleship and at Dogger Bank the ‘M’ class destroyers) most Royal Navy and German warships were coal burning, generating clouds of black smoke, particularly at high speed, which interfered with observation of other ships, reading signals and noting the fall of shot.
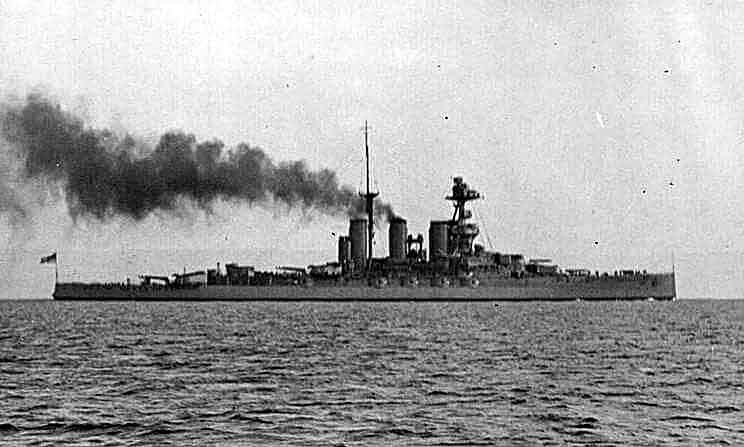
HMS Princess Royal one of Admiral Beatty’s battle cruisers at the Battle of Dogger Bank on 24th January 1915 in the First World War
Account: In January 1915 Admiral Ingenohl, the commander-in-chief of the German High Seas Fleet (Hochseesfleet) directed Admiral Hipper to take his squadron of battle cruisers on a reconnaissance to the north of the Dogger Bank, the fishing area off the north east coast of England, leaving harbour on the evening of 23rd January 1915 and returning the following evening. The purpose of the reconnaissance is not clear, perhaps it was simply to test British reactions.
The battle cruiser SMS von Der Tann was not available for the mission due to the severe damage she sustained in the British air raid on Cuxhaven on 25th December 1914 during which she collided with another cruiser. Hipper’s force comprised his battle cruiser squadron; his flagship SMS Seydlitz, SMS Derfflinger, SMS Moltke and the armoured cruiser SMS Blucher as a replacement for von der Tann, the Second Scouting Group of light cruisers; SMS Stralsund, SMS Rostock, SMS Kolberg and SMS Graudenz and two flotillas comprising twenty-two destroyers. Although less well armed than the battle cruisers the Blucher was capable of keeping up with the rest of the squadron.
HMS Tiger one of Admiral Beatty’s battle cruisers at the Battle of Dogger Bank on 24th January 1915 in the First World War
German naval wireless traffic was being monitored and decoded by Royal Navy staff in Room 40 at the London Admiralty. Room 40 intercepted the wireless orders for the reconnaissance sent to Hipper’s ships.
The interception enabled the British Admiralty to implement the plan set up to counter such a German incursion after the raids on English north-eastern coastal towns at the end of 1914.
The plan involved the Third Battle Squadron, comprising eight pre-Dreadnought battleships under Admiral Bradford based at Rosyth, and Admiral Beatty’s two Battle Cruiser Squadrons in the Firth of Forth, Commodore Goodenough’s First Light Cruiser Squadron, and Commodore Tyrwhitt’s Harwich based destroyers and Commodore Keyes’ Oversea Submarine Flotilla.
Shortly after noon on 23rd January 1915 the Admiralty in London sent out orders to put the plan for meeting the long-expected German attack in operation.
On the night of 23rd January 1915 as Hipper’s force was leaving Wilhelmshaven the various British formations were getting under way, albeit handicapped by fog at Harwich from where Commodore Roger Keyes was heading for Heligoland off the German base area with the destroyers HMS Firedrake and Lurcher and four submarines and Commodore Tyrrwhitt was leaving with the light cruisers HMS Arethusa, Aurora and Undaunted and twenty-two destroyers, being every available ship, to join Beatty.
The point fixed as the rendezvous for Beatty’s force was to the north-east of the Dogger Bank and the extensive mine field laid over the bank by the Germans.
Beattie was sailing south from his Rosyth base with his three battle cruisers, HMS Lion, Tiger and Princess Royal, and Admiral Moore’s HMS New Zealand and Indomitable.
Commodore Goodenough with his four light cruisers HMS Southampton, Birmingham, Nottingham and Lowestoft sailed straight out into the North Sea before turning south and heading for the rendezvous.
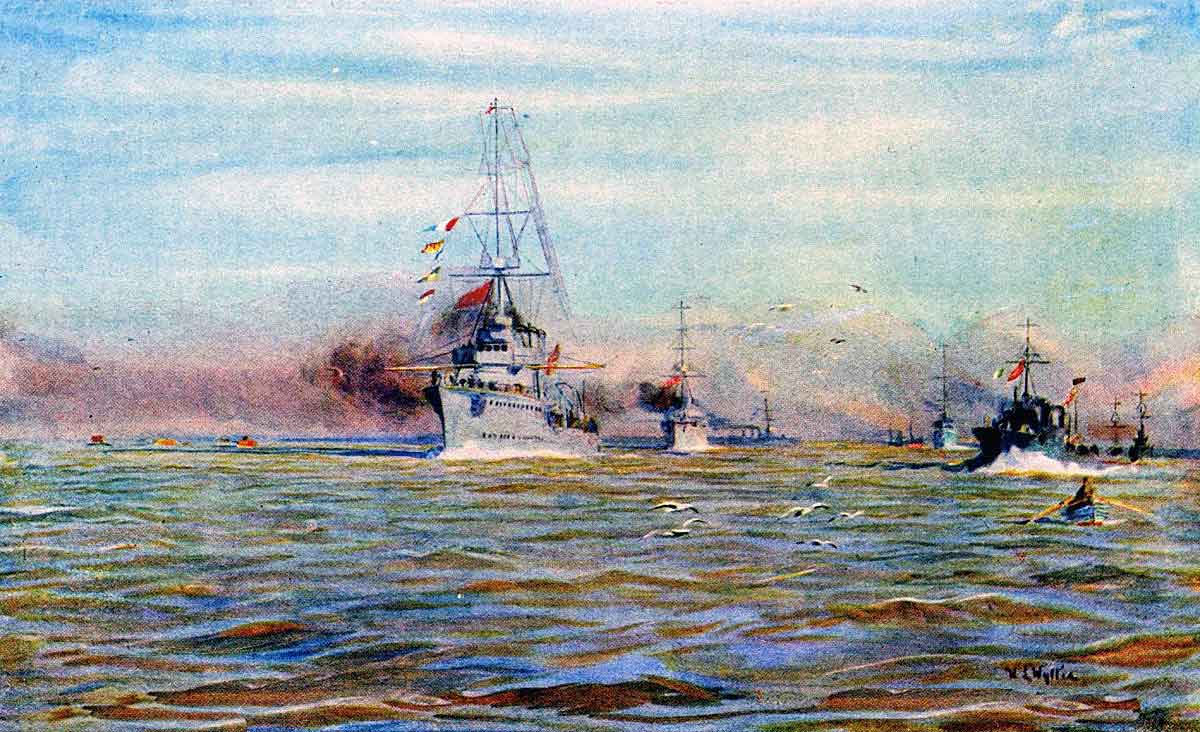
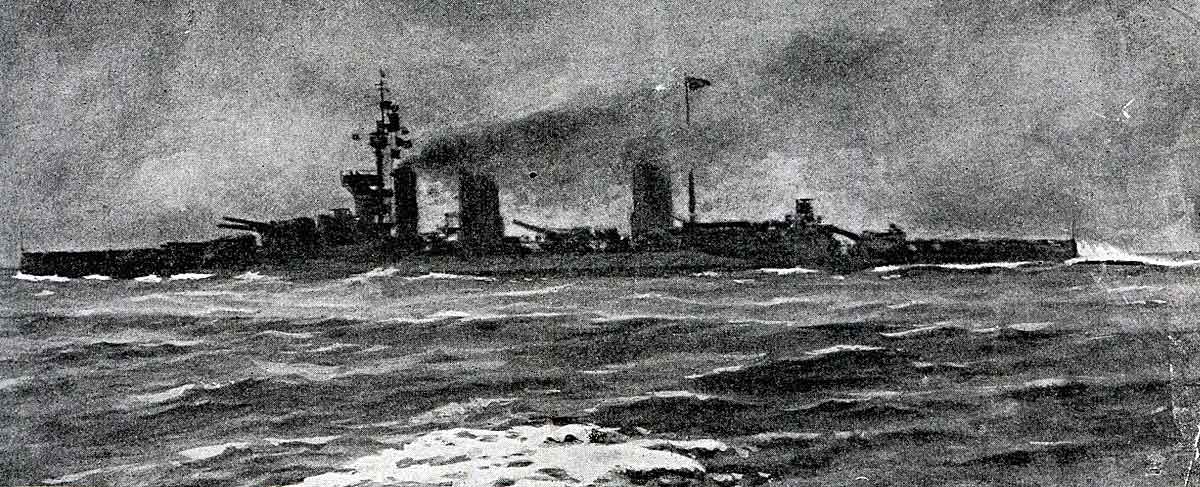
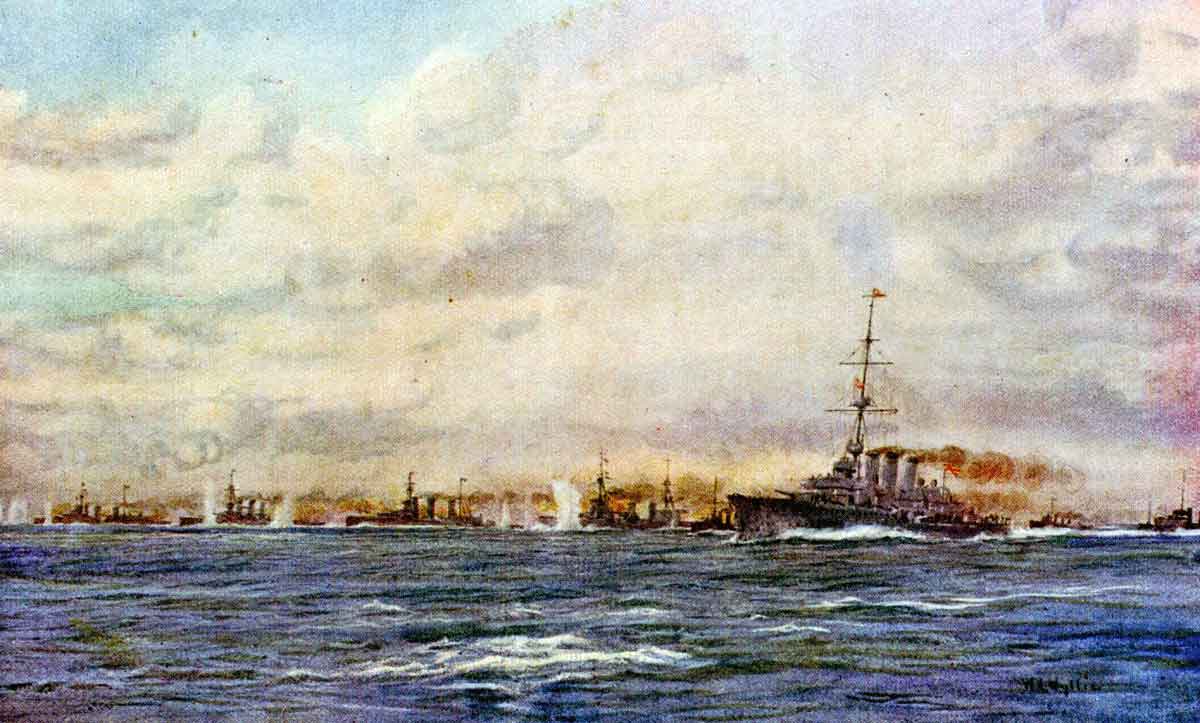
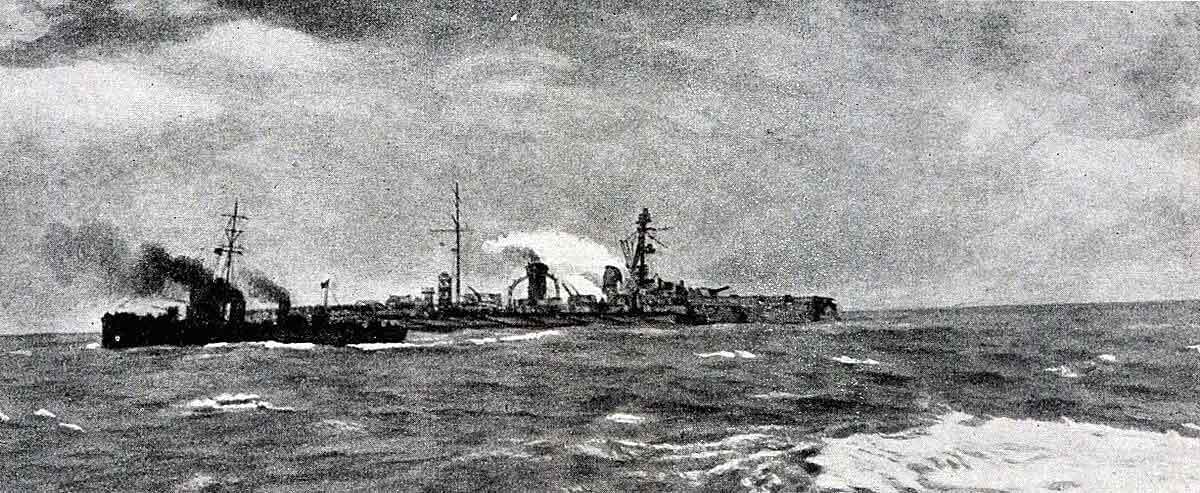
British Light Cruisers and Destroyers putting to sea from Harwich on 24th January 1915 for the Battle of Dogger Bank in the First World War: picture by Lionel Wyllie in the First World War
Admiral Bradford with the Third Battle Squadron (eight pre-Dreadnought Edwards: HMS King Edward VII, Hibernia, Africa, Britannia, Commonwealth, Dominion, Hindustan, Zealandia and the light cruiser Blanche) and the Third Cruiser Squadron was heading for a separate rendezvous thirty miles north of Beatty’s.
The rest of the Grand Fleet was at sea and heading for various other rendezvous covering the British coastline.
All ships were ordered to maintain wireless silence to avoid warning the Germans that the Grand Feet with all the major Royal Navy units positioned down the East Coast was at sea and awaiting the arrival of Hipper’s force.
German battle cruisers SMS Derfflinger, Moltke and Seydlitz sailing to the Battle of Dogger Bank on 24th January 1915 in the First World War
7am on 24th January 1915:
At around 7am on 24th January 1915 Admiral Beatty with his five battle cruisers passed through the rendezvous point.
Goodenough’s four light cruisers were sailing parallel to him five miles to his port.
At around 7.10am Commodore Tyrwhitt from Harwich was sighted ahead of the British battle cruisers with HMS Arethusa and the new ‘M’ class destroyers: Meteor, Milne, Minos, Mentor, Mastiff and Morris (Miranda, delayed by repairs in the dockyard, came up with Undaunted).
The light cruisers HMS Aurora and Undaunted accompanied by the destroyers of their two flotillas and HMS Miranda were fifteen miles behind Tyrwhitt due to delay caused by the fog.
After passing through the rendezvous point Beatty turned south to meet the German ships, his squadron in the order; HMS Lion, Tiger, Princess Royal, New Zealand and Indomitable.
HMS New Zealand one of Admiral Beatty’s battle cruisers and Admiral Moore’s flagship at the Battle of Dogger Bank on 24th January 1915 in the First World War
7.15am on 24th January 1915:
At 7.15am Beatty signalled to the light cruisers of Goodenough’s squadron to adopt a line of search at extreme signalling distance between ships on a line north-east by north from Lion.
As the signal was being made Southampton signalled that she could see gun flashes to the south. At the same time the gun flashes were observed from Lion to the south-east.
Within minutes the information came in from Aurora that she was engaging the German fleet. Beatty cancelled his earlier signal and ordered a chase to the south.
German armoured cruiser SMS Blucher sunk in the Battle of Dogger Bank on 24th January 1915 in the First World War
7.20am on 24th January 1915:
At around 7.20am Lion began the chase at 22 knots heading south-south-east in the direction of the gun flashes.
It appeared that the German ships were making a course to pass to the north of the German minefield in the Dogger Bank cutting across Beatty’s original course.
Tyrwhitt in Arethusa had not seen the German ships as he came up but Aurora following some fifteen miles behind him had seen a three funnelled cruiser with four destroyers at around 7am and challenged them thinking they were likely to be Arethusa’s flotilla. In fact the ship was the German light cruiser Kolberg and she opened fire at 7.15am firing accurate salvos that hit Aurora. Aurora replied hitting Kolberg who turned away to the east.
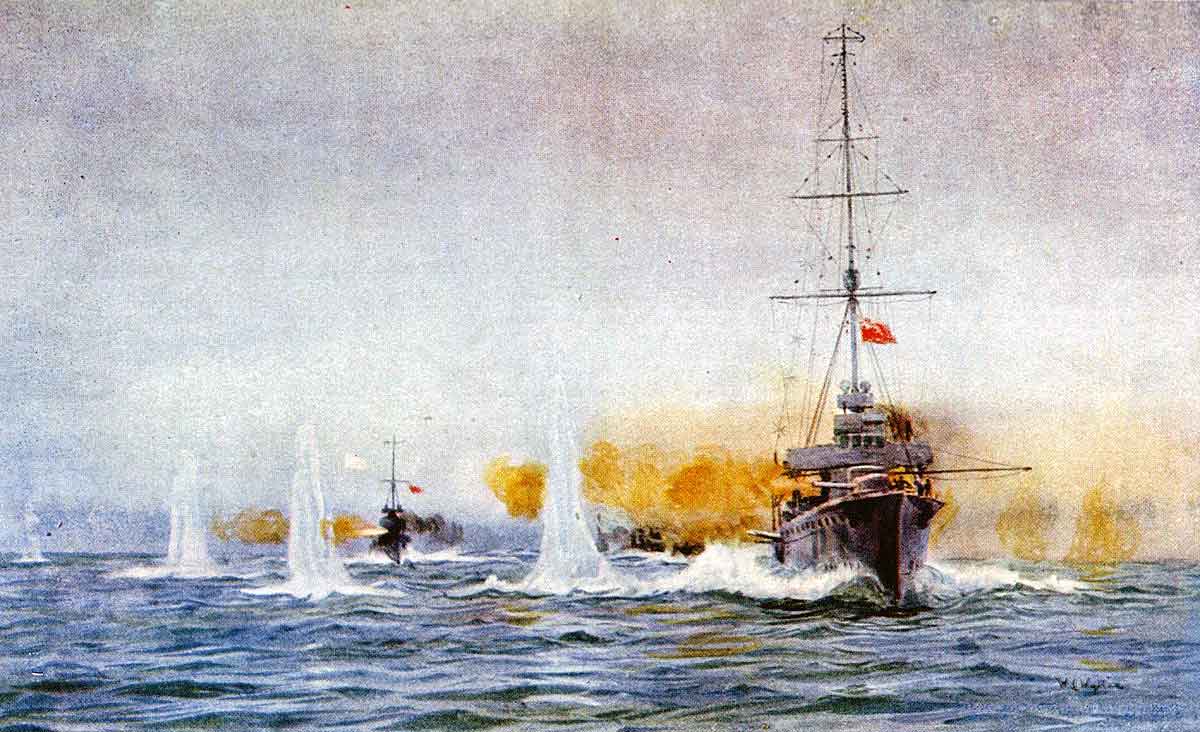
British light cruiser HMS Aurora begins the Battle of Dogger Bank at 7.15am on 24th January 1915 in the First World War opening fire on the German light cruiser SMS Kolberg: picture by Lionel Wyllie
More German ships appeared on the horizon. Aurora, Undaunted and their destroyer flotillas veered to the north-east to keep contact.
At 7.30am the British ships met HMS Southampton and reported the presence of the German ships to the south-east.
Soon afterwards Southampton saw the German battle cruisers, light cruisers and destroyers in the process of concentrating before heading for home, after receiving from Kolberg her report of the contact with Aurora.
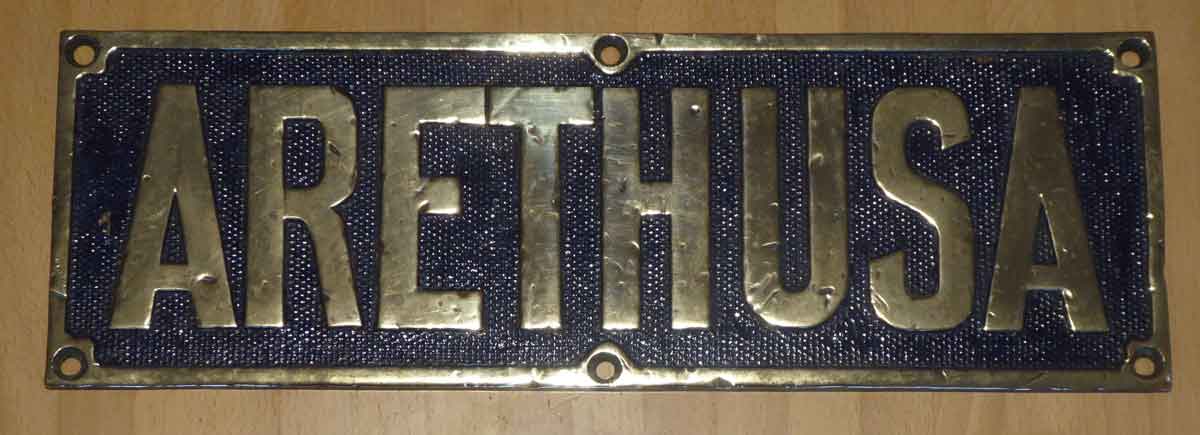
Nameplate from HMS Arethusa: Battle of Dogger Bank on 24th January 1915 in the First World
Hipper later informed his superiors that he sensed the presence of a substantial Royal Navy presence beyond the horizon and felt bound to withdraw with all haste.
Beatty, heading in a south-easterly direction and working up to full speed, at 7.50am saw the German ships heading away from him.
The dim light and the volume of smoke made it difficult to compute the exact number or character of the German ships or their precise course.
Beatty continued on a south-easterly course continuing to work his battle cruisers up to full speed, while Tyrwhitt sent his ‘M’ class destroyers forward to report the composition of the German squadron.
Seydlitz and Derfflinger were capable of 26 knots, Moltke and Blucher of 25.5 knots. The British ‘M’ class destroyers established top speeds in trials of 35 knots. New Zealand and Indomitable were capable of around 25 knots, Lion, Tiger and Princess Royal of 28 knots.
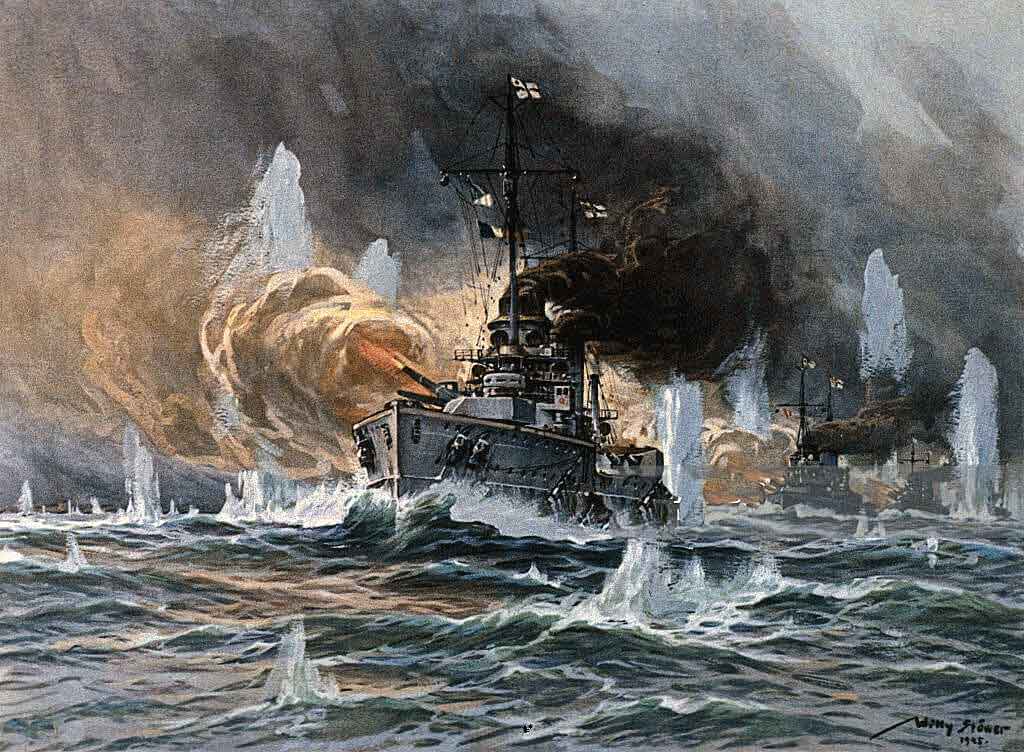
German Battle Cruisers in action at the Action off the Dogger Bank on 24th January 1915 in the First World War: picture by Willie Stoewer
8.15am on 24th January 1915:
The ‘M’ class destroyers led by Meteor closed the German ships, which at 8.15am altered course and opened fire, forcing the British destroyers to turn away.
After a few rounds the German ships resumed their course towards home and the ‘M’ class destroyers returned to their pursuit, enabling them to report to Beatty at 8.45am that the German force comprised four battle cruisers (in fact the Blucher was an armoured cruiser), at least four light cruisers and a flotilla of destroyers. This information was passed back to Admiral Jellicoe and further dispositions of Grand Fleet units were made to cover any attempt by the German ships to break through to the north.
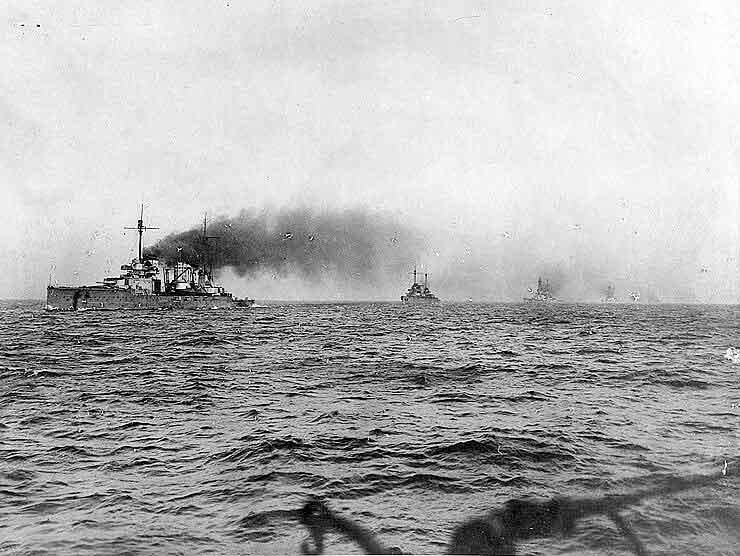
Admiral Beatty’s force of battle cruisers, light cruisers and destroyers in pursuit of Admiral Hipper’s German squadron on 24th January 1915 in the Battle of Dogger Bank Action in the First World War: picture by Lionel Wyllie
Also at 8.15am Beatty’s battle cruisers settled down to a stern chase of the German ships on a parallel course, his ships working up to as great a speed as they could muster: by 8.30am doing 26 knots, a knot more than New Zealand’s maximum and half a knot greater than Indomitable’s. Being coal burning the battle cruisers depended in part on the efforts of their stoker teams in shovelling the coal into the burners. Beatty called for greater speed yet.
The ‘M’ class destroyers were within 9,000 yards (5 miles) of the German ships and being fired on by Blucher, the rearmost German ‘big’ ship. Beatty ordered the destroyers to fall back and take station ahead of the battle cruisers. The rest of the destroyers were astern of the battle cruisers and Goodenough’s light cruisers were on the port quarter.
The German ships were in the order: SMS Seydlitz, Hipper’s flagship, in the van, followed by SMS Derfflinger, SMS Moltke and then SMS Blucher, with the light cruisers and destroyers ahead of the larger ships.
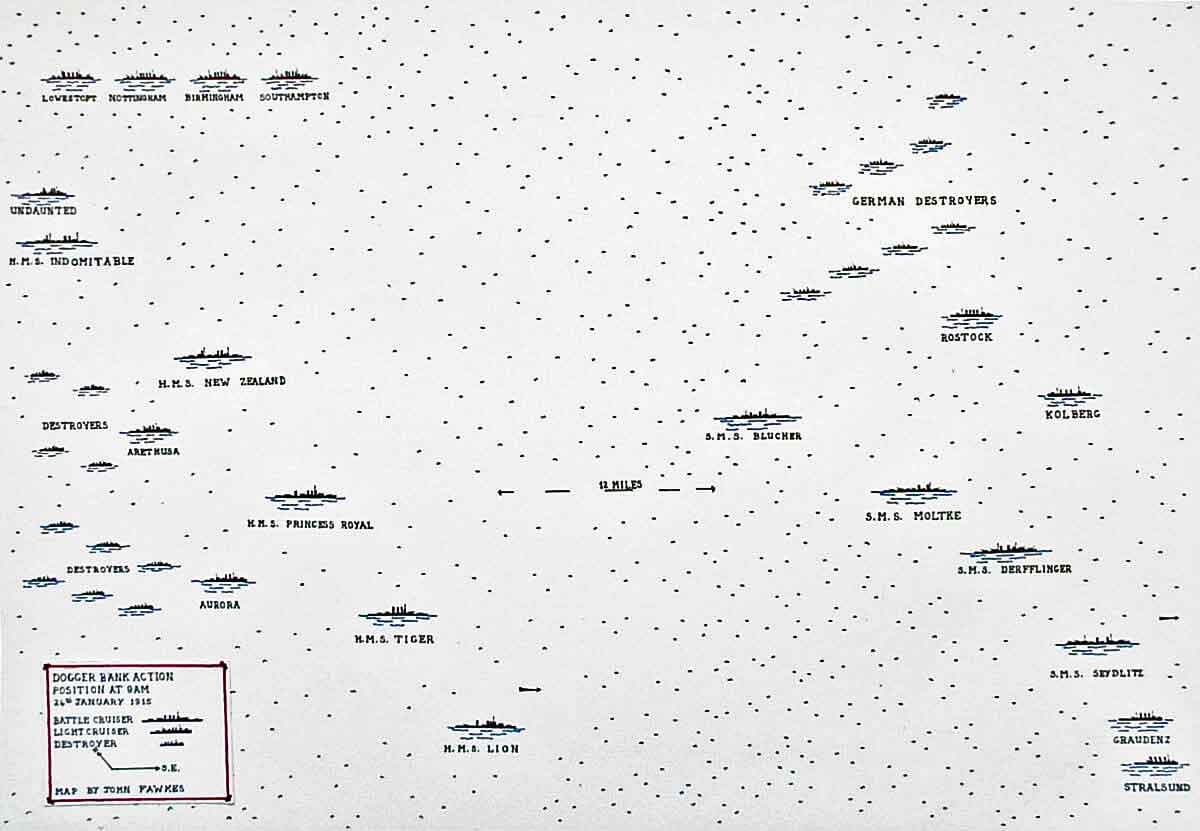
Map of the Battle of Dogger Bank on 24th January 1915 at 9am in the First World War: map by John Fawkes
8.52am on 24th January 1915:
At 8.52am Beatty signalled for 29 knots. This speed was beyond New Zealand and Indomitable. Beatty knew that they would inevitably fall behind the three faster battle cruisers but the essence of the battle was to close the gap before the German ships reached safety.
Lion, being the leading British ship, opened fire once the range was down to 20,000 yards (11 ¼ miles). The first shot was short and the second over. Beatty signalled the British battle cruisers to ‘engage’. Tiger and Princess Royal opened fire.
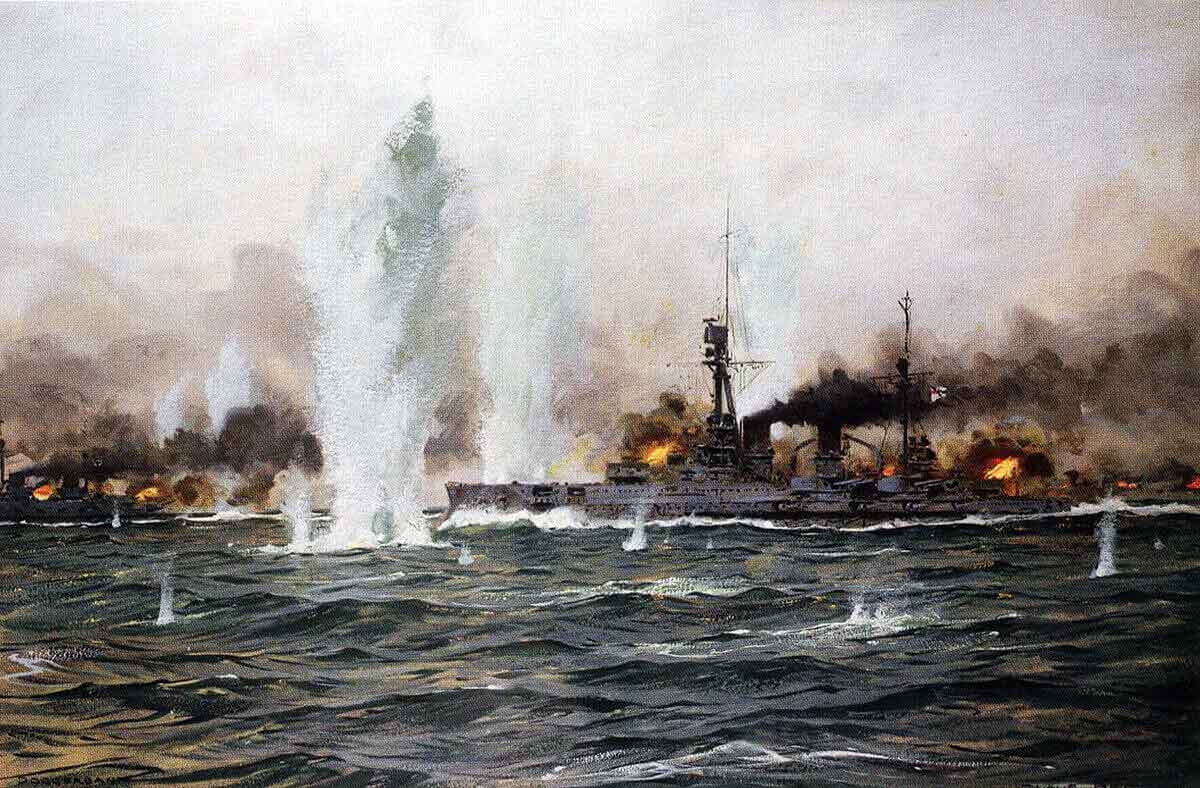
British battle cruisers HMS Lion, Tiger (known as ‘the big cats’) and Princess Royal in chase of the German squadron of Admiral Hipper on 24th January 1915 in the Battle of Dogger Bank in the First World War: picture by Lionel Wyllie
By 9.15am Lion was hitting the rear German ship Blucher. The initial salvos caused serious damage to Blucher and effectively destroyed her chances of escaping from the British ships. The third salvo hit her on the water-line and significantly reduced her speed. The fourth salvo carried away her after super-structure and disabled her two after turrets, causing 200 to 300 casualties in the crew.
The German cruisers returned fire on the British battle cruisers as they caught up with them. Lion shifted her fire to the Moltke while Tiger and Princess Royal continued to fire on Blucher. Beatty altered the British course slightly to starboard to enable the after turrets on the battle cruisers to come into action. The German ships had more turrets facing aft than facing forward.
German battle cruisers: SMS Seydlitz leads SMS Moltke, Hindenburg, Derfflinger and Von der Tann into Scapa Flow on the German surrender in 1918. Of these ships Seydlitz, Moltke and Derfflinger fought at the Battle of Dogger Bank on 24th January 1915 in the First World War
9.20am on 24th January 1915:
At 9.20am Beatty ordered Tyrwhitt to take his destroyers into the lead. Tyrwhitt had until then been allowing his destroyers to fall back so that their smoke would not mask the battle cruisers’ view of their targets. Such was the speed of the chase, now at around 28 to 29 knots, that most of the destroyers was unable to move forward.
Tyrrwhitt ordered the ‘M’ class destroyers with their additional performance to go on ahead. Captain Meade led off in Meteor with Miranda, Mentor and Milne but could only slowly overhaul the battle cruisers.
9.28am on 24th January 1915:
Lion now inflicted damage on Moltke. However Lion was in range of all the German large ships and three of them were firing on Lion. At 9.28am Lion received a hit on the water-line.
The British ships had gained sufficiently on the Germans for New Zealand, the penultimate in the British line, to open fire on Blucher and Lion needed to be relieved of the concentrated fire of the German squadron.
At 9.35am Beatty signalled for his ships to switch their fire to their opposite numbers in accordance with Grand Fleet standing battle orders.
Under this arrangement Lion would fire on Seydlitz, Tiger on Derfflinger, Princess Royal on Moltke, leaving New Zealand and Indomitable to deal with Blucher.
Seydlitz was firing on Lion at a range of 17,500 yards (10 miles) and her rounds were falling short, but Lion immediately hit Seydlitz causing significant damage and putting Seydlitz’s rear turrets out of action, killing the crews of both turrets. The shell penetrated the ammunition handling systems of the two turrets and the resulting explosions and fires nearly destroyed the ship.
German armoured cruiser SMS Blucher sunk at the Battle of Dogger Bank on 24th January 1915 in the First World War
In accordance with Beatty’s signal Princess Royal shifted her fire to the Moltke. New Zealand continued to fire on Blucher. Indomitable was not yet in range. Tiger was engaging the Seydlitz and continued to do so although Derfflinger was the second German ship and therefore her appropriate target under the fire scheme. This left Derfflinger free to continue to fire on Lion without interference. The German fleet adhered to the old principal of firing on the opposing van so that three ships were firing on Lion; Seydlitz, Derfflinger and Moltke.
In the pursuit both British and German forces were sailing flat out causing thick black smoke to pour from the funnels of some forty ships. The result was that the battle area became obscured making accurate gunnery at the long range extremely difficult. Tiger lost sight of the leading German ships and the cruiser Southampton reported that her shots were going over the target.
Two of the German ships in addition to the Blucher seemed to be on fire and the German destroyers appeared to be hanging back to provide assistance. Beatty formed the view that the German admiral could well be planning a counter-attack by his destroyers using torpedoes to disrupt and divert the British pursuit.
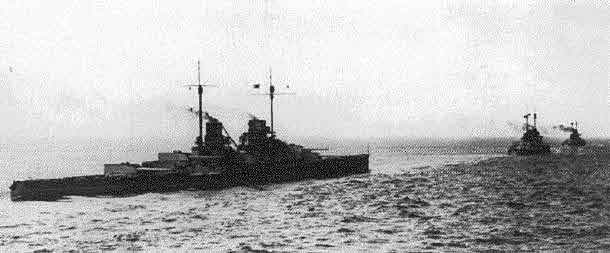
The German Squadron advancing at the Battle of Dogger Bank on 24th January 1915 in the First World War
9.40am on 24th January 1915:
At 9.40am Beatty turned away by two points to avoid any destroyer attack, which did not in fact come about. The turn caused the range between the two sides to increase significantly.
The firing continued with Blucher, Moltke and Seydlitz all apparently on fire.
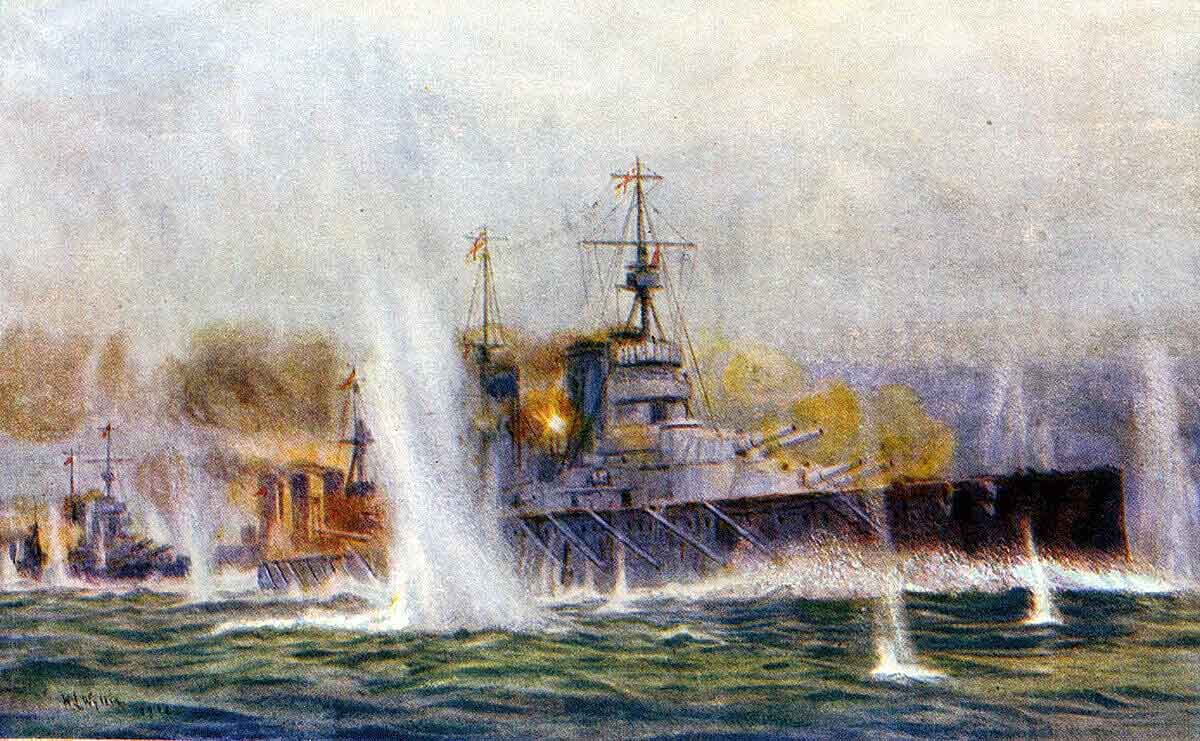
Shells were also hitting Lion, the principal target for the German ships. Lion was reducing speed to 24 knots to allow the battle cruiser squadrons to close up when hits smashed the roof of Lion’s ‘A’ turret, disabling one of the guns, and an 11 inch shell from Seydlitz pierced Lion’s armour belt damaging a number of important damage control systems and giving the ship a 10 degree list to port.
Admiral Beatty’s flagship HMS Lion heavily damaged during the Battle of Dogger Bank on 24th January 1915 in the First World War: picture by Willy Stoewer
10am on 24th January 1915:
At around 10am the action engulfed Goodenough’s light cruisers that had until then been shadowing the German force on its port quarter. Blucher sheered away from the course followed by the German battle cruisers towards the British light cruisers and turned her fire on them. This caused Admiral Hipper to form the view that Goodenough’s light cruisers were mounting an attack on his squadron, intending to use torpedoes, and ordered the German battle cruisers to engage the British light cruisers with their port armament to drive them away. Goodenough hurriedly pulled out of range before his lightly armoured ships could suffer serious damage.
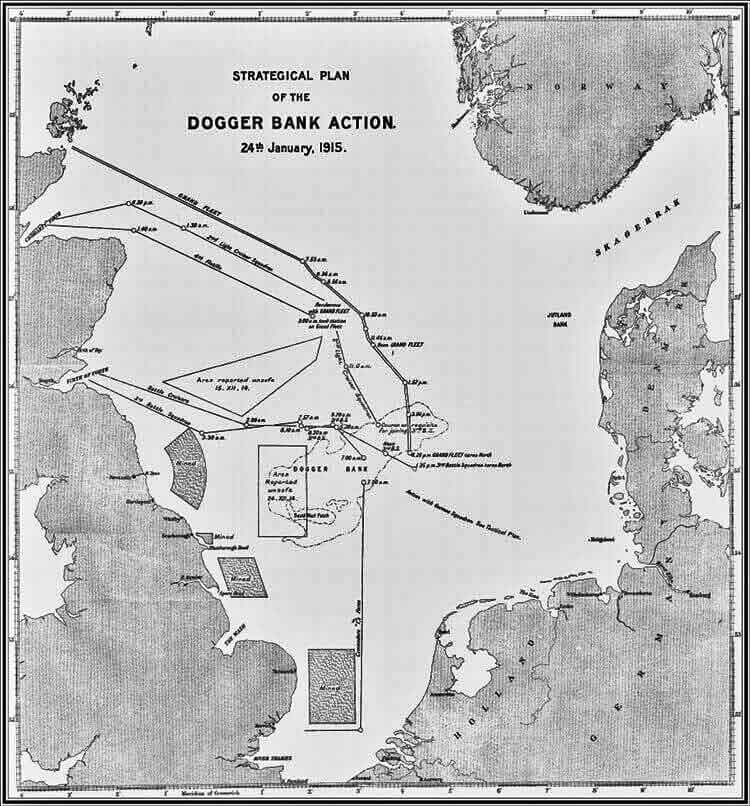
Map of the North Sea showing the battle north of the Dogger Bank on 24th January 1915 in the First World War
The situation became increasingly confused. The German destroyers seemed to have fallen back and were generating so much smoke that the German battle cruisers were hidden for much of the time. It was difficult and at times impossible for the British gunnery officers to observe the fall of their shot.
There was also uncertainty as to the German ships’ course. When at 10am Blucher veered towards the north Beatty assumed that she was following the direction taken by the German flagship and that the whole force had turned onto a more northerly course. This had not happened. Blucher appears to have turned alone to get away from the British ships that were fast reducing her to a ruin. The rest of Hipper’s ships maintained the course towards Germany with occasional zig zags to throw out the British gunnery.
The German destroyers caused Beatty concern that they were again intending a torpedo attack on the British battle cruisers. It was also a worry that the German destroyers would drop floating mines into the sea and Beatty repeatedly changed course to keep the British battle cruisers away from the German destroyers’ wake.
German battle cruiser SMS Seydlitz: Seydlitz was Admiral Hipper’s flagship in the Battle of Dogger Bank on 24th January 1915 in the First World War
10.18am on 24th January 1915:
Beatty carried out a succession of turns towards Hipper’s ships and at 10.18am the range was down to 17,500 yards (10 miles). At this point two shells from Derfflinger struck Lion below the water line causing substantial flooding inside the ship. The German guns had Lion’s range so precisely, firing accurately and rapidly, that shells were falling all around the ship and she was forced to zig-zag.
It was now clear to Beatty that the rearmost German ships under cover of the destroyers’’ smoke had hauled out on the port quarter of Seydlitz. Beatty ordered his battle cruisers to take up a line north-north-west of Lion, in order to give them a clearer view to fire on the German ships, and to continue to build up their speed.
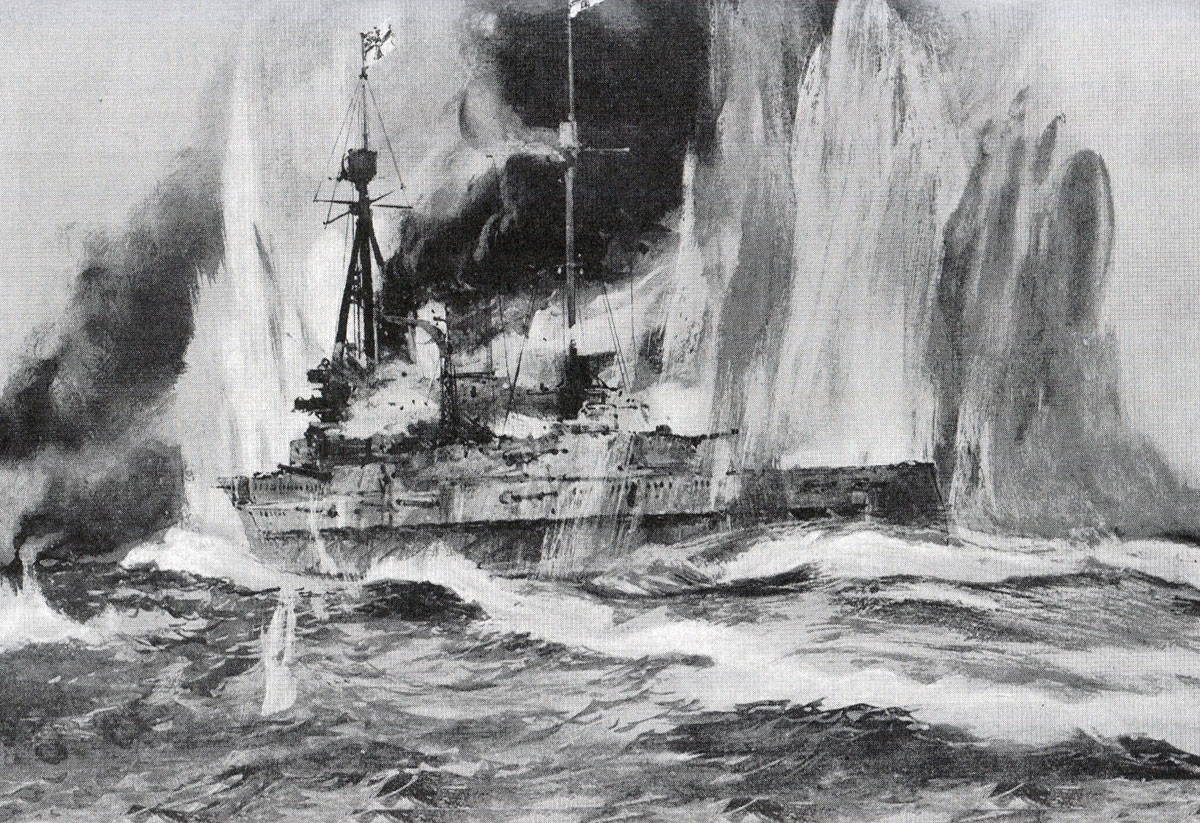
German armoured cruiser SMS Blucher in action at the Battle of Dogger Bank on 24th January 1915 in the First World War: picture by Claus Bergen
In response Hipper altered to starboard so that the British ships would have to cross his wake, thereby running the risk of floating mines launched from the German ships. Beatty could not take this risk and continued on the parallel course.
It now came down to a straight race. All the main German ships were showing signs of considerable damage from the British battle cruisers’ gunfire, except Derfflinger which had not been fired on. Jellicoe’s battleships were 150 miles to the north and hurrying south.
Blucher was clearly in trouble. She was still returning fire but was burning and dropping back. The German battle cruisers continued to concentrate their fire on Lion. Between 10.35 and 10.50am several more shells hit her, penetrating her armour and causing more flooding. A shell struck near ‘A’ turret causing a fire which was quickly extinguished. Beatty signalled the other ships to press the pursuit.
10.48am on 24th January 1915:
At about 10.48am Blucher began a wide circle to port, apparently out of control. She came within range of the British light cruisers which engaged her. Beatty signalled Indomitable, now within range, to ‘engage the enemy breaking away to the northward (i.e. Blucher)’.
At this point it looked as if the German force was facing annihilation at the hands of the British battle cruisers.
German battle cruiser SMS Seydlitz: Seydlitz was Admiral Hipper’s flagship in the Battle of Dogger Bank on 24th January 1915 in the First World War
10.50am on 24th January 1915:
At around 10.50am submarines were reported on Lion’s starboard bow. As no British submarines could be in that position they were assumed to be German. To avoid them Beatty ordered an eight point turn to port at 10.54am. This radical change in the British course would set the British ships sailing north by east at right angles to the German course. Beatty changed his order to a course of north-east. This put the British ships on a course converging with the course of the German ships. It would also have the effect of cutting off Blucher and possibly forcing Hipper’s other ships to turn back to support her.
This outbreak of what at the time was called ‘periscopitis’ arose from the concern all surface ships felt towards the submarine threat. There appear to have been no German submarines in the area at the time.
At this point Hipper turned to the south and ordered his destroyers to deliver an attack in an attempt to save the Blucher.
It would seem that when Hipper saw the British turn to north by east he took the view that there was an opportunity for the rest of his squadron to escape and decided to leave the Blucher to fend for herself.
German armoured cruiser SMS Blucher badly damaged in the Battle of Dogger Bank on 24th January 1915 in the First World War: the British light cruiser HMS Arethusa is in the foreground preparing to rescue members of Blucher’s crew
11am on 24th January 1915:
At 11am a German shell struck Lion and penetrated her armour abreast of the boiler-rooms. So much damage was done that the port engine had to be stopped and, listing 10 degrees to port, Lion’s speed was reduced to 15 knots. Lion fell out of the line and the other British ships raced past her.
At this critical point in the action Beatty effectively lost control of his squadron. Lion was clouded in smoke, her wireless had been disabled and several of her signal halliards shot away.
There could be no signalled handover of command to Beatty’s deputy Admiral Moore in HMS New Zealand. Moore did eventually take over command when it became clear that Lion was moving slowly unable to communicate and out of the fight. Moore was unaware of the submarine scare or consequently why Beatty had ordered the eight point turn.
HMS Lion leads the British Battlecruisers at the Battle of Dogger Bank on 24th January 1915 in the First World War
Before relinquishing control Beatty flew two final signals that became inextricably confused and confusing. One was ‘Attack the enemy’s rear’ and the other Nelson’s famous Trafalgar signal ‘Engage the enemy more closely’ (or rather its modern equivalent which said ‘Keep closer to the enemy’). Because the signals were only shown on two halyards and Lion was wreathed in smoke the signals were difficult to read. In addition the earlier signal saying ‘course north-east’ was still flying.
Tiger, Indomitable and New Zealand all read the signals as saying ‘Attack the enemy’s rear bearing north-east’. None of these ships saw the signal saying ‘keep closer to the enemy’.
As Blucher was north-east of HMS New Zealand Admiral Moore took his instruction to be to attack Blucher. Tiger and Princess Royal ceased firing on Derfflinger and Moltke and all four British battle cruisers turned on Blucher which was under attack by Goodenough’s light cruisers and Captain Meade’s ‘M’ class destroyers.
Relieved of the fire of the British battle cruisers Hipper’s remaining four battle cruisers made off towards the German coast, accompanied by the light cruisers and destroyers, leaving Blucher to her fate.
SMS Blucher falls behind the retreating German Squadron at the Battle of Dogger Bank on 24th January 1915 in the First World War
Blucher now had only two of her turrets in operation. Goodenough’s light cruisers were hitting her at 14,000 yards (8 miles). Arethusa came up and added her fire. The ‘M’ class destroyers delivered torpedo attacks on Blucher which struck home although Meteor was hit by a heavy shell which burst in her front boiler room and put her out of action. Arethusa put two torpedoes into Blucher. In reply Blucher fired a number of torpedoes at the ships attacking her.
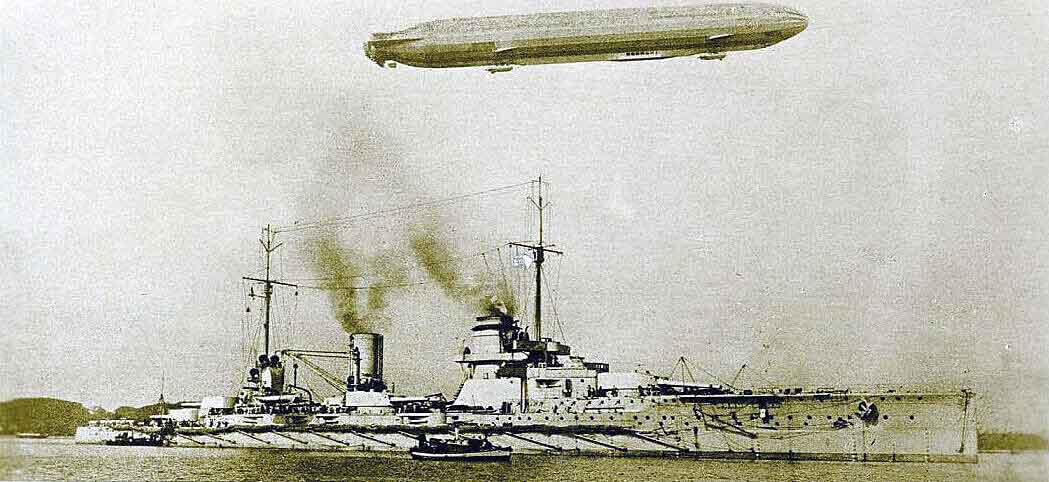
A Zeppelin came over and tried to intervene but was driven off by gunfire.
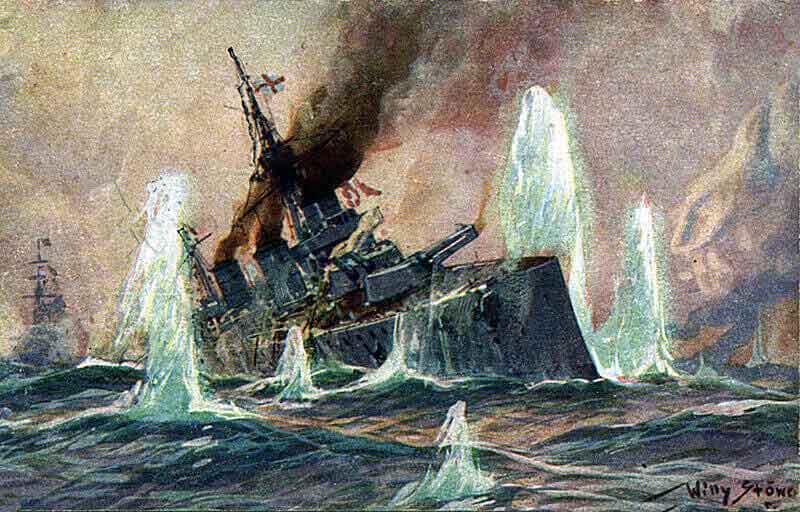
German armoured cruiser SMS Blucher sinking in the Battle of Dogger Bank on 24th January 1915 in the First World War
11.45am on 24th January 1915:
At 11.45am Blucher appeared to strike her colours and Moore resumed the pursuit of the rest of Hipper’s ships, but they were now twelve miles away escaping at 25 knots. Keyes and his submarines were believed to be in an intercepting position and there were reports that the German High Seas Fleet was coming out of harbour to meet Hipper’s squadron. It was no longer possible to catch Hipper before he reached safety so Moore turned back to assist the crippled Lion.
Arethusa closed with the Blucher finding that several hundred of the Blucher’s crew were gathered on the upper decks. Suddenly at 12.10pm Blucher capsized and sank.
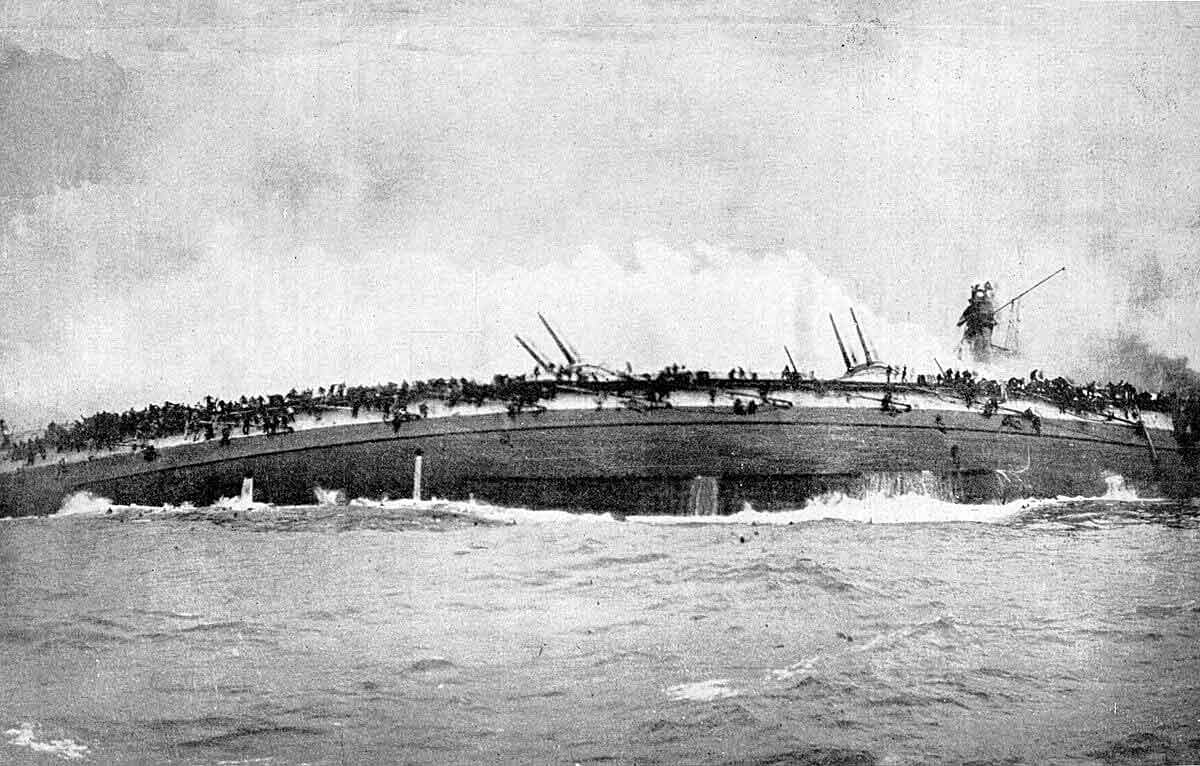
German armoured cruiser SMS Blucher capsized and sinking in the Battle of Dogger Bank on 24th January 1915 in the First World War
Arethusa lowered her boats and some 260 survivors of Blucher’s crew were picked up. At this point a German sea plane flew over and began bombing the men in the sea and Arethusa’s boats. It was driven off with gunfire but the Zeppelin returned and resumed the attack. Arethusa recalled her boats and Tyrwhitt withdrew his squadron from the area leaving the remaining survivors in the sea.
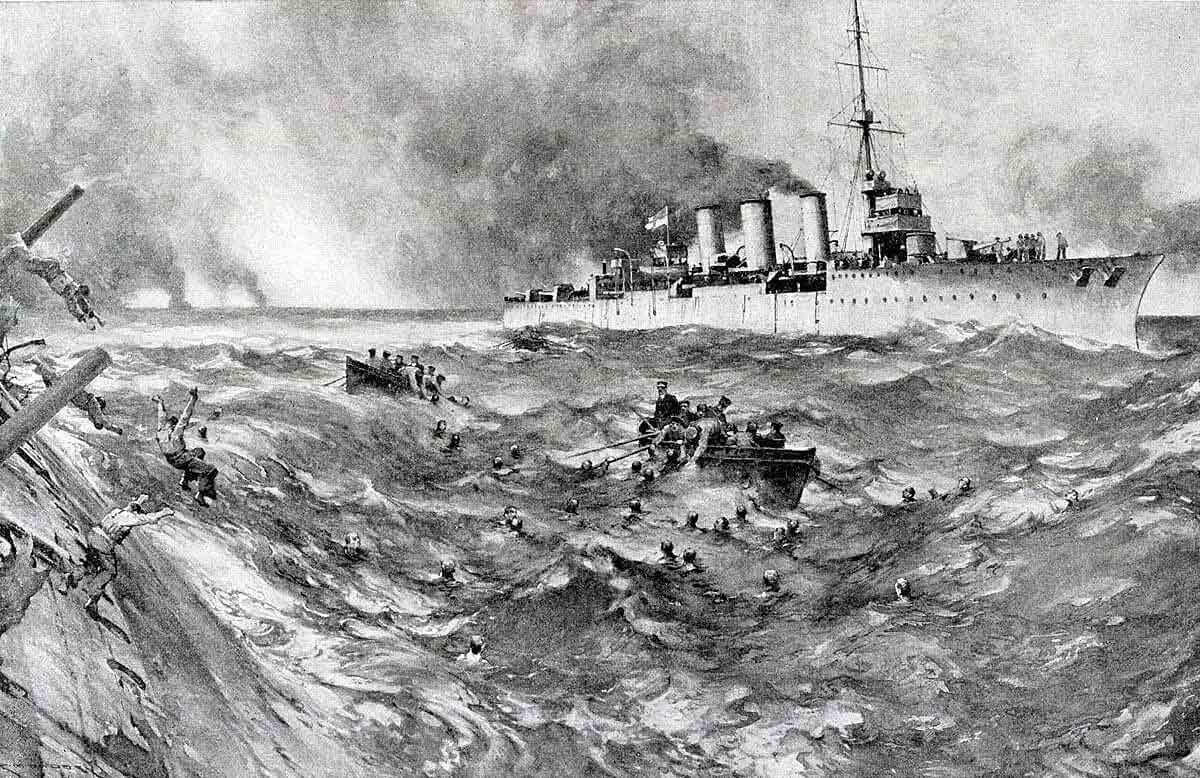
Boats from the British light cruiser HMS Arethusa rescuing surviving crew members of the sinking German armoured cruiser SMS Blucher in the Battle of Dogger Bank on 24th January 1915 in the First World War
At 11.50am Admiral Beatty moved from Lion to the destroyer HMS Attack and hurried to re-join the battle cruisers which he expected to be pursuing the retreating German ships. As Attack came up to the battle cruisers she found they were heading towards her. Once abreast of Princess Royal Beatty went aboard. Beatty immediately ordered the ships to make a 16 point turn and resume the pursuit. Within a short space of time Beatty was persuaded that Hipper’s ships were out of reach and ordered his battle cruisers to return to Lion.
Lion’s state was a considerable problem for the British naval command. German submarines were believed to be in the area and Lion’s ability to sail to her home port at only around 12 knots made her a tempting target.
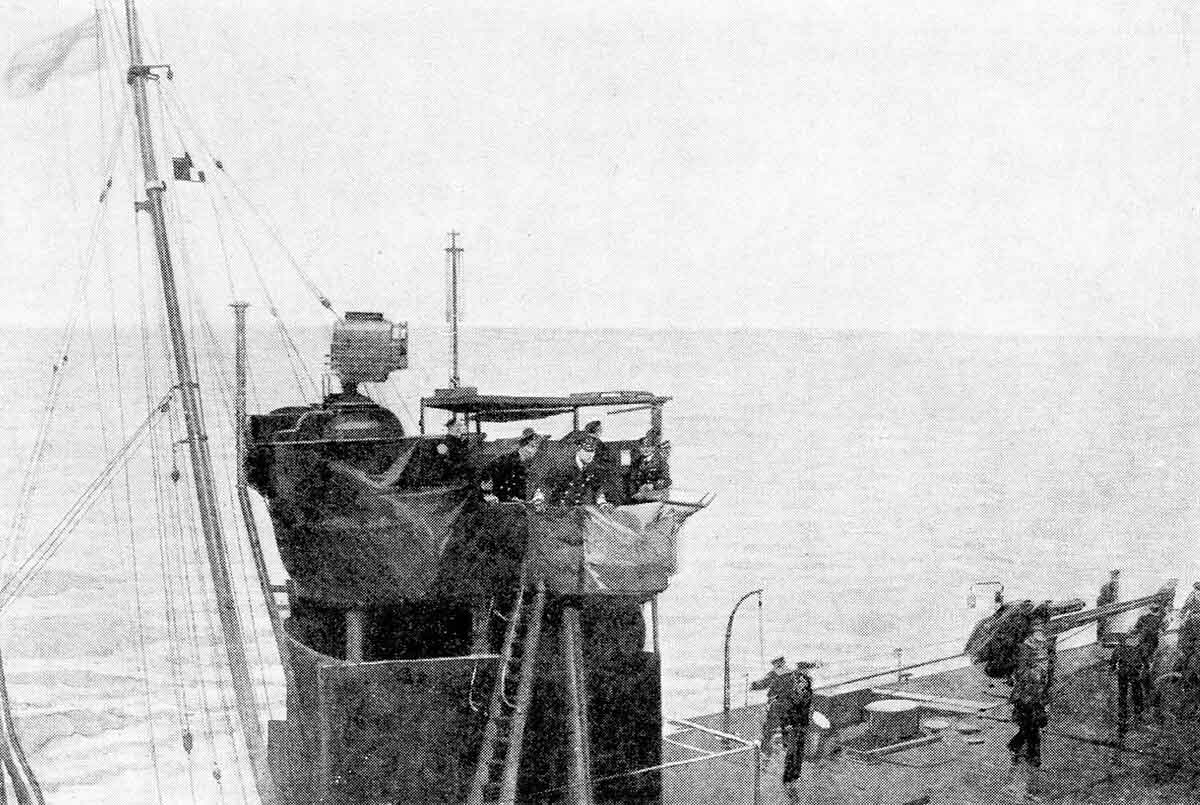
Admiral Beatty on the bridge of the British destroyer HMS Attack after transferring from his flag ship the damaged battle cruiser HMS Lion during the Dogger Bank Action on 24th January 1915 in the First World War
The British destroyer flotillas were keen to sail south and make an attack on the German High Seas Fleet as it emerged from harbour.
At around 2.30pm Beatty proposed to Jellicoe that he keep one destroyer flotilla and send the rest to attack the German fleet. At this time Lion’s starboard engine began to give further trouble and her speed dropped to 8 knots.
3.30pm on 24th January 1915:
At 3.30pm Beatty was forced to order Indomitable to take Lion in tow. The Fourth Flotilla arrived from the Grand Fleet, but instead of releasing Tyrwhitt’s destroyers to sail south, Beatty retained all the destroyers to provide a defensive screen for Indomitable and Lion.
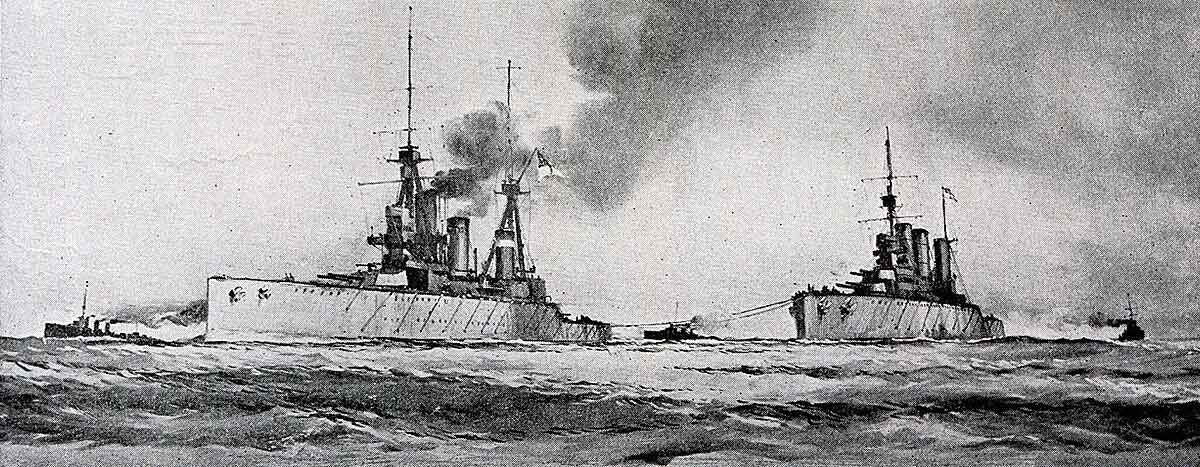
British battle cruiser HMS Indomitable towing the damaged HMS Lion after the Dogger Bank Action on 24th January 1915 in the First World War
At around this time the squadrons of battle ships under Jellicoe’s direct command came up with Beatty’s squadron and Jellicoe, seeing the state of Lion, confirmed Beatty’s order that all the destroyers present provide a protective screen to get the damaged battle cruiser and Indomitable back to port.
Jellicoe added the 2nd Light Cruiser Squadron to the escort and the two light cruiser squadrons formed a cordon in line ahead between Indomitable and Lion and the direction of the German bases.
4.30pm on 24th January 1915:
At 4.30pm Jellicoe turned back for Scapa Flow and at dusk Beatty left Indomitable and Lion and returned to Rosyth with Tiger, Princess Royal and New Zealand.
Soon after Beatty left, the Lion’s engines broke down completely leaving her entirely dependent on Indomitable’s tow, which now proceeded at 7 knots. A German destroyer attack was expected at any moment. Dawn found Lion still a hundred miles from Rosyth.

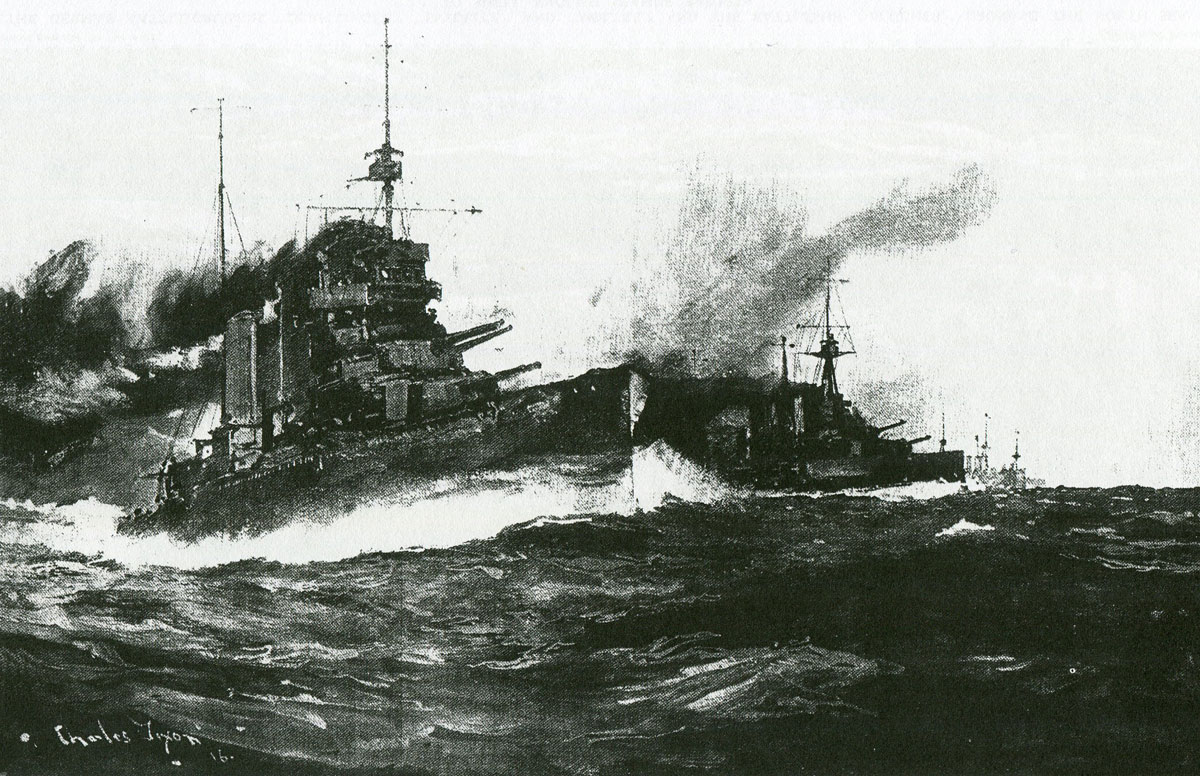
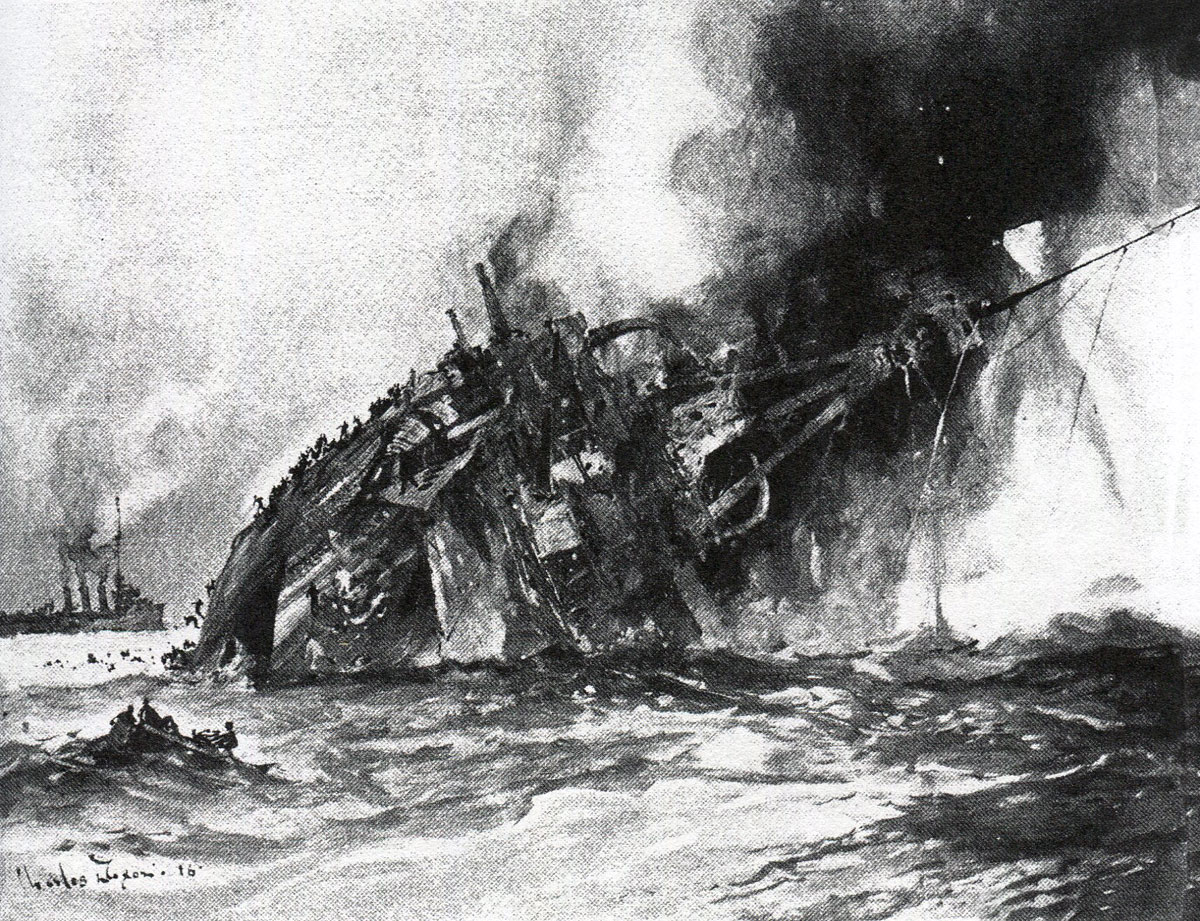
HMS Indomitable tows in HMS Lion severely damaged in the Dogger Bank Action on 24th January 1915 in the First World War: picture by Charles Edward Dixon
25th January 1915:
During the next day some of Lion’s flooded compartments were pumped out enabling her speed to be increased. By dawn on 26th January 1915 Lion was anchored in the Firth of Forth and all concerned breathed a sigh of relief that the German navy had missed a sitting duck.
The damaged ‘M’ class destroyer Meteor was also towed back to her base in the Humber by the destroyer Liberty.
SMS Blucher sinking at the Battle of Dogger Bank on 24th January 1915 in the First World War
Casualties at the Battle of the Dogger Bank:
British Ships:
The casualties on the major ships involved in the battle were:
Lion (struck by sixteen 11 and 12 inch shells and one 8.3 inch shell) 1 Killed and 20 wounded
Tiger (struck by six 11 and 12 inch shells and one 8.3 inch shell) 10 killed including the Squadron Engineer Officer Captain C.G. Taylor RN and 11 wounded
Princess Royal (not hit) no casualties
New Zealand (not hit) no casualties
Indomitable (struck by one 8.3 inch shell) no casualties
German Ships:
Seydlitz (struck by three 13.5 inch shells) 159 killed and 33 wounded
Derfflinger (struck by three 13.5 inch shells) no casualties
Moltke no casualties
Blucher (struck by around seventy shells and seven torpedoes) 792 killed 234 prisoners and 45 wounded
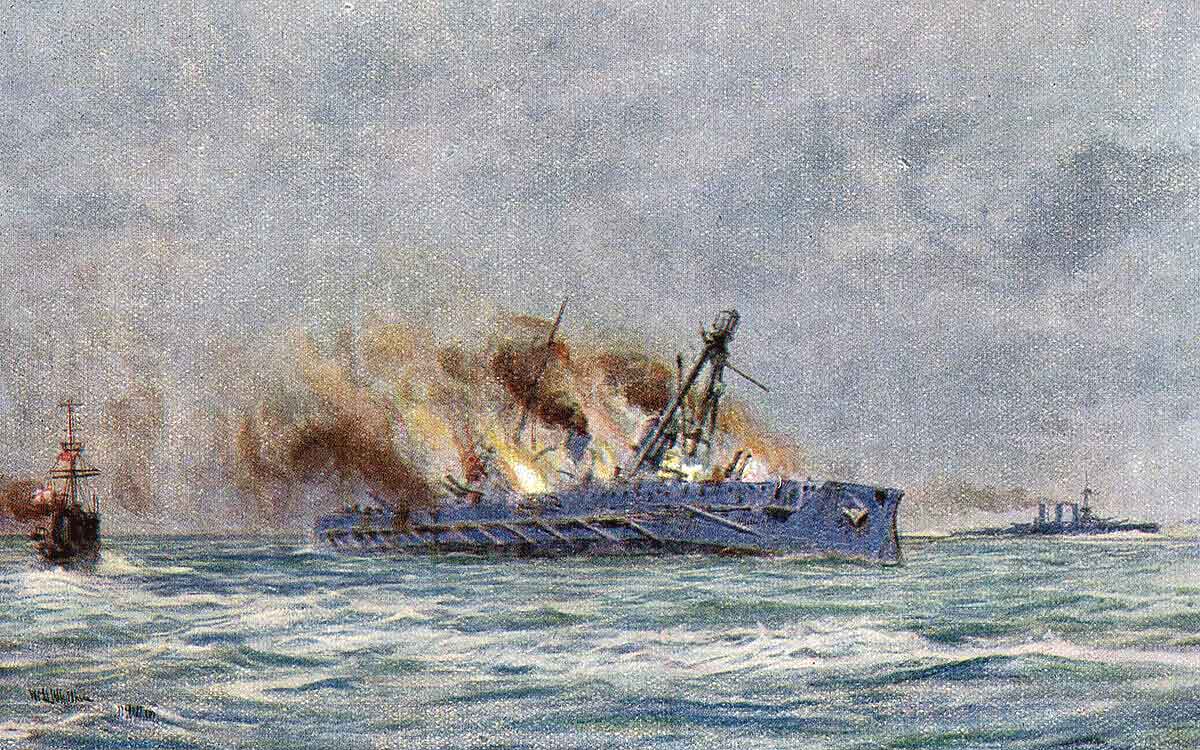
End of the German armoured cruiser SMS Blucher sinking in the Dogger Bank Action on 24th January 1915 in the First World War: picture by Lionel Wyllie
The German ships were substantially over manned carrying crew members from the ships temporarily out of action, primarily SMS von der Tann. Blucher’s complement was 880, but she carried 250 additional men from the von der Tann.
It is believed that there were substantial casualties on the German light cruisers and destroyers.
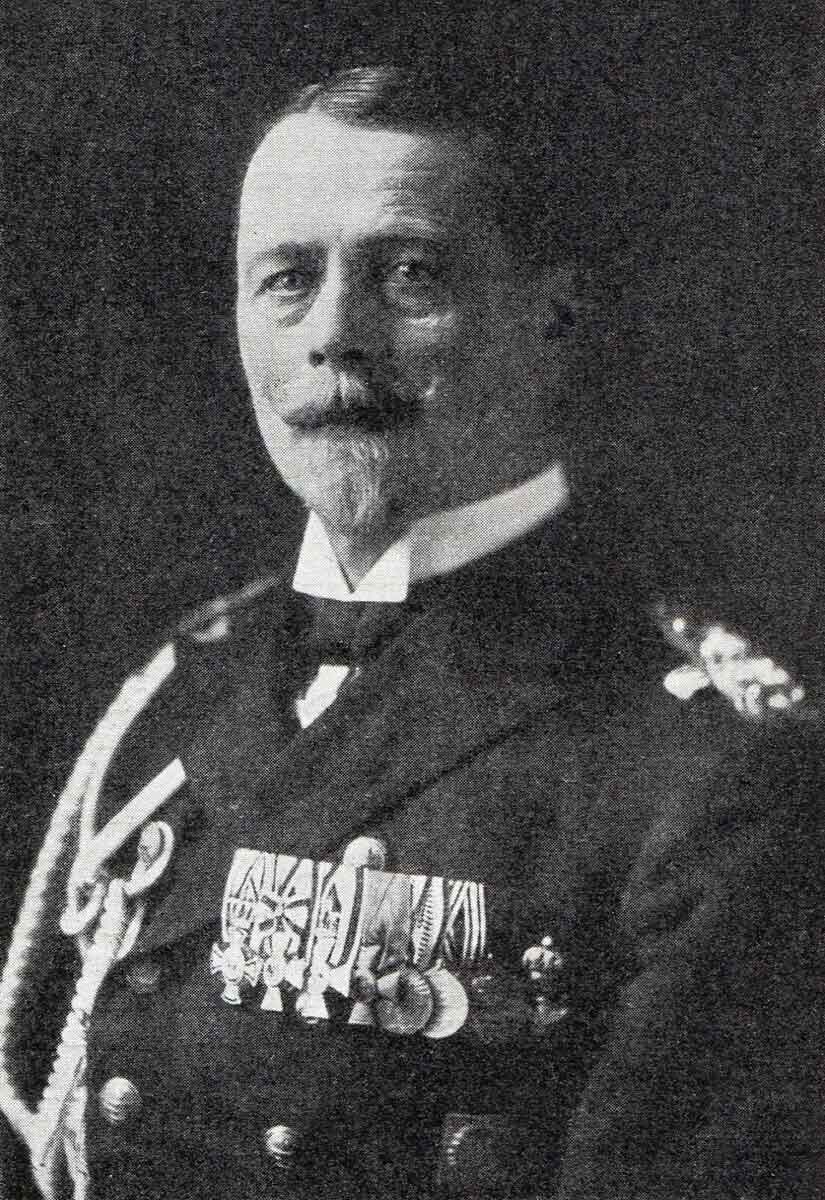
Admiral von Ingenohl retired by the Kaiser from command of the German High Seas Fleet following the Dogger Bank Action on 24th January 1915 in the First World War
Aftermath to the Battle of the Dogger Bank:
The Kaiser was furious at the loss of the armoured cruiser SMS Blucher. Von Ingenohl was retired from his position as commander-in-chief of the German High Seas Fleet and replaced by Admiral Hugo von Pohl.
The German naval authorities took some time to issue an explanation as to what had happened in the Dogger Bank Action. When they did so they stated that the British force comprised thirteen large ships and seven small cruisers. Admiral Scheer wrote an account of the battle that was substantially correct, which suggests that the German naval authorities knew their assessment of the number of British ships engaged was inaccurate.
There were two important consequences of the Dogger Bank Action. The first was that the Kaiser ordered that no further operations were to take place in the North Sea that might imperil a major ship. This held good until the foray leading to the Battle of Jutland on 31st May 1916.
The second was that the near loss of SMS Seydlitz from the initial shell strikes caused the German naval authorities to investigate carefully the vulnerability of the battle cruisers to shells penetrating their ammunition handling areas beneath the gun turrets. The result was that better ammunition handling procedures were introduced and the doors and hatches redesigned and re-inforced to prevent shells from penetrating these areas.
It is unfortunate that the British naval authorities did not investigate the damage caused to Lion more closely. This might have caused them to take similar steps in the British battle cruiser fleet and possibly have prevented the loss at the Battle of Jutland of one or all of Invincible, Princess Royal and Queen Mary, lost probably due to this very weakness.

Officers of the British battle cruiser HMS Lion after the Dogger Bank Action on 24th January 1915 in the First World War
That Lion survived the hits she received was probably due to the efforts of her warrant gunner Alexander Grant who reversed in Lion the short cuts instituted in the battle cruiser fleet to speed up rates of fire and restored the regulation ammunition handling procedures and flash-proof barriers, while ensuring that firing was as quick as before.
On the British side Admiral Moore was removed from command for failing to follow up Hipper’s retreating ships.
The previous battle in the First World War is the Battle of the Falkland Islands
The next battle in the First World War is Gallipoli Campaign: Part I the Naval Attack on the Dardanelles