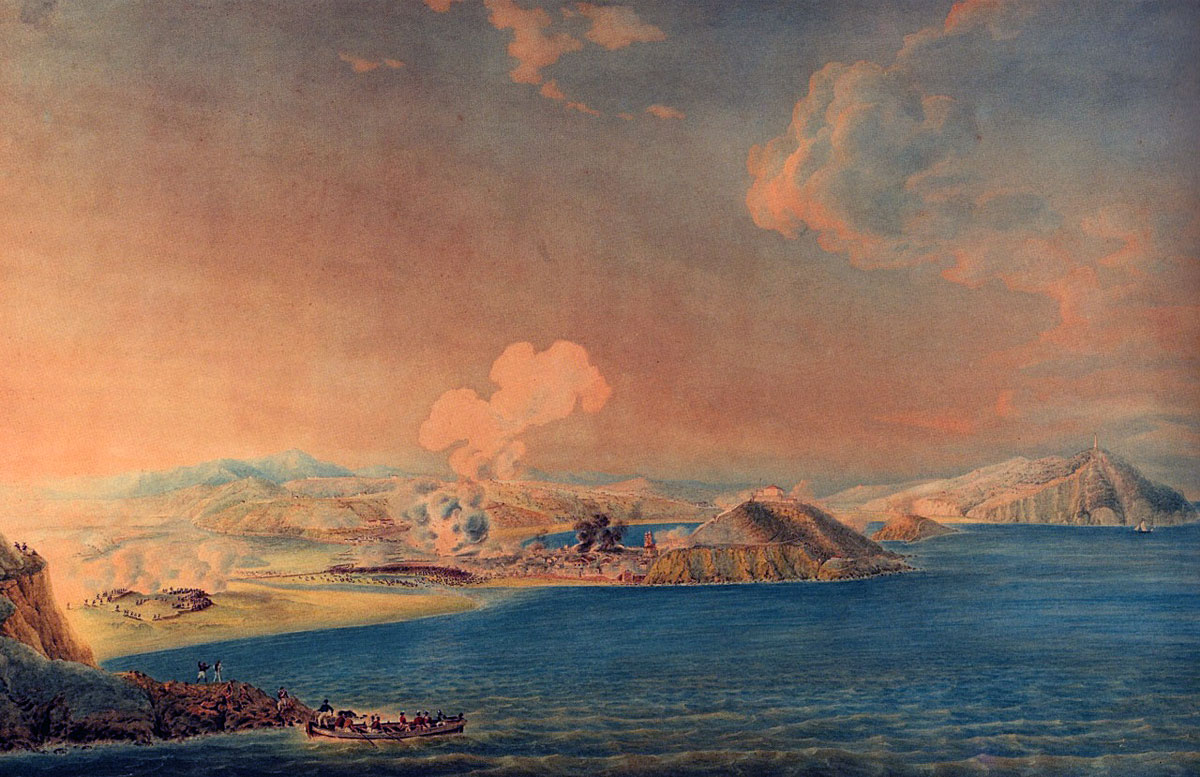
The hard-fought struggle to capture San Sebastian, the city port on the north-east coast of Spain near the French border, between 11th July and 9th September 1813 in the Peninsular War
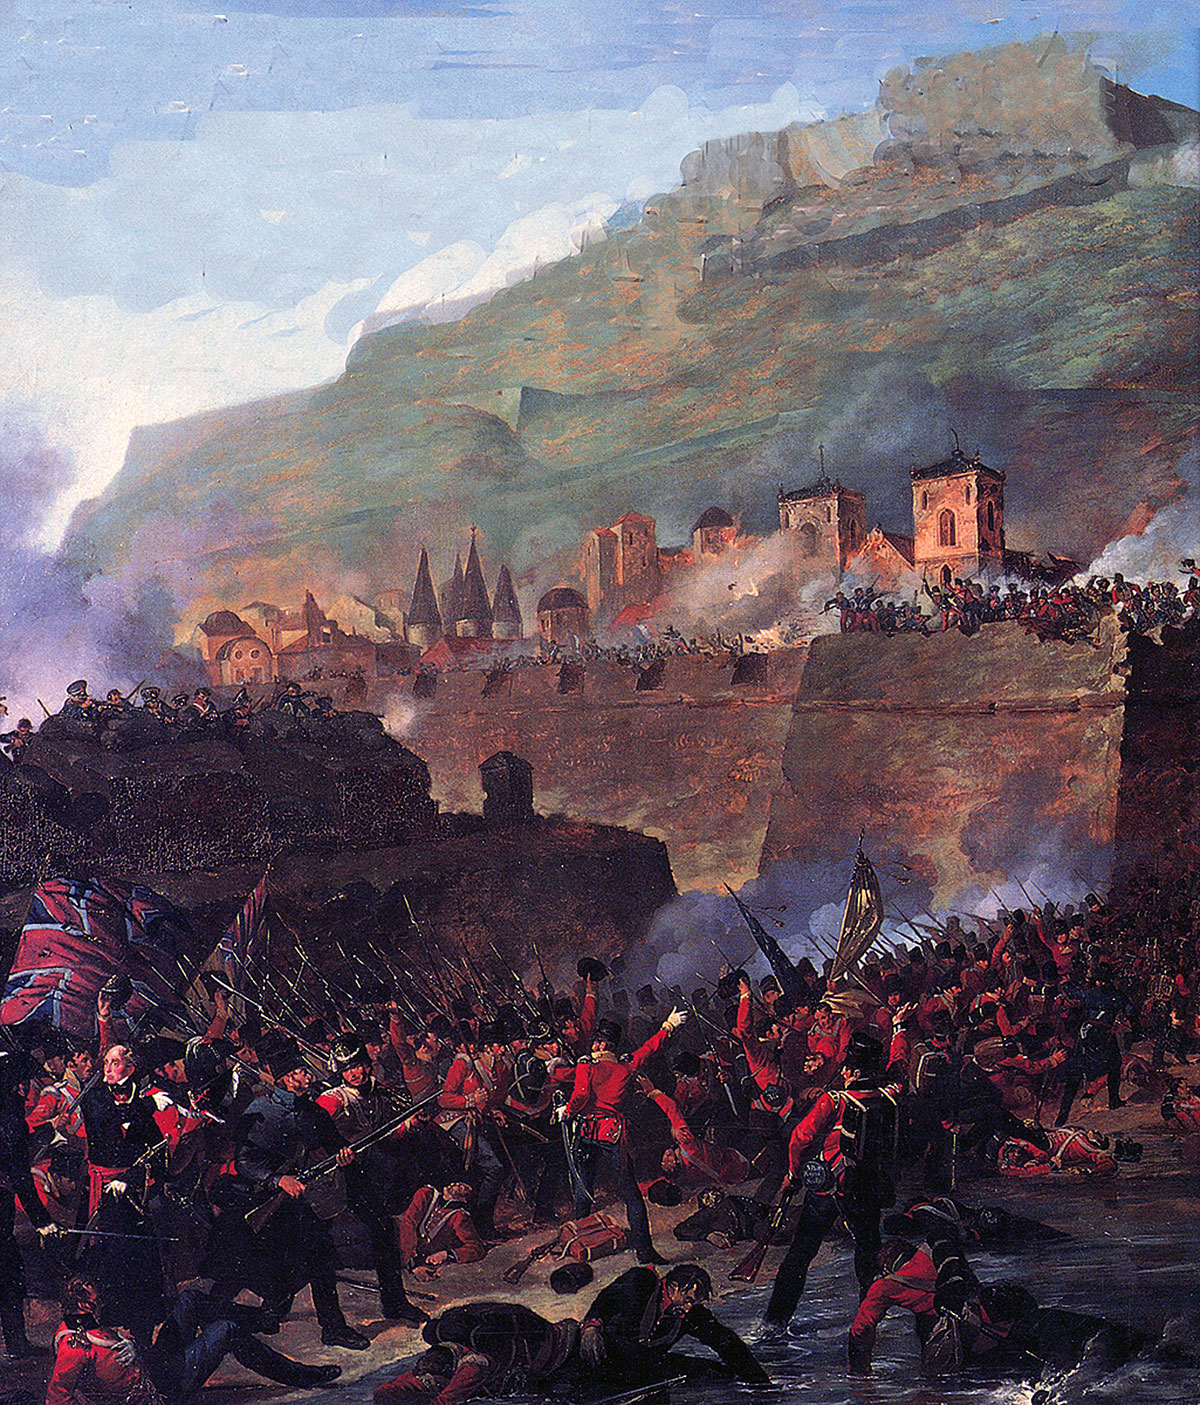
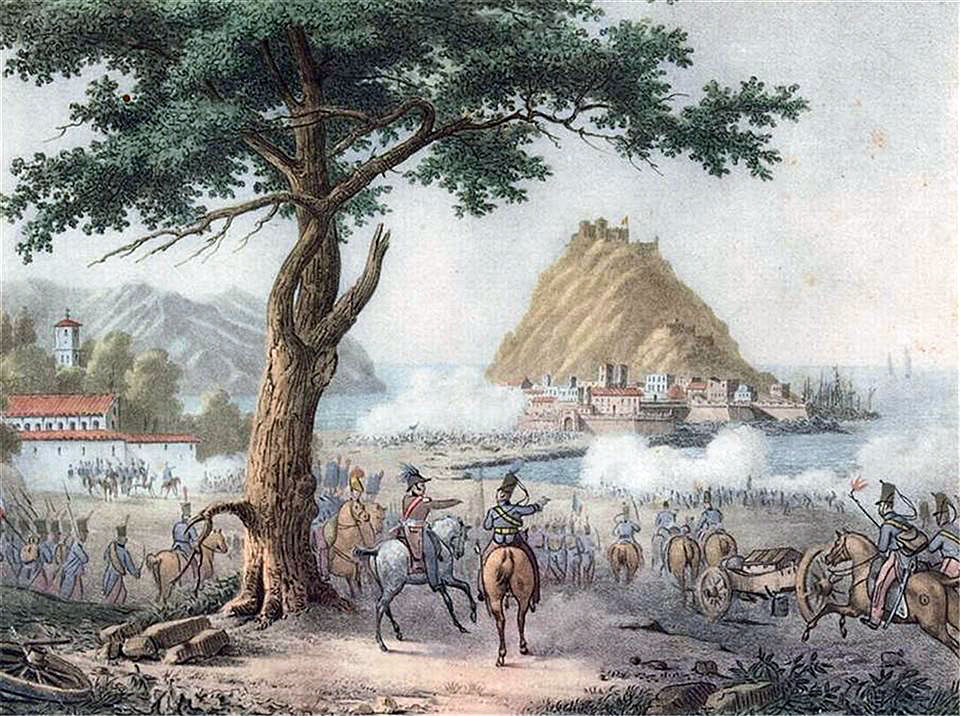
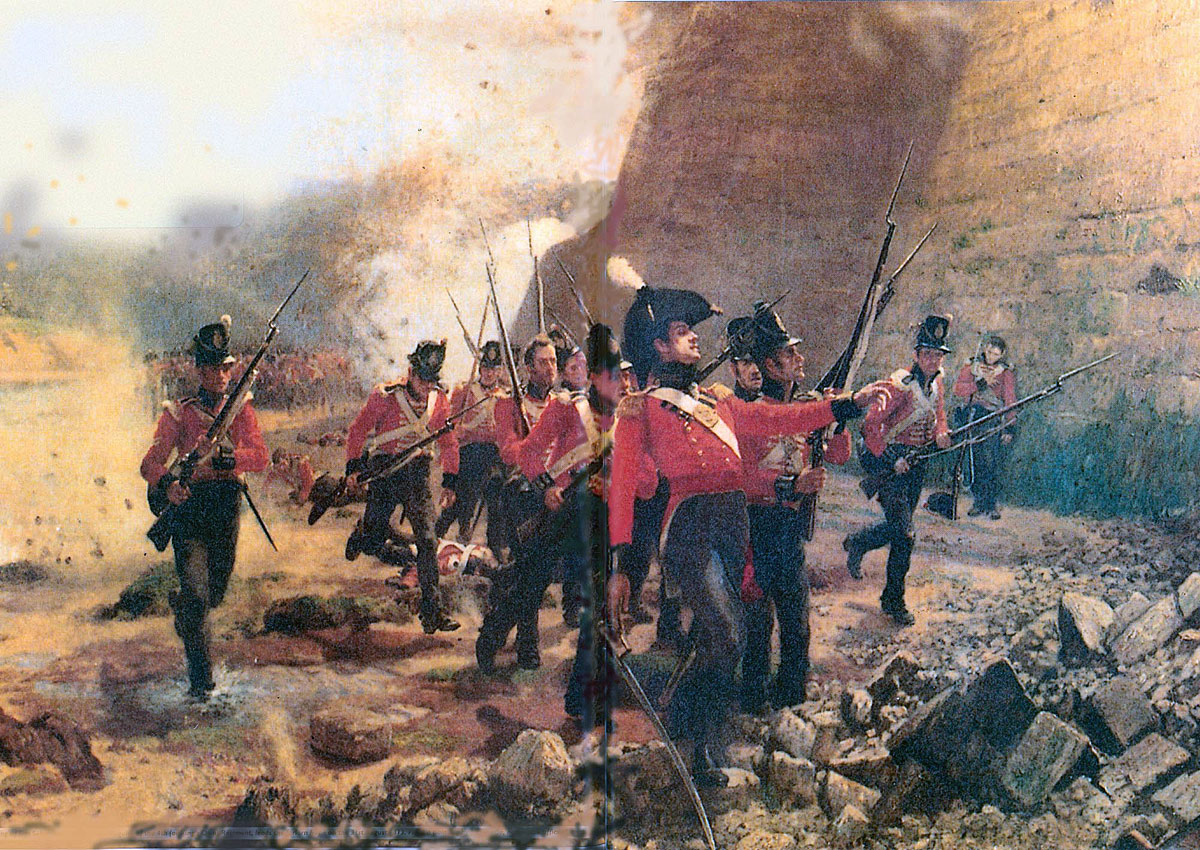
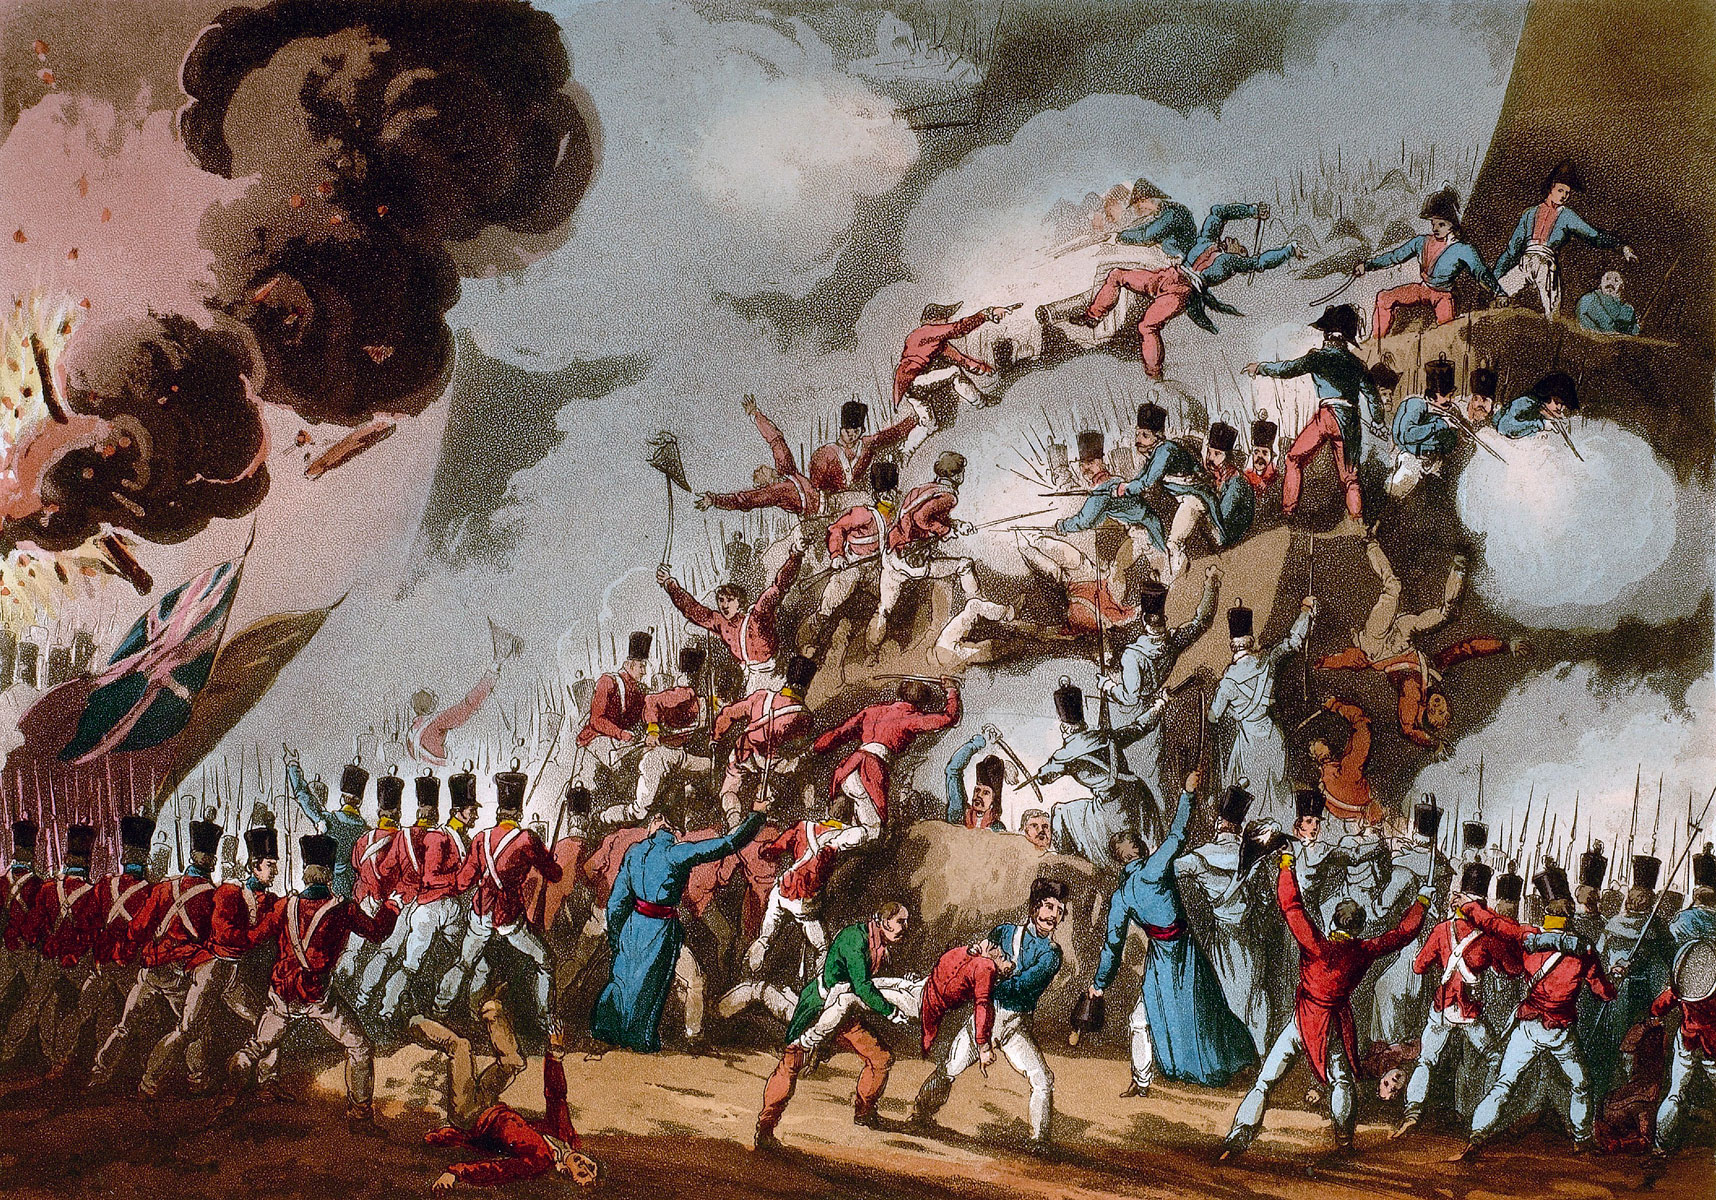
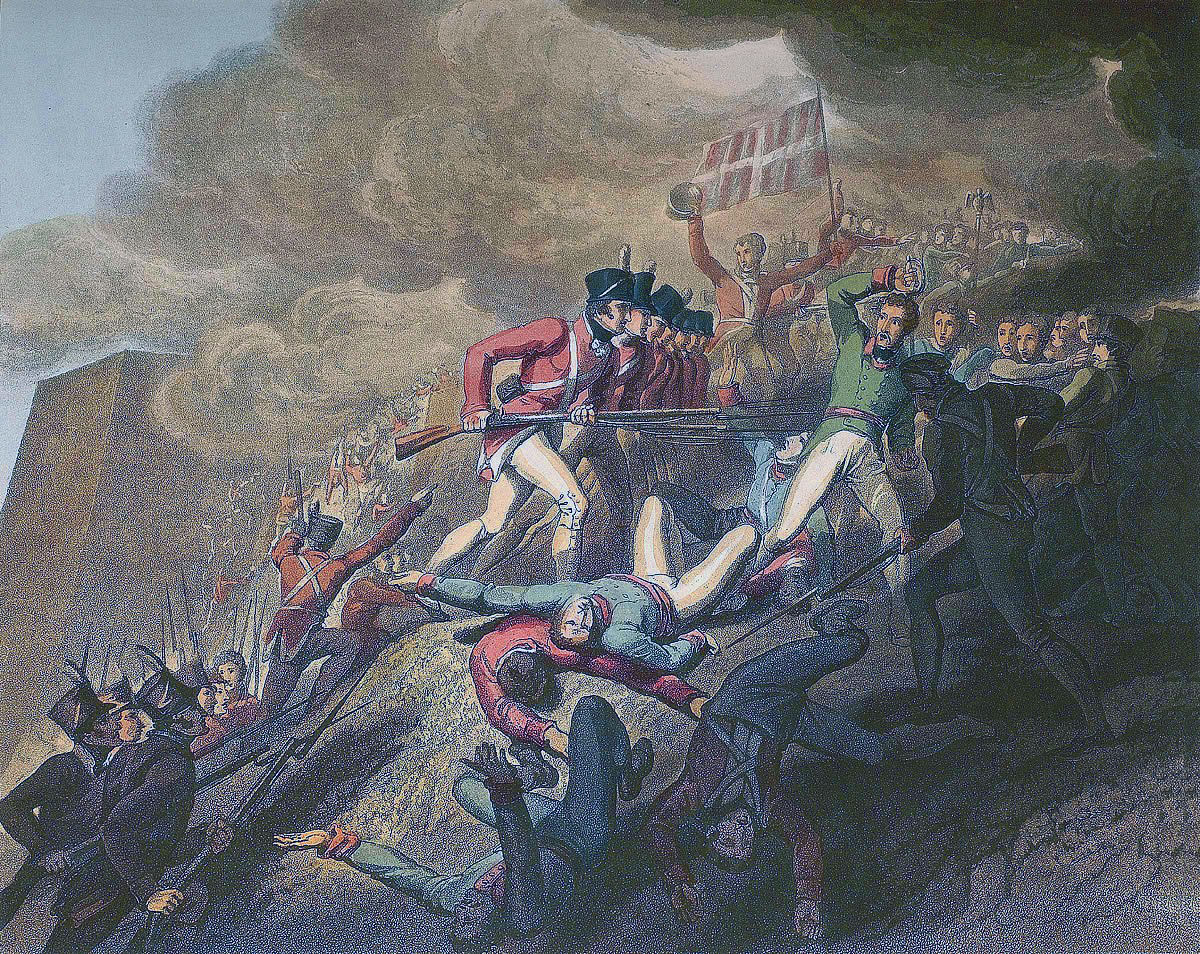
Storming of San Sebastian between 11th July and 9th September 1813 in the Peninsular War (left section): picture by Denis Dighton
The previous battle of the Peninsular War is the Battle of Vitoria
The next battle of the Peninsular War is the Battle of the Pyrenees
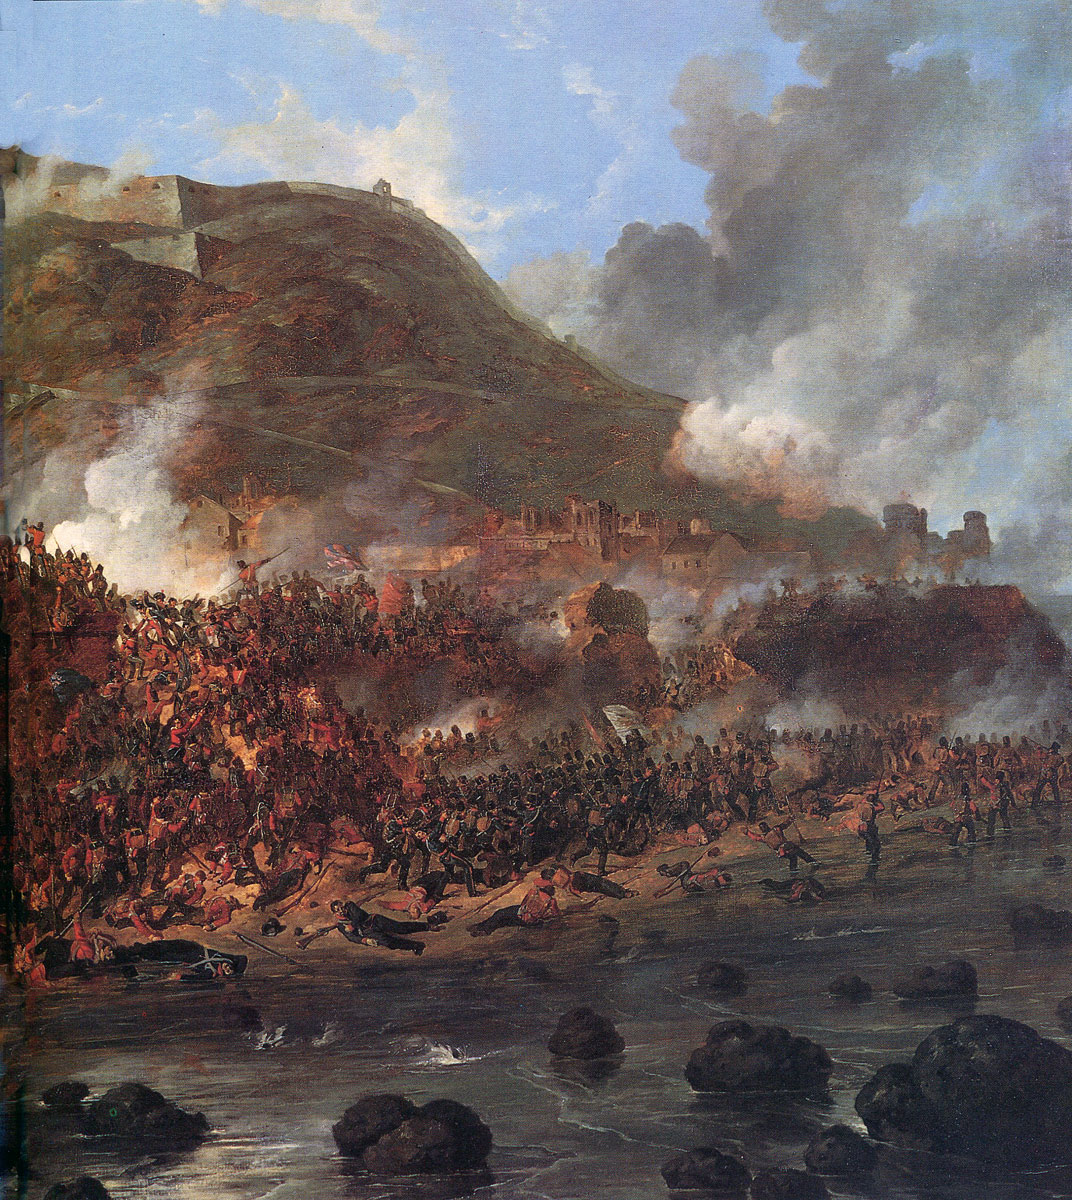
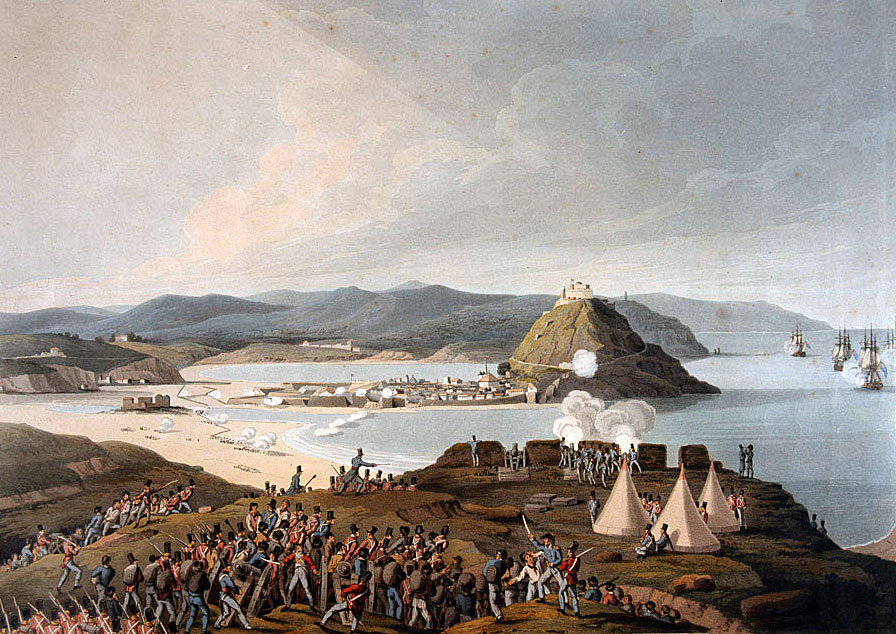
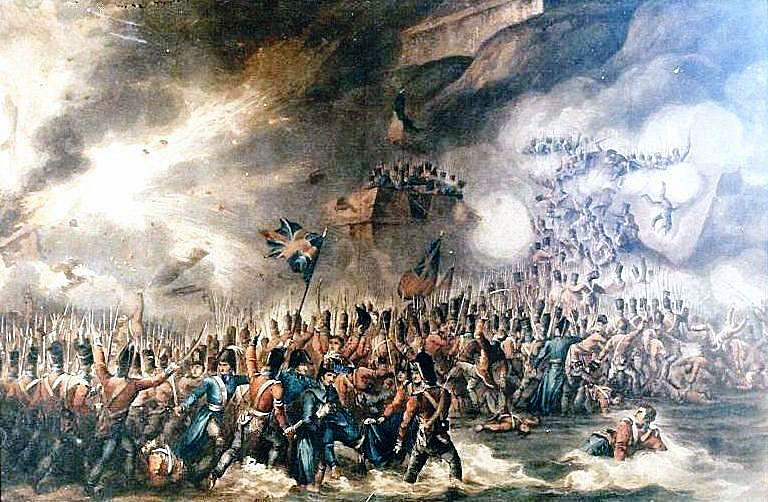
Storming of San Sebastian between 11th July and 9th September 1813 in the Peninsular War (right section): picture by Denis Dighton
City of San Sebastian: Storming of San Sebastian between 11th July and 9th September 1813 in the Peninsular War
War: Peninsular War
Dates of the Storming of San Sebastian: 11th July to 9th September 1813
Place of the Storming of San Sebastian: In Spain, on the north-east coast, near the French border.
Combatants at the Storming of San Sebastian: British, Portuguese and Spanish against the French

General Louis Emmanuel Rey, French commander at the Storming of San Sebastian between 11th July and 9th September 1813 in the Peninsular War
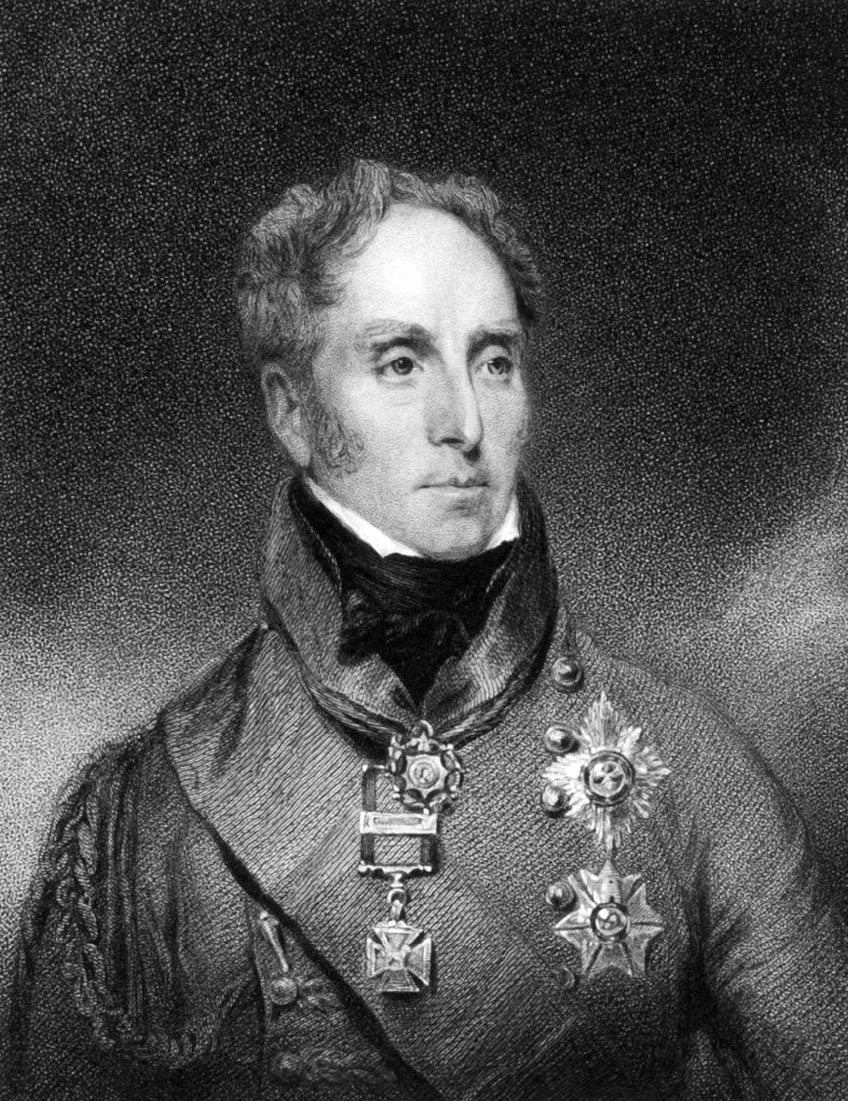
Commanders at the Storming of San Sebastian: General Sir Thomas Graham against General Rey.
Size of the armies at the Storming of San Sebastian: around 15,000 British, Portuguese and Spanish troops against a final total of around 3,000 French troops.
Winner of the Storming of San Sebastian: The first British, Portuguese and Spanish attack on San Sebastian, on 25th July 1813, was unsuccessful. Operations against San Sebastian were suspended during the period of the Battle of the Pyrenees (Battles of Roncesvalles, Maya and Sorauren). The second British and Portuguese attack on San Sebastian on 31st August 1813 was successful, leading to the surrender of the French garrison on 9th September 1813.
Background to the Storming of San Sebastian:
At the Battle of Vitoria on 21st June 1813, Wellington’s British, Portuguese and Spanish army defeated the army commanded by Joseph Bonaparte and Marshal Jourdan, comprising the French Armies of the Centre, the South and of Portugal. The French retreated towards the border between Spain and France in the Pyrenees Mountains, followed by Wellington’s army.
Lieutenant General Sir James Leith, commander of the British Fifth Division at the Storming of San Sebastian between 11th July and 9th September 1813 in the Peninsular War
During the previous years, while the fighting had been in the western, central and southern areas of Spain, the port city of San Sebastian, situated on Spain’s north-east coast near the French border, fulfilled the role of depot, storing and passing on supplies and drafts of soldiers for the French armies, arriving by road from France over the Pyrenees Mountains, or by sea from St Jean de Luz in France, a short voyage away.
The French removed the guns from the defences of San Sebastian for use in the field.
With the French defeat at Vitoria and their retreat towards the border in the Pyrenees, San Sebastian resumed its significance as a defensive bastion, needed to hold up Wellington’s advance towards the French border.
There was no French garrison allocated to San Sebastian. The only French troops in the city were passing through as escorts for the large French road convoys bringing out of Spain, valuables, supplies, government records and escaping Spanish collaborators.
General Louis Emmanuel Rey, commanding the escort for one of these convoys, formed from the garrison of Burgos Castle, arrived in San Sebastian to find himself with the unenviable task of directing the French defence of the city.
On 26th July 1813, Rey received information from General Foy that he was unable to hold up the British advance. This news caused a panic-stricken exodus of Spanish refugees from San Sebastian, considerably easing Rey’s difficulty in providing them with protection and supplies.
City of San Sebastian seen from the Convent of San Bartolomeo: the Storming of San Sebastian between 11th July and 9th September 1813 in the Peninsular War: picture by a British officer present at the attack
Foy provided Rey with 4 battalions of infantry and 40 gunners.
On 28th July 1813, General Mendizabel, the Spanish commander, imposed a land blockade on San Sebastian.
The sea route from San Sebastian to St Jean de Luz in France was to remain open for most of the period of the attack on the city.
City of San Sebastian: Storming of San Sebastian between 11th July and 9th September 1813 in the Peninsular War
The City of San Sebastian:
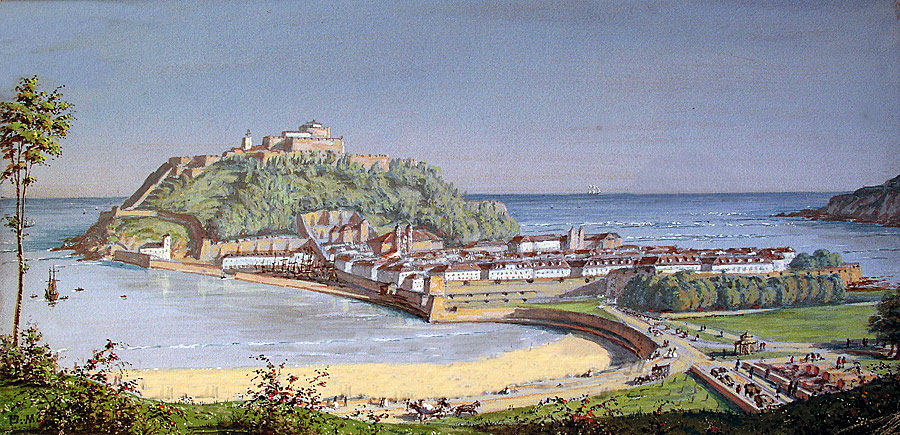
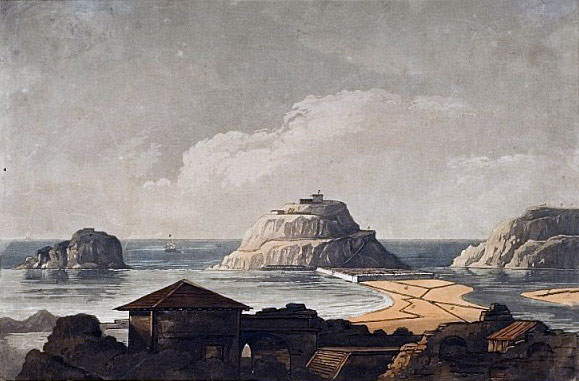
San Sebastian stands on a low peninsula running 1,100 yards from south to north and ending at the northern end in a rugged hill, 400 feet high, Monte Orgullo, on which was situated the castle of La Mota.
On the west side of the peninsula lies a bay with the small Island of Santa Clara in its entrance.
On the east side of the peninsula flows the river and estuary of Urumea.
An 8-foot wall was built along the flanking sides of the city, on the bank of the Urumea and on the edge of the western bay.
At high tide, the sea lapped against the bottom of the wall. At low tide, a strip of shore was exposed along the walls and the Urumea became fordable.
Monte Orgullo and Castle La Mota seen from the Island of Santa Clara in the Storming of San Sebastian between 11th July and 9th September 1813 in the Peninsular War
On the land-ward side of the city stood a wall and ditch, a bastion and outside that, a horn work.
Guns were mounted in La Mota Castle and in two other batteries on Monte Orgullo flanking the castle.
The fortifications of the city were overlooked by the surrounding hills, giving attackers a good position for batteries to fire on them.
The wall on the eastern side of the city was overlooked by the Chofre Sandhills, 600 yards across the Urumea estuary.
Other than in the bastion there were no casemated defences to provide the usual cover for a garrison under siege.
Storming of San Sebastian between 11th July and 9th September 1813 in the Peninsular War
The water supply to the city and garrison depended on a number of brackish wells, the aqueduct providing the normal water supply being cut off by the attacking army at an early stage.
The area outside the wall, bastion and horn work was built up with suburbs and a number of convents, providing cover for an attacking army. It was Rey’s immediate task to destroy them.
One convent only, the Convent of San Bartolomeo was retained, fortified and garrisoned.
The French garrison’s artillery was distributed, 13 guns on Monte Orgullo, 45 guns around the city defences and 18 guns in reserve.
On 1st July 1813, the French garrison from the seaside town of Getaria, 50 miles along the coast to the west, arrived in San Sebastian, raising the garrison to around 3,000 men.

Attack of 25th July 1813: Storming of San Sebastian between 11th July and 9th September 1813 in the Peninsular War: map by John Fawkes
The first attempt to storm San Sebastian:
On 3rd July 1813, 20 Royal Navy ships, led by a frigate, attempted to impose a blockade on San Sebastian; but with limited success, French vessels continuing to sail into the bay from St Jean de Luz, particularly at night.
On 12th July 1813, during a two-day visit to San Sebastian, Wellington reconnoitred the city and sanctioned the plans for its attack, in consultation with Major Smith, a senior engineer.
Batteries were to be erected on the Chofre Sandhills, to fire on the eastern wall of the city and create a breach. An assault would then be launched at low tide, when there was dry land along the edge of the city wall.

Lieutenant General Sir Thomas Graham: Storming of San Sebastian between 11th July and 9th September 1813 in the Peninsular War
On 13th July 1813, General Graham took over the operations against San Sebastian from General Mendizabel, the Spanish commander.
The right attack on San Sebastian would be conducted by Bradford’s Portuguese Brigade, while General Oswald’s British Fifth Division would constitute the left attack.
On 12th July 1813, a battery was built to fire on the fortifications of San Bartolomeo Convent and on 14th July 1813, the bombardment of the convent was begun.
3 days of this bombardment, supported by guns from the Chofre Sandhills were sufficient to reduce the defences of the convent to ruins.
On 14th July 1813, the San Bartolomeo Convent was stormed by the British 9th Regiment, supported by the Royal Scots and Portuguese troops.
After taking the convent, the attackers advanced onto the isthmus, where they came under heavy French gunfire and suffered significant loss (the 9th losing 70 officers and men killed or wounded).
Over the next few days, the British Royal Artillery built batteries on the Chofre Sandhills and opened fire on San Sebastian, with the aim of opening breaches in the defences.
A mine was laid in an underground aqueduct, at the point where it passed under the western demi-bastion of the horn work.

Contemporary cartoon of the Storming of San Sebastian between 11th July and 9th September 1813 in the Peninsular War
The bombardment was over three days, eleven 24 pounders firing at the wall between the towers of Los Hornos and Las Mezquitas, at the southern end of the eastern fortifications of the city.
By the morning of 23rd July 1813, a practicable breach was made (the Great Breach).
The British guns then turned on the wall to the north of Los Hornos and a further breach (the Lesser Breach), 30 feet wide, was made by the end of the day.
At the same time, Rey’s men worked with desperate energy to build retrenchments across the breaches and install batteries to fire into the flanks of any attacking force attempting to storm the breaches.
The British bombardment started fires that raged through the city, the French garrison having no supply of water to counter them.
British Batteries on the Chofre Sandhills firing on San Sebastian in the Storming of San Sebastian between 11th July and 9th September 1813 in the Peninsular War
The storming columns assembled for the attack during the night and were in position by dawn of 24th July 1813, but it was considered that the burning buildings would block any incursion into the city and the assault was postponed.
The breaching batteries resumed their fire, aiming for the French retrenchments.
General Graham ordered the assault to take place on the morning of 25th July 1813, once the tide receded sufficiently to give access along the length of the eastern perimeter of the city defences for the attacking columns. The time for this was reckoned as dawn.
The troops selected for the assault were the Royal Scots, to assault the Great Breach, supported by the 9th Regiment.
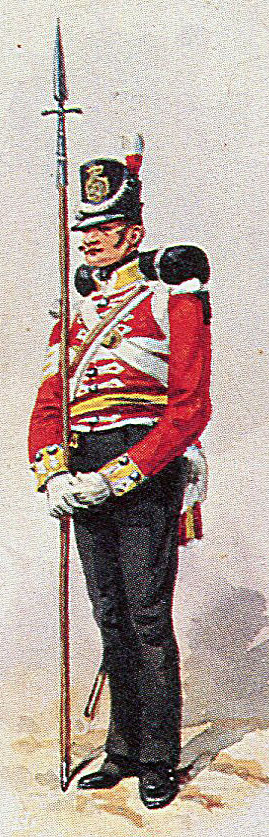
Sergeant of the 38th Regiment: Storming of San Sebastian between 11th July and 9th September 1813 in the Peninsular War: picture by Richard Simkin
The 38th Regiment was to assault the more distant Lesser Breach.
The light companies of these regiments, with a ladder party, were to attack at the point where the mine was exploded at the western end of the horn-work.
The troops assembled in the trenches dug into the isthmus leading to the city and began the assault.
As the main column advanced along the western bank of the River Urumea, the troops came under fire from the artillery in the city and then, on passing the eastern outer wall of the horn work, were subject to fire and a rain of exploding hand-grenades and other devices from the defenders.
The column worked its way along the eastern wall, finding that only a small section of the shore was uncovered, due to a miscalculation of the tide, forcing the troops to struggle over slippery rocks and through pools, with no order maintainable.
While Wellington specifically stipulated that the attack should be made in daylight, to enable the British batteries to support the attacking infantry with a further bombardment of the defences, the attack was begun at 4.30am, before dawn broke, ruling out artillery support.
Further, the 38th Regiment, required to make its way to the more distant Lesser Breach, was positioned at the rear of the column.
The mine in the aqueduct exploded at the requisite time and the assaulting light companies rushed forward, but in spite of being surprised and the destruction of much of the outer wall, the defenders rallied and drove the attacking British troops back, with substantial loss.
In the attack on the Great Breach, the Royal Scots were met by a tempest of fire from muskets and guns positioned in the retrenchment.
Major Fraser, commanding the Royal Scots, and Lieutenant Harry Jones, the engineer, surmounted the breach and jumped fifteen feet down into the town. Fraser was killed and Jones wounded along with the few men who had passed the breach.
The rest of the Royal Scots fell back under the heavy fire and began to withdraw along the river bank, taking with them the 9th and 38th Regiments, there being no room for these to pass the Royal Scots, the whole force finally running back to the starting trenches.
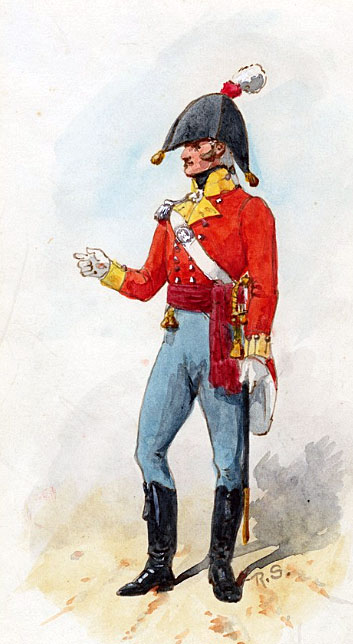
Officer of the 9th East Norfolk Regiment: Storming of San Sebastian between 11th July and 9th September 1813 in the Peninsular War: picture by Richard Simkin
Casualties in the first attempt to storm San Sebastian:
The total British casualties in the first assault were 8 officers killed, 30 wounded and 6 captured: 121 men killed, 142 wounded and 118 captured. Most the captured were wounded men left in the breach or on the shore.
The Royal Scots lost 86 officers and men killed and 245 wounded.
French casualties are not known but were unlikely to be significant.
Follow-up to the first attempt to storm San Sebastian:
The reaction of the troops involved in the first unsuccessful attempt to storm San Sebastian was to blame the army’s engineers and artillery, considering that they had neither the expertise nor the will to support the infantry properly.
This view led to a significant fall in morale in the Fifth Division.
Wellington, characteristically, blamed the Fifth Division troops for the failure, turning to the rest of the army for volunteers to carry out the next attack.
For the time being, the attack on San Sebastian was suspended while Wellington and the rest of the army dealt with the incursion across the French border by the French army, re-constituted under Marshal Soult, appointed to the supreme command in Spain by the Emperor Napoleon, in place of the Emperor’s brother Joseph Bonaparte and chief of staff, Marshal Jourdan.
Before continuing the attack on San Sebastian, Wellington and his British, Spanish and Portuguese army were compelled to fight the Battles of Roncesvalles, Maya and Sorauren; collectively known as the Battle of the Pyrenees, between 25th July and 2nd August 1813.
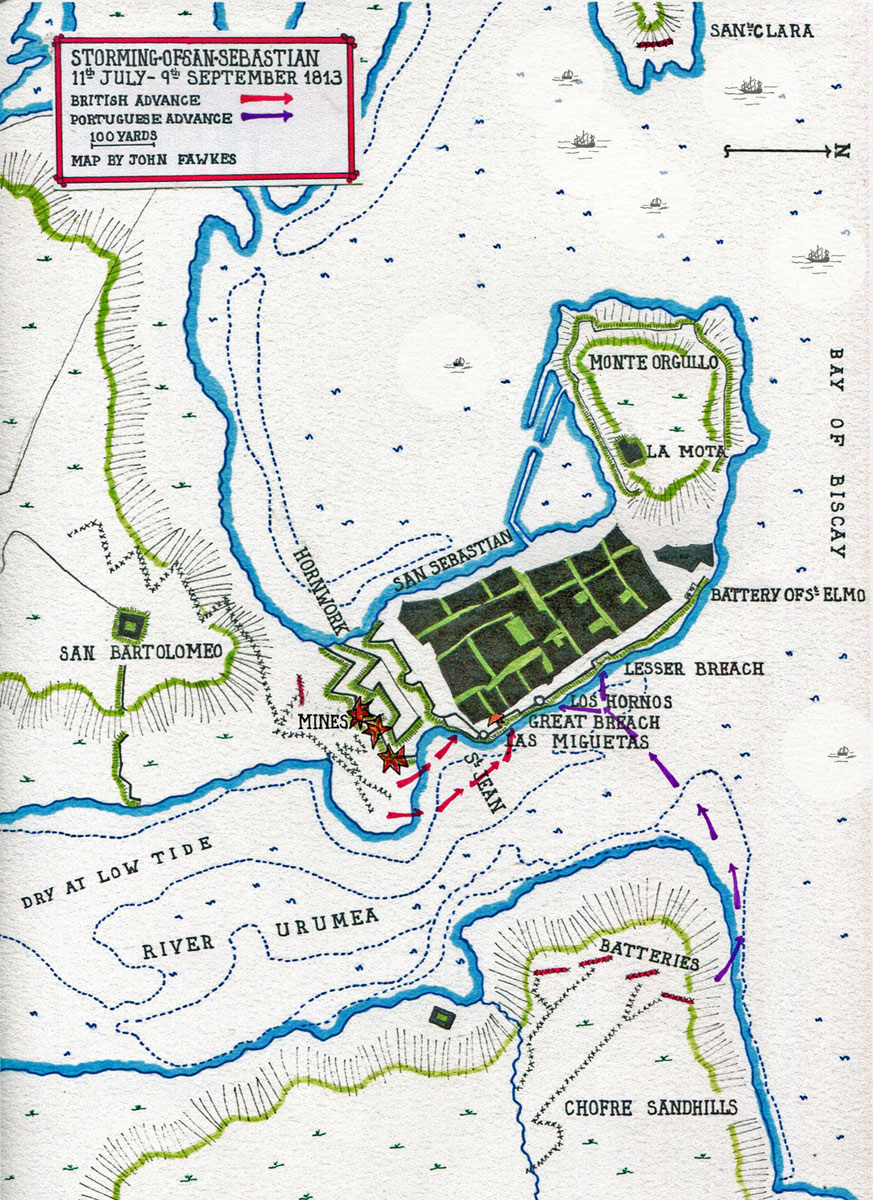
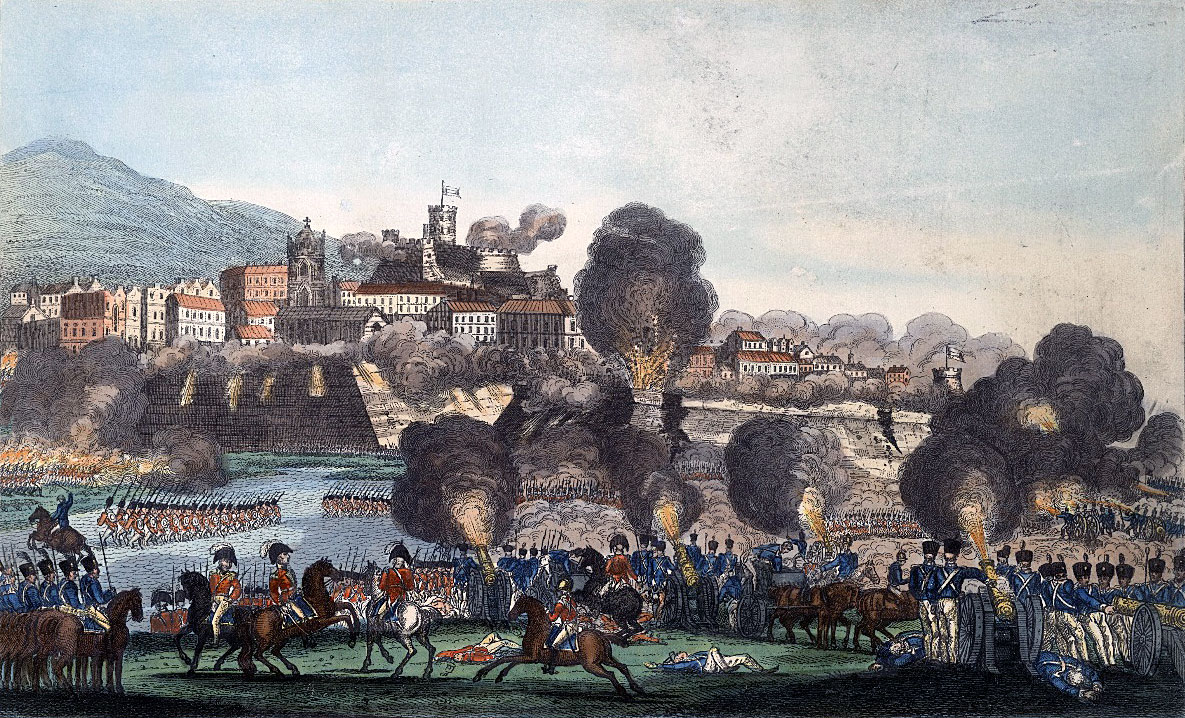
Attack of 31st August 1813: Storming of San Sebastian between 11th July and 9th September 1813 in the Peninsular War: map by John Fawkes
The Second, successful, storming of San Sebastian on 31st August 1813:
After the successful Battles of the Pyrenees, Wellington resumed his efforts to take the city of San Sebastian.
Fortescue considers that Wellington’s reason for not pursuing Soult’s beaten French army into France immediately after the Battles of the Pyrenees was that he feared his own army was near the end of its tether and might well collapse from the stresses it had been forced to endure.
To the pause of two weeks in the attack on San Sebastian, a further two weeks was added, while Wellington awaited the arrival of his artillery siege train from Portugal.
Lieutenant Maguire of the 4th King’s Own Regiment leading the Forlorn Hope in the assault of 31st August 1813 in the Storming of San Sebastian between 11th July and 9th September 1813 in the Peninsular War: picture by JP Beadle
The guns arrived on 19th August 1813, with further ordnance stores on 23rd August 1813.
At around the same time the First Brigade of British Foot Guards marched in from Oporto, recovered from its epidemic of sickness.
An additional reinforcement was a new brigade from England, comprising the 66th, 84th and 85th Regiments.
The siege of San Sebastian was restarted on 22nd August 1813, with the building of two new batteries on San Bartolomeo hill.
On 26th August 1813, the British guns opened fire on the city, 15 guns on the left attack and 48 guns on the right attack.
That night, work on another battery was begun, to fire on the south-east corner of the defences.
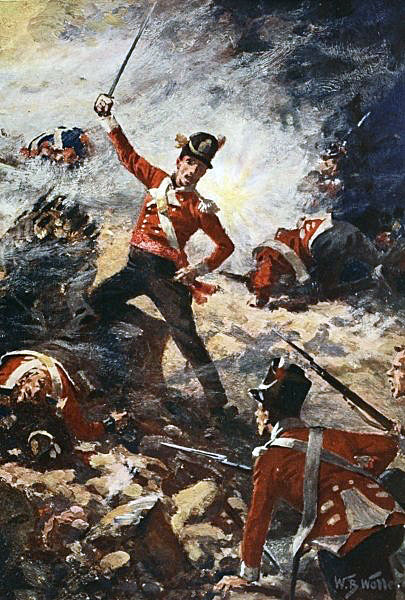
Lieutenant Colin Campbell of the 9th Regiment leading the Forlorn Hope in the First Attack on 25th July 1813 in the Storming of San Sebastian between 11th July and 9th September 1813 in the Peninsular War
The British Royal Navy captured the Island of Santa Clara in the western bay by a surprise attack and a battery mounted on the island to fire into the Castle of La Mota.
On the night of 27th August 1813, the French attempted a sortie from the city, which was repulsed.
Over the next days, the British guns subjected the city and its defences to an overwhelming bombardment.
On the night of 29th/30th August 1813, Graham mounted a feint attack, with the aim of causing the French to fire their counter-mines prematurely. This failed in its purpose.
By the afternoon of 30th August 1813, the city defences from the south-east corner of the horn work, the St Jean Bastion and a substantial length of the eastern defences had been levelled by the British gunfire.
In the early hours of 31st August 1813, the British exploded three mines under the eastern bastion of the horn work, destroying more of the fortification and providing cover for the advance of the impending assault.
To press home his criticism of the Fifth Division, Wellington required the division to conduct the day to day business of the siege, while calling for 40 volunteers from each of the battalions of the First, Fourth and Light Divisions to conduct the actual assault, in place of the Fifth Division.
General Leith, having recovered from the wound he received at the Battle of Vitoria and resumed command of the Fifth Division, had no intention of allowing Wellington’s relegation of his division to stand.
Leith ordered the volunteer contingents from the other divisions to supply the firing parties in the trenches, with the task of keeping down the fire from the garrison in the horn work, with the remainder providing a reserve for the main attacks.
47th Regiment at the Storming of San Sebastian between 11th July and 9th September 1813 in the Peninsular War: picture by William Heath
Leith ordered 1,000 men from Robinson’s brigade of the Fifth Division, drawn from the 4th, 47th and 49th Regiments, to man the two assault columns.
The right column was to storm the old breach between the two towers, Los Hornos and La Mezquitas.
The left column was to storm the breach in the bastion of St Jean.
The purpose of the second column’s attack was to outflank a new wall of rubble built by the French garrison down the inside of the outer wall from opposite the Lesser Breach to the front line.
Thick fog on 31st August 1813 delayed the attack from 8am to 11am, when the lifting fog enabled the British guns to open fire on the city and its defences.
The French garrison stood to their posts, voltigeurs and grenadiers holding the key points in the breaches, with the gunners ready to fire into the flanks of the attacking columns as they attempted to scale the breaches.
At 11am on 31st August 1813, the assault began, headed by the Forlorn Hope under Lieutenant Maguire of the 4th King’s Own Regiment. Maguire and his party ran down the seaward side of the eastern wall to gain access to the Great Breach.
Second Attack on 31st August 1813 in the Storming of San Sebastian between 11th July and 9th September 1813 in the Peninsular War
After the Forlorn Hope, a sergeant and 10 men leaped onto the covered way to cut the fuse of a land mine laid by the French garrison under the sea-wall of the eastern demi-bastion. This move startled the French into firing the mine prematurely, killing the sergeant’s party, but failing to catch the main British assault.
Once the Forlorn Hope scaled the breach, they found themselves facing a sixteen-foot drop into the city, with a maze of obstacles at the bottom, before they reached the newly built retrenchment, from which the French delivered a heavy musketry fire.
The storming party was shot down in droves, until they fell back to the base of the breach on the seafront.
The attack on the St Jean bastion encountered the same problems, with the additional afflictions of a heavy flanking fire from a party of grenadiers and two guns on their left and fire into the rear of the column from infantry and a 4 pounder gun positioned in the horn work.
Graham sent forward his reserves to maintain the attack, the balance of Robinson’s Brigade, Hay’s Brigade and the volunteers of the First and Light Divisions.
None achieved any more than the initial assault.
Faced with the inability of the two attacking columns to make any progress into the city, Graham shifted the focus of the attack to the horn work.
Working the British Batteries on the Chofre Sandhills at the Storming of San Sebastian between 11th July and 9th September 1813 in the Peninsular War: picture by J.J.Jenkins
The fifty British guns positioned on the Chofre Hills changed their target to the curtain wall between the horn work and the city. They maintained this fire for half an hour, killing numbers of the French garrison positioned on the wall and destroying sections of the wall.
The columns renewed the assaults on the breaches. Two regiments of Portuguese infantry, the 13th and the 34th, wading across the Urumea River and joining the attack, the 13th at the northern Lesser Breach and the 34th at the Great Breach.
These regiments were subjected to a heavy and telling bombardment from the French guns in the castle and situated in the St Elmo Tower as they waded the Urumea River.
A party of the 85th Regiment approached the St Elmo tower by boat, threatening to land and attack it.
In spite of these supreme efforts, the storming parties were unable to make headway into the French defences.
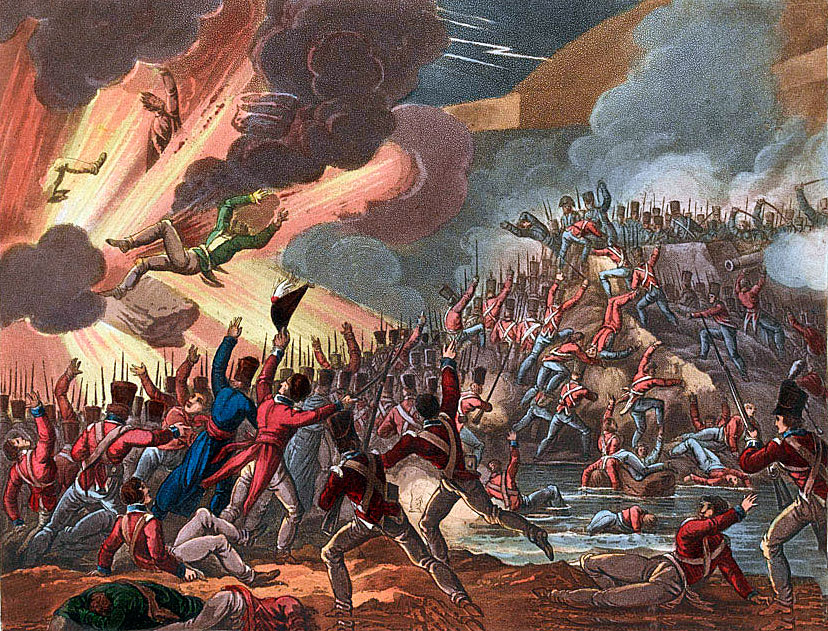
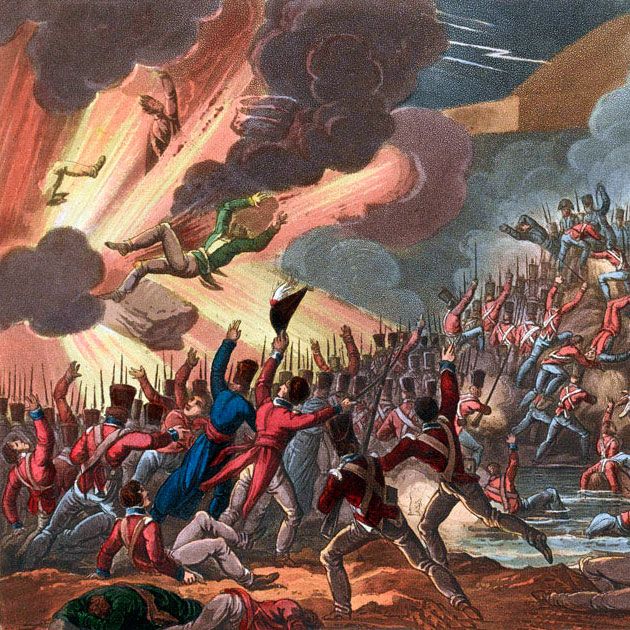
Explosion of the French expence magazine behind the Great Breach on 31st August 1813 in the Storming of San Sebastian between 11th July and 9th September 1813 in the Peninsular War
Then, through some accident, or possibly triggered by the British artillery bombardment, an expense magazine situated behind the southern end of the Great Breach exploded, hurling numbers of French troops into the air and throwing the defending troops who survived into confusion.
The British attacking column, particularly Hay’s Brigade, were able to storm the eastern end of the horn work, penetrate the curtain wall and enter the city.
At the same time, the French fell back from the defences in the Great Breach, allowing the attacking column to force its way into the city.
The Portuguese 13th Regiment penetrated the Lesser Breach and Rey realised that his desperate struggle to defend San Sebastian was lost.
The French garrison fell back to Monte Orgullo, holding only the convent of St Theresa at the foot of the hill.
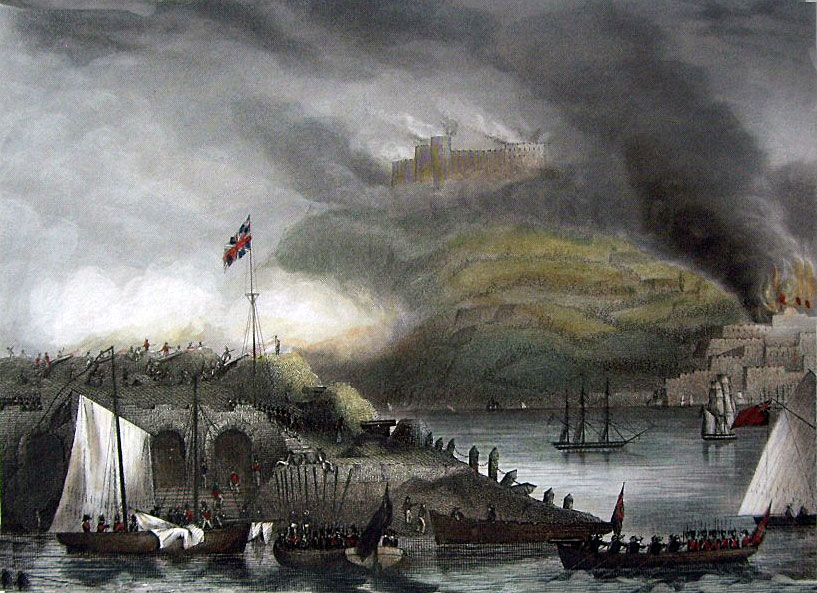
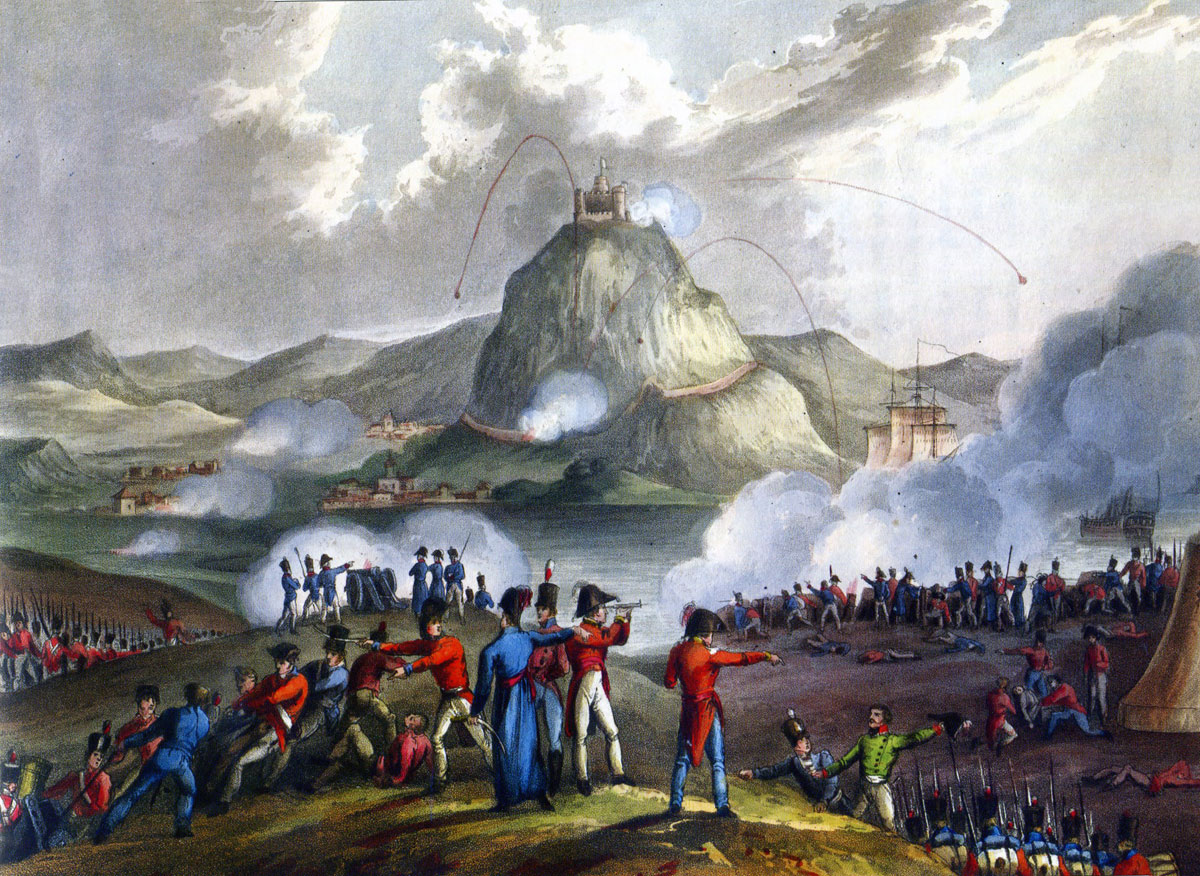
Assault on Monte Urgullo and the Castle of La Mota at the Storming of San Sebastian between 11th July and 9th September 1813 in the Peninsular War
The Final Surrender of the French Garrison of San Sebastian:
Rey’s surviving troops on Monte Orgullo numbered around 1,280, less than half the original garrison.
On 8th September 1813, 60 British guns opened fire on the French holding Monte Orgullo and the Castle of La Mota.
There was little cover on the mountain and after two hours of a terrific bombardment that destroyed all the French guns, Rey sued for terms and on the next day, 9th September 1813, his garrison marched out under the conditions of surrender.
Such was the admiration for the defence that all the French officers were permitted to retain their swords, a conventional method of marking approval for the conduct of a surrendering force.
Graham is reported as responding to Rey’s request for terms of surrender by saying ‘He can write his own.’
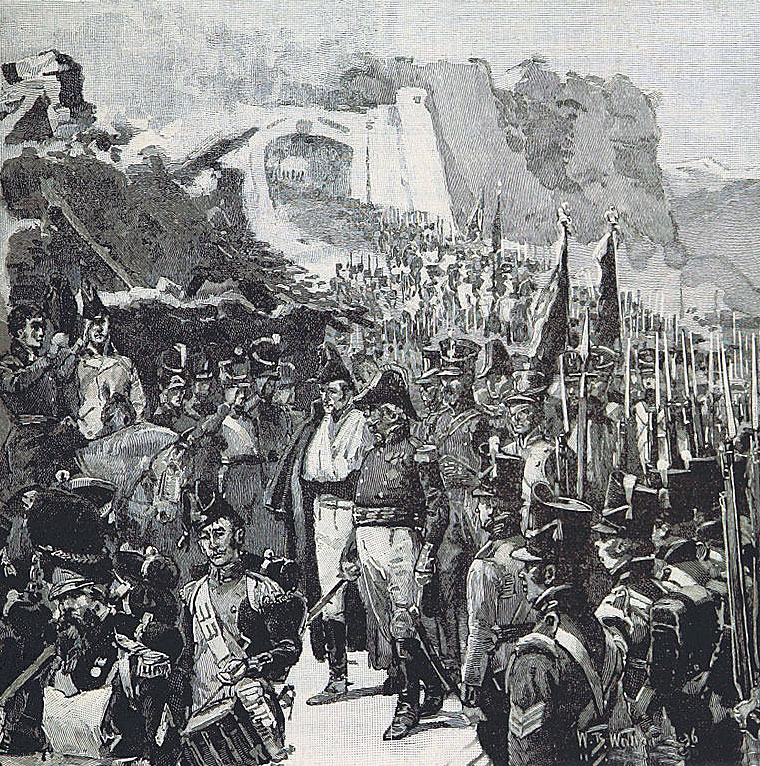
General Rey leads his surviving garrison out of the Castle of La Mota after the French surrender following the Storming of San Sebastian between 11th July and 9th September 1813 in the Peninsular War: picture by William Barnes Wollen
During the course of the final storming of San Sebastian, Wellington was compelled to fight off a second attempt to relieve the French garrison by Soult’s army; at the Battle of San Marcial.
The Aftermath of the Storming of San Sebastian:
With the French withdrawal to Monte Orgullo, the British and Portuguese troops gave themselves up to looting the burning city of San Sebastian for the next two days.
The sacking of San Sebastian is considered the worst example of indiscipline by British troops in the Peninsular War.
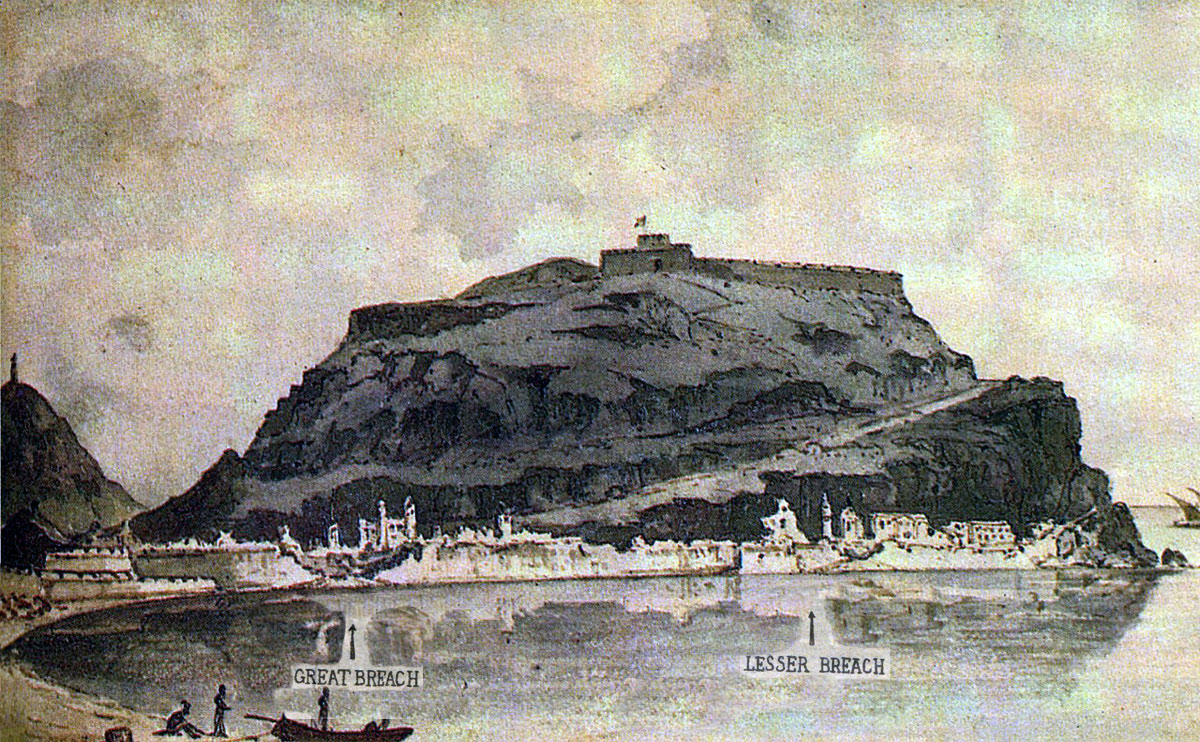
Contemporary picture of San Sebastian showing the Great Breach and the Lesser Breach after the Storming of San Sebastian between 11th July and 9th September 1813 in the Peninsular War: picture by Edward Heath
Casualties from the Storming of San Sebastian:
The City of San Sebastian was almost completely destroyed during the course of the siege and storming.
In the Fifth Division, Robinson’s Brigade lost 872 killed and wounded in the course of the siege, of which, the 4th lost 278 men, the 47th lost 252 men and the 59th lost 352 men.
In Hay’s Brigade, the Royal Scots lost 194 killed and wounded, the 9th lost 166 men and the 38th lost 132 men.
The regiments that provided the storming parties from the First, Fourth and Light Divisions suffered proportionately heavy losses, but these were limited in numbers due to the small parties of volunteers.
Lieutenant Colonel Fletcher, the chief engineer, was killed and his deputy Major Smith was wounded.
Storming of San Sebastian between 11th July and 9th September 1813 in the Peninsular War: picture by RA Westall
Generals Leith, Robinson and Oswald were all wounded in the second attack.
1,860 French troops surrendered with the fall of San Sebastian, of whom 480 were lying in hospital, ill or wounded.
670 French troops were taken prisoner in the attack of 31st August 1813.
French casualties up to 22nd August 1813 were 850 killed or wounded.
French losses as a result of the siege of San Sebastian were the 3,000 men of the garrison.
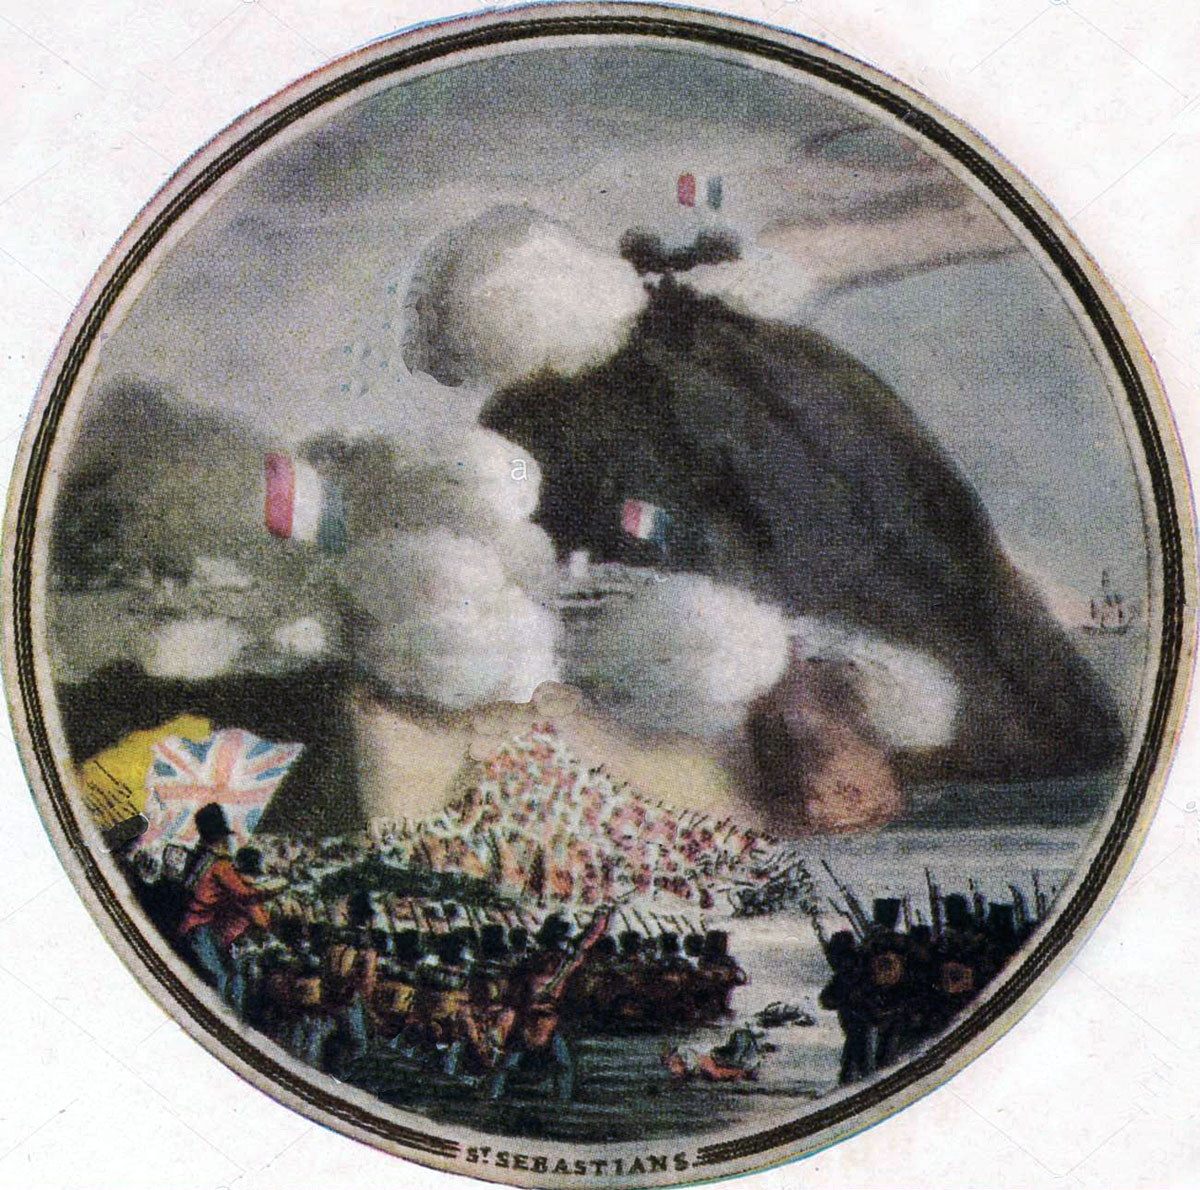
Medal commemorating the Storming of San Sebastian between 11th July and 9th September 1813 in the Peninsular War: picture by Edward Orme

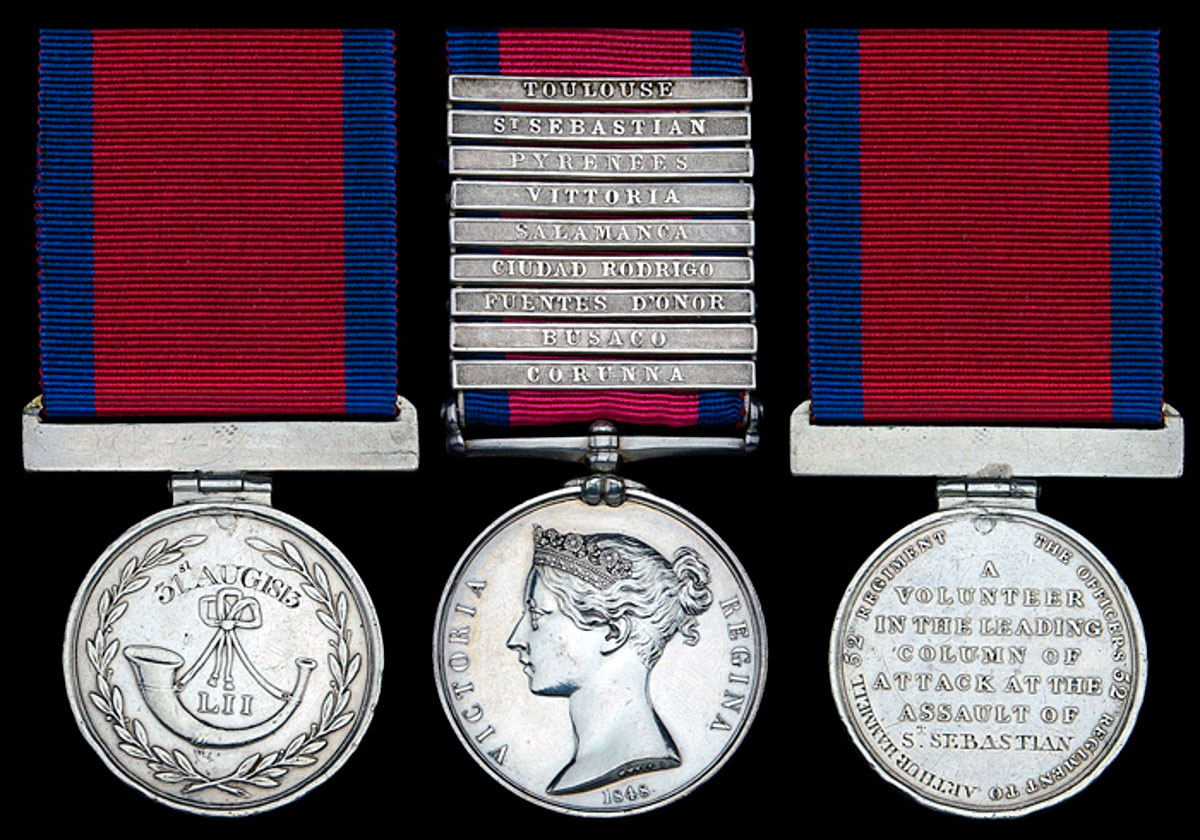
Military General Service Medal 1848 with clasp for San Sebastian: Storming of San Sebastian between 11th July and 9th September 1813 in the Peninsular War
Battle Honours and Medal for the Storming of San Sebastian:
San Sebastian became a battle honour for the following British regiments: 1st Royal Scots, 2nd, 4th King’s Own, 9th, 38th 47th and 59th.
Personnel from a number of other regiments took part in the final assault on San Sebastian. Because these men comprised detached parties of volunteers their regiments were not awarded the battle honour.
The Military General Service Medal 1848 for service in the Peninsular War and other areas was issued with a clasp for San Sebastian.
MGSM and Regimental ‘Forlorn Hope’ Medal awarded to Private Arthur Hammell of 52nd Light Infantry for the Storming of San Sebastian between 11th July and 9th September 1813 in the Peninsular War
Anecdotes and traditions from the Storming of San Sebastian:
- The French army was skilled and experienced in the conduct of sieges and the defence of cities under siege, while the British were not. The British army was highly critical of its engineers on this score. The conduct of an assault on a fortified city required considerable expertise, which the British engineers did not have. One of the points made by Fortescue is that the creation of a breach by artillery bombardment was countered by the erection of a retrenchment within the breach, usually comprising a ditch and barricade with artillery firing from the now concealed flanks and that a retrenchment was frequently stronger and more difficult to take than the original fortification destroyed by the breaching bombardment.
- The target of a breaching bombardment pointed out to the garrison where an assault was to be mounted and enabled suitable counter-measures to be put in place and men assembled. The successful assaults on Badajoz were by the two forces that converted diversionary attacks into full assaults with no preparatory bombardment or other warning, with the result that the sections of the city perimeter attacked were poorly defended.
- Judge Advocate Larpent recorded in his journal that the French garrison in San Sebastian marked Napoleon’s birthday on 15th August 1813 with a tremendous triple salvo from all the city’s guns and mortars at daybreak aimed at the besieging troops. Larpent comments that ‘the garrison are amazingly pert, from their success hitherto..’
- The Forlorn Hope in the First Attack on 25th July 1813 in the Storming of San Sebastian, was led by Lieutenant Colin Campbell of the 9th Regiment, later Lord Clyde and an important British commander in the Indian Mutiny. Campbell was severely wounded during the attack.
- The Regency artist Denis Dighton painted a large picture of the storming of San Sebastian, which appears in two sections at the top of this site. The original picture is displayed at Leith Hall in Scotland.
Storming of San Sebastian between 11th July and 9th September 1813 in the Peninsular War
References for the Storming of San Sebastian:
See the extensive list of references given at the end of the Peninsular War Index.
The previous battle of the Peninsular War is the Battle of Vitoria
The next battle of the Peninsular War is the Battle of the Pyrenees

41. Podcast on the Storming of San Sebastian: the hard-fought struggle to capture the city port on the north-east coast of Spain near the French border between 11th July and 9th September 1813 in the Peninsular War: John Mackenzie’s britishbattles.com podcasts