The British ‘Pyrrhic Victory’ on 17th June 1775 in the opening weeks of the American Revolutionary War
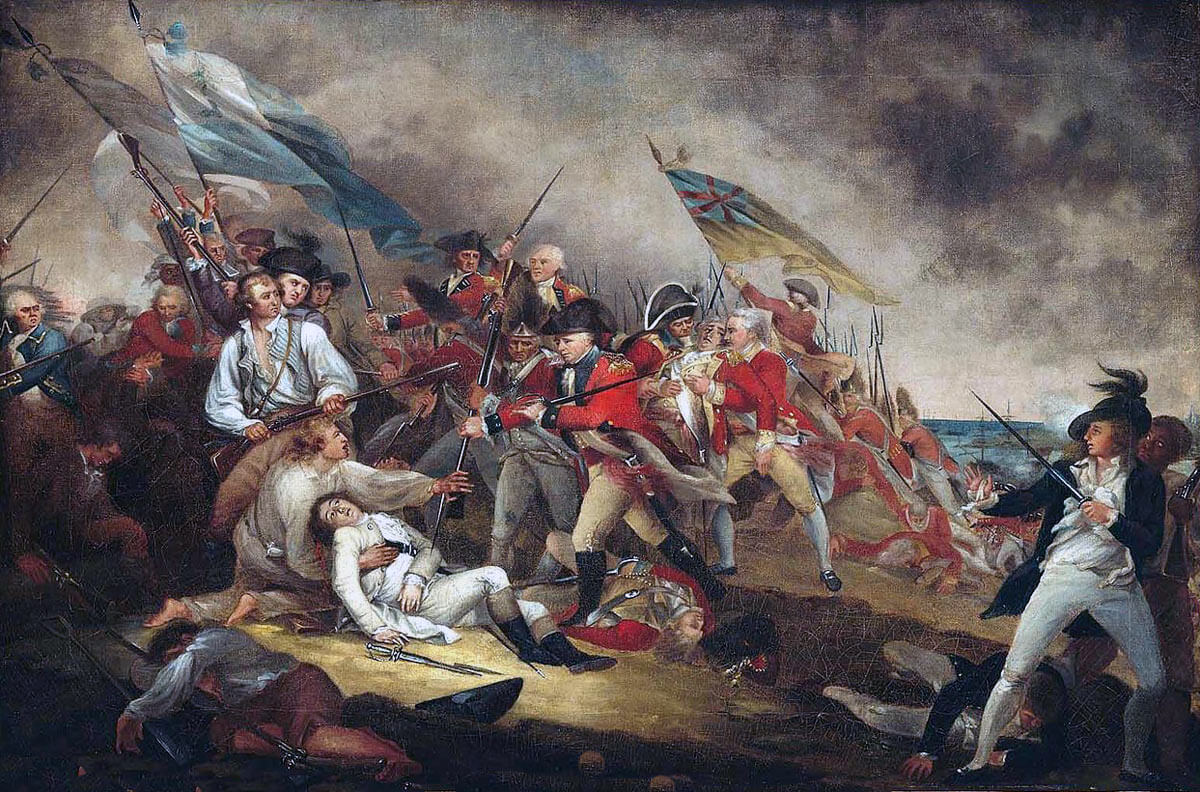
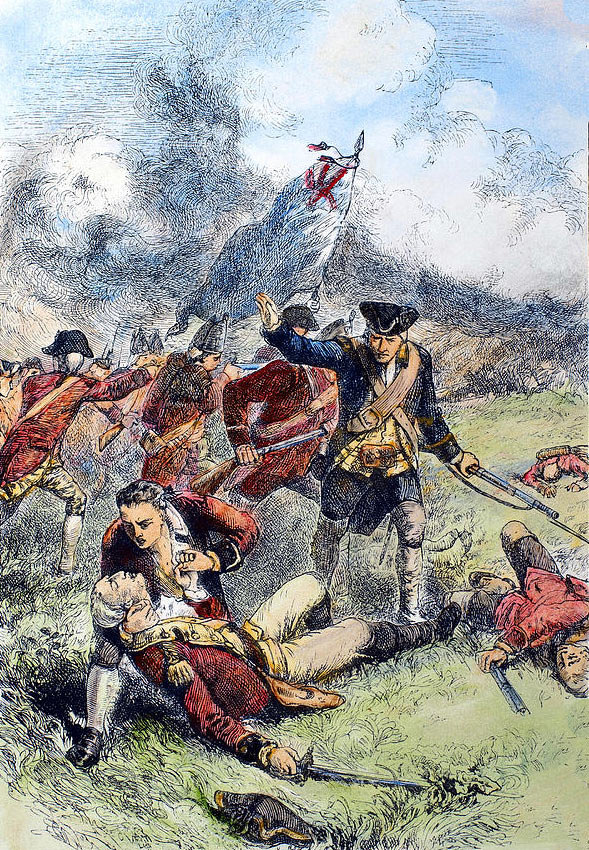
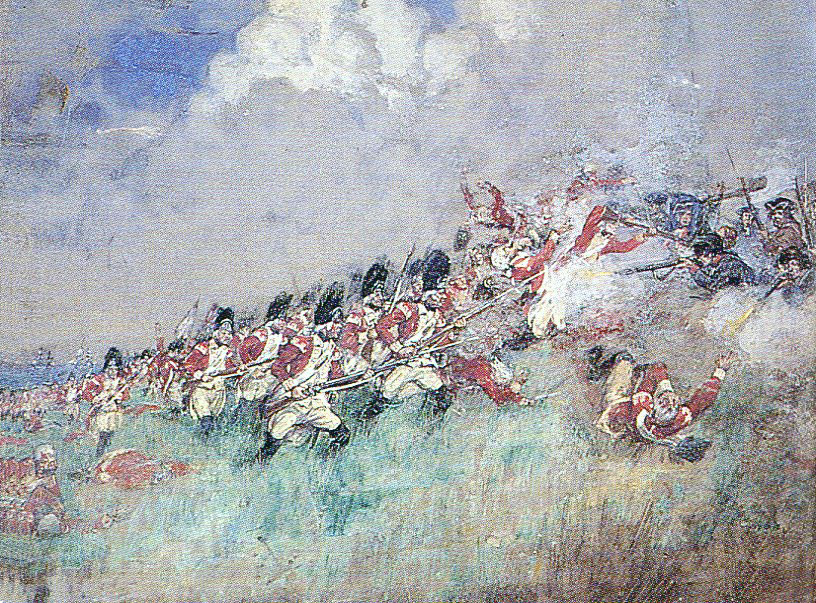
Death of General Warren at the Battle of Bunker Hill on 17th June 1775 in the American Revolutionary War: picture by John Trumbull
The previous battle of the American Revolutionary War is the Battle of Lexington and Concord
The next battle of the American Revolutionary War is the Battle of Quebec 1775
Return to the American Revolutionary War index
Battle of Bunker Hill on 17th June 1775 in the American Revolutionary War
Battle: Bunker Hill
War: American Revolution
Date of the Battle of Bunker Hill: 17th June 1775
Place of the Battle of Bunker Hill: On the Charlestown Peninsula on the north side of Boston Harbour.
Battle of Bunker Hill on 17th June 1775 in the American Revolutionary War
Combatants at the Battle of Bunker Hill: British troops of the Boston garrison against troops of the American Continental Army.
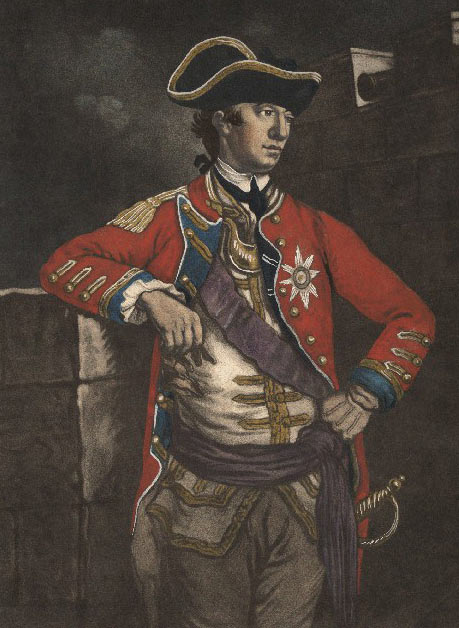
Major-General William Howe, British Commander: Battle of Bunker Hill on 17th June 1775 in the American Revolutionary War
Generals at the Battle of Bunker Hill: Major-General William Howe against General Artemas Ward and General Israel Putnam.
Size of the armies at the Battle of Bunker Hill: 2,400 British troops against 1,500 Americans.
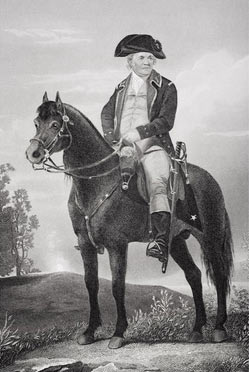
General Israel Putnam, American Commander: Battle of Bunker Hill on 17th June 1775 in the American Revolutionary War: picture by Alonzo Chapell
Uniforms, arms and equipment at the Battle of Bunker Hill: The British grenadiers, light infantry and battalion company men wore red coats. The headgear of the companies was bearskin fronted mitre caps for the grenadiers, tricorne hats (with the front partially flattened, in the Prussian style) for the battalion companies and caps for the light infantry. The British troops were armed with muskets and bayonets. The British had light guns and were supported by the heavy guns of the fleet. The Americans were armed with muskets or whatever firearms they could obtain, a few bayonets and some light guns.
Winner of the Battle of Bunker Hill: While the British drove the Americans from the Charlestown peninsula, it was with heavy loss. The battle was at the time considered to be an American defeat, but has since been lifted to the ranks of a heroic stand against the forces of oppression.
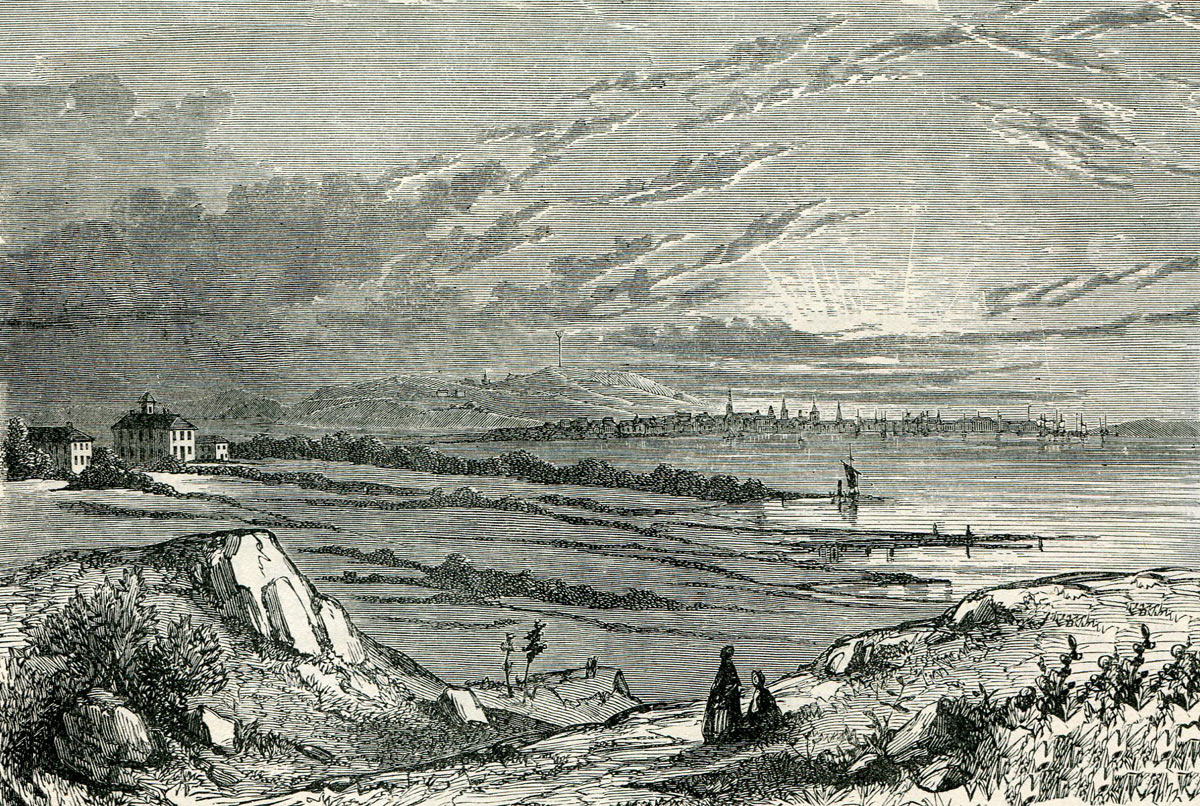
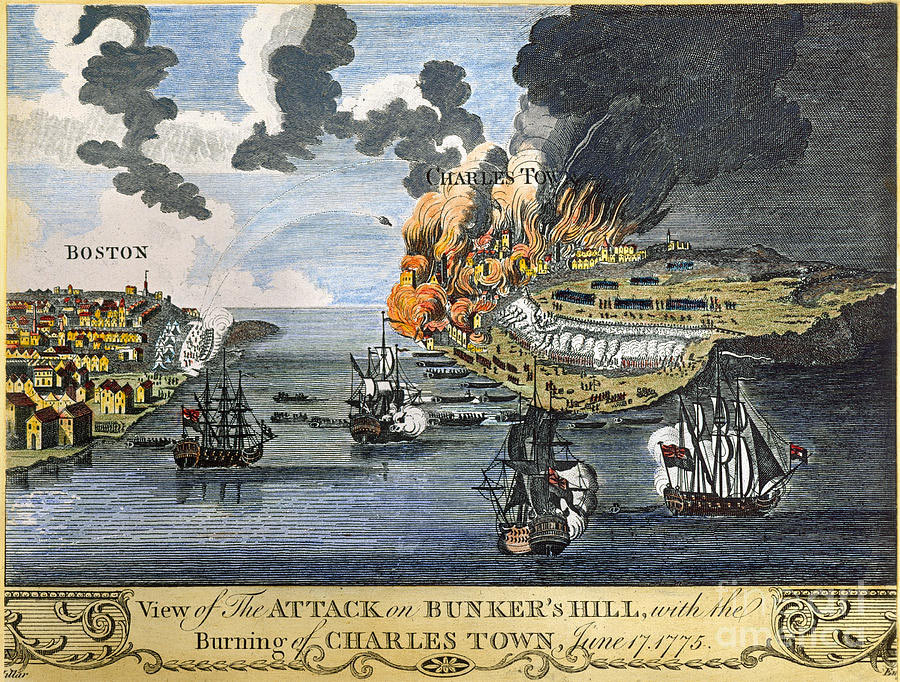
Boston : Battle of Bunker Hill on 17th June 1775 in the American Revolutionary War
British Regiments at the Battle of Bunker Hill:
The flank companies (grenadiers and light companies) of the 4th, 10th, 18th, 22nd, 23rd, 35th, 59th, 63rd and 65th Regiments of Foot and detachments of Marines from the Fleet.
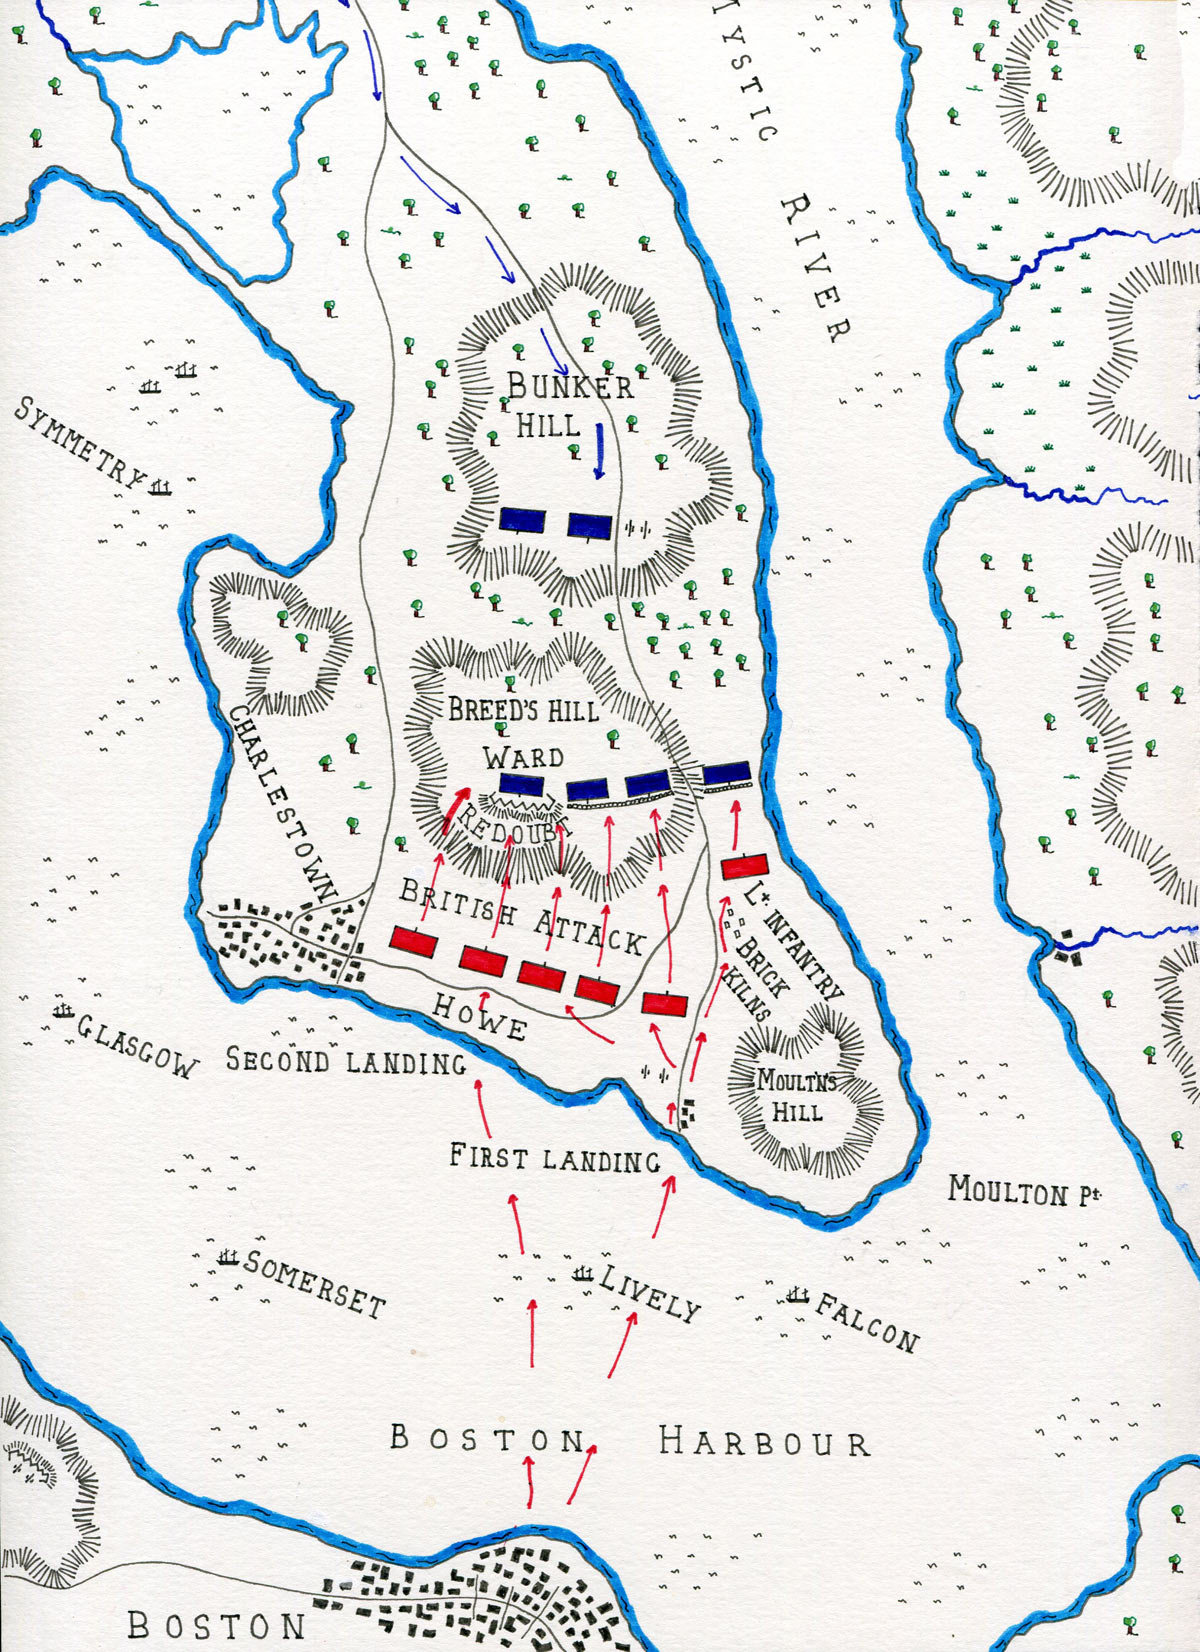
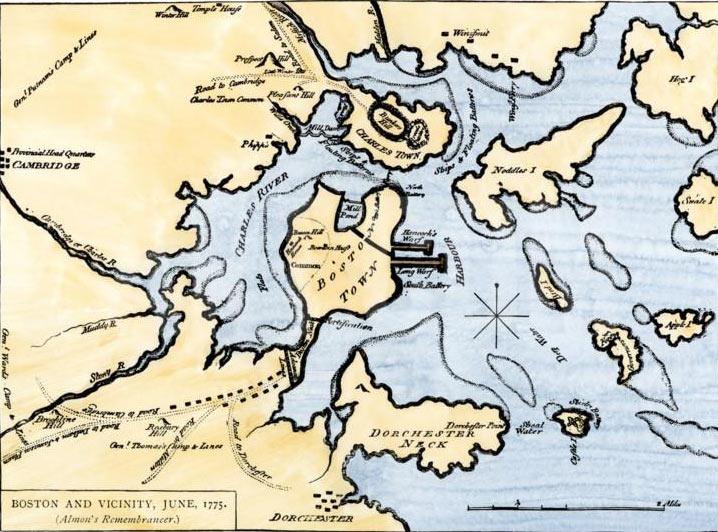
Map of the Battle of Bunker Hill on 17th June 1775 in the American Revolutionary War: map by John Fawkes
Account of the Battle of Bunker Hill: With the outbreak of the American Revolutionary War, General Gage, the British commander-in -chief in the American Colonies, found himself blockaded in Boston by the American Continental Army occupying the hills to the west of the city. Gage resolved to seize the Charlestown peninsula across the harbour. Before he could act, on the night of 16th June 1775, around 1,500 American troops of the Massachusetts regiments and Putnam’s Connecticut regiment occupied Breed’s Hill and Bunker Hill on the peninsula.
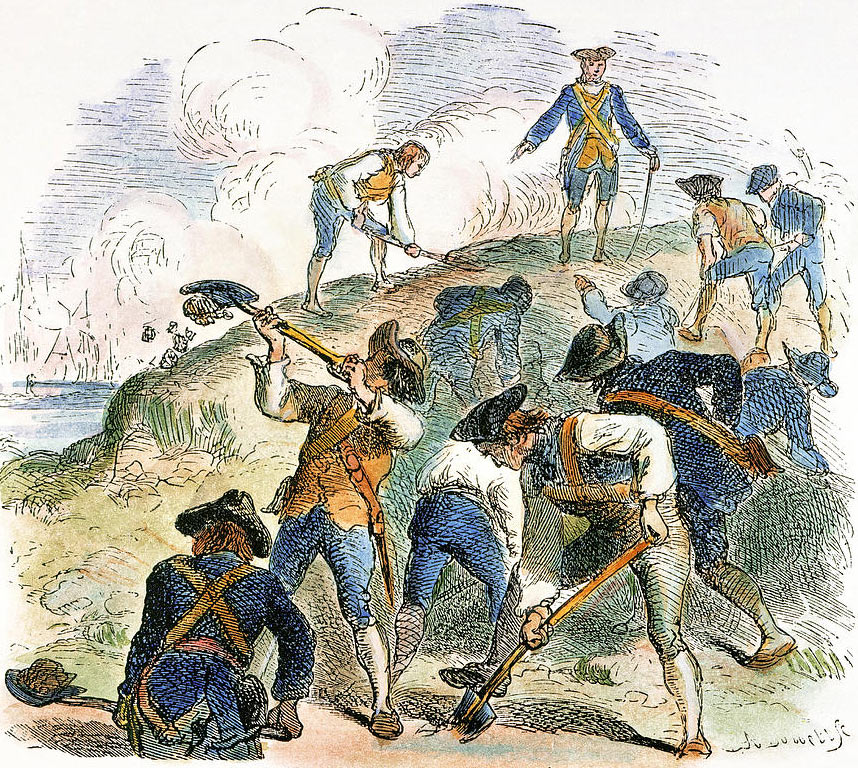
American troops building the redoubt on Breed’s Hill: Battle of Bunker Hill on 17th June 1775 in the American Revolutionary War
The American troops began to build a redoubt on Breed’s Hill. The fortification was complete by the morning, after a night of frenzied work. The presence of the Americans on the peninsula was observed by His Majesty’s Ship Lively which opened fire on them.

Officer of 4th King’s Own Regiment: Bunker Hill on 17th June 1775 in the American Revolutionary War
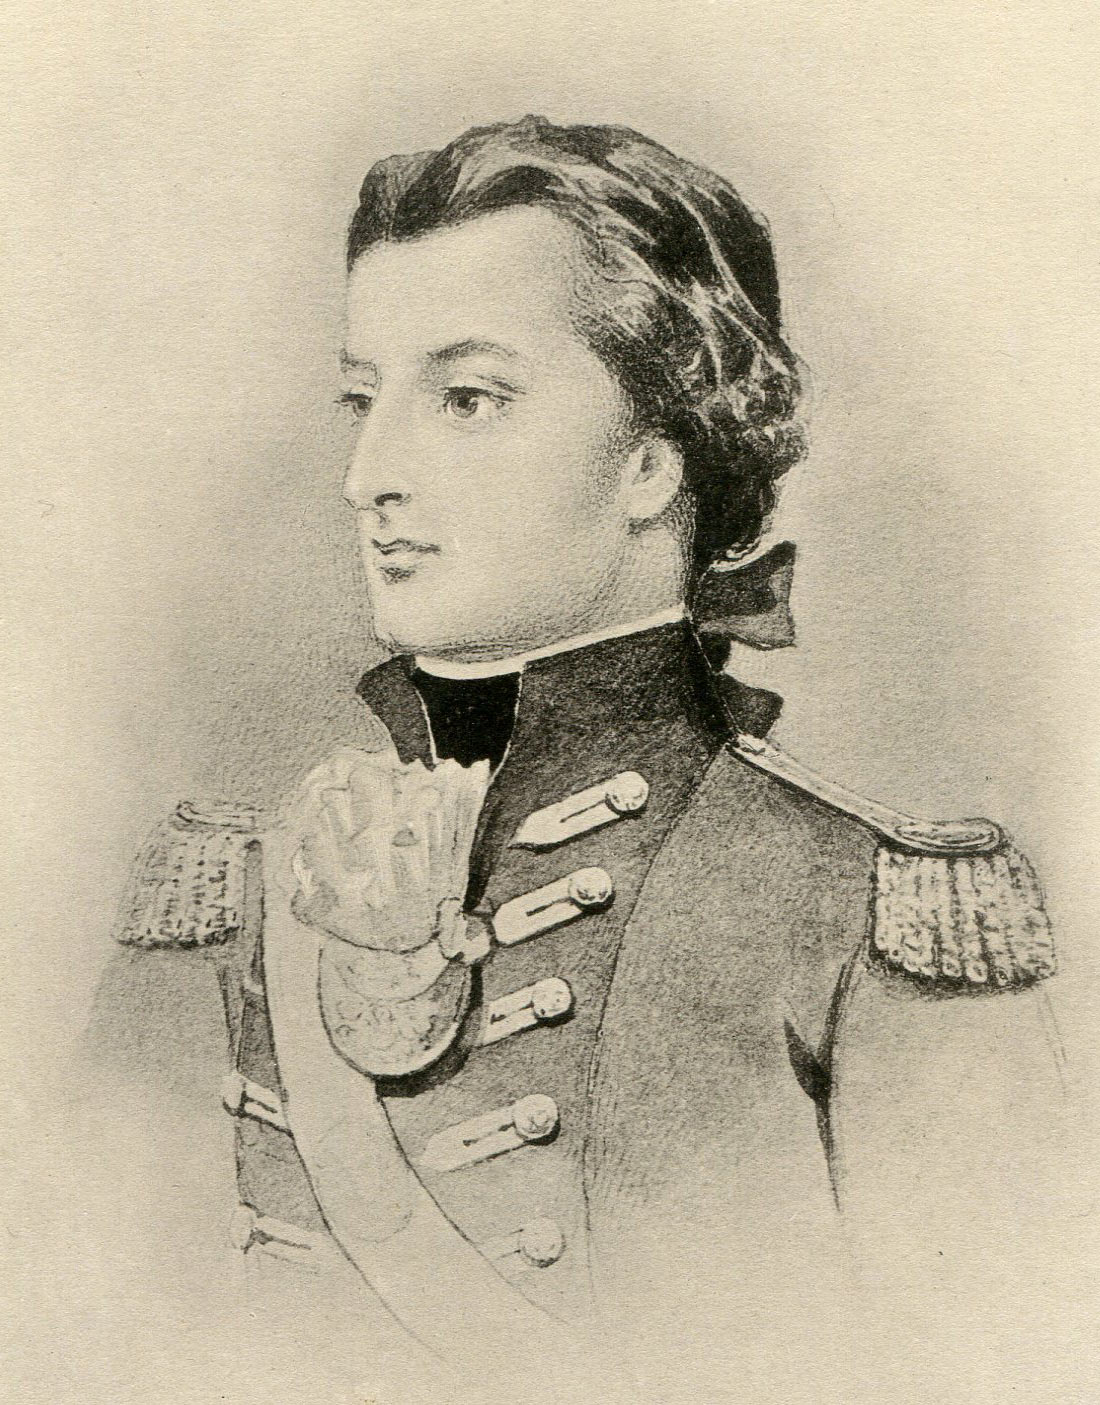
Captain William Glanville Evelyn of 4th King’s Own Regiment: fought at Battle of Bunker Hill on 17th June 1775 in the American Revolutionary War and died in New York in October 1776
Plans were hurriedly put in motion by the British to attack the Americans and drive them from their position. Major General Howe, one of the three generals sent from Britain to assist General Gage, was given the command.
While the preparations for the British attack were in train, the Americans extended their fortifications from the redoubt to the sea shore, to prevent a flank attack. More American troops gathered on Bunker Hill but few of them could be persuaded to move to the forward positions on Breed’s Hill.
Howe landed with his force on the southern shore of the peninsular and directed the light infantry to attack the section of American line at the sea shore. Gage and Howe would have been well advised to have landed in the rear of the American position. It is likely that the British senior officers discounted the ability of the American troops to resist a frontal attack and overestimated the ability of their own troops to make one.
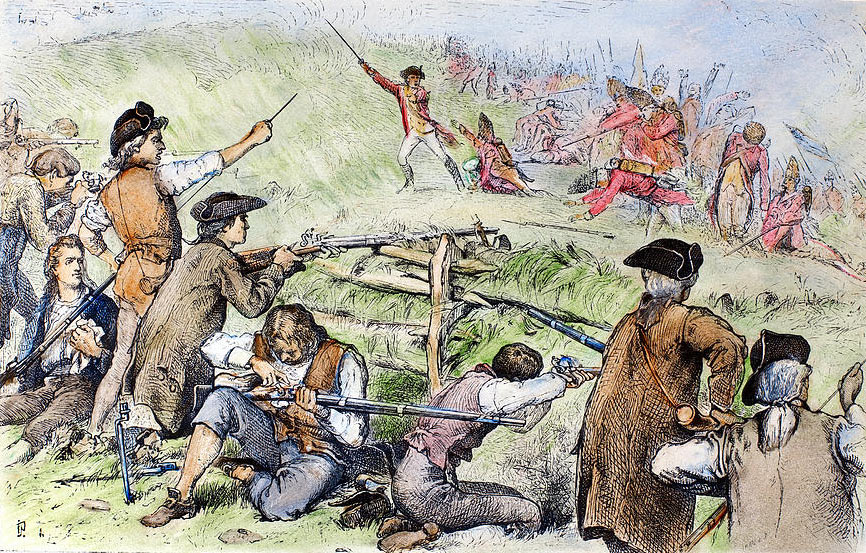
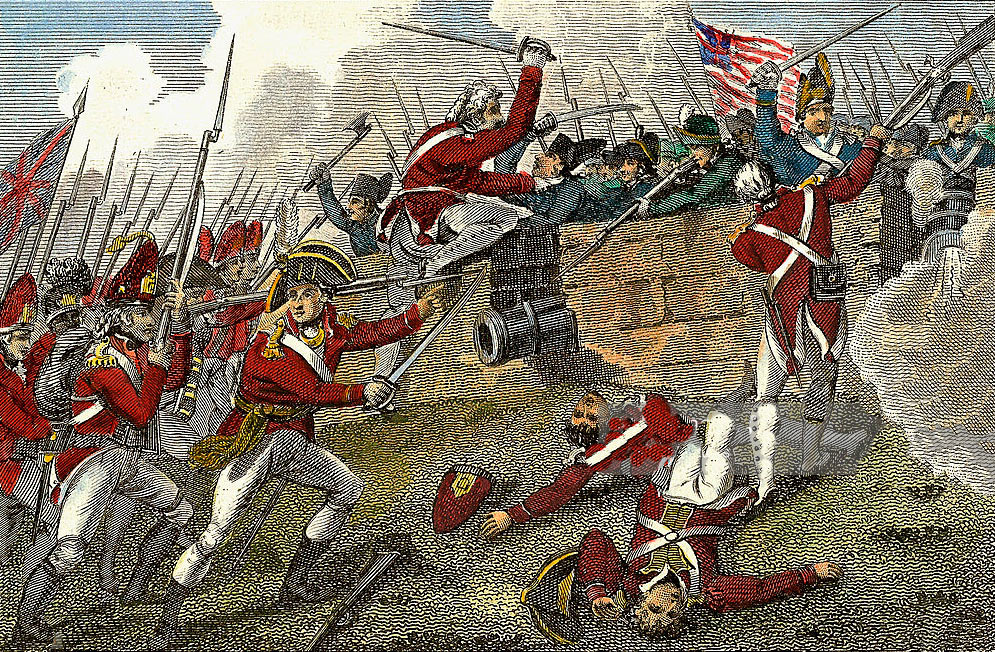
American troops repel the first British attack on Breed’s Hill: Battle of Bunker Hill on 17th June 1775 in the American Revolutionary War: picture by Charles Henry Granger
The British light infantry column was repelled with heavy casualties. General Howe now launched a frontal assault on the redoubt with the main body of his troops. This attack was driven back with heavy loss, despite an American shortage of ammunition. During the attack, the British left wing suffered from the fire of Americans in the town of Charlestown and the town was set ablaze.
The attacks should have been preceded by a bombardment from the British field artillery, but it was found that the 6 pounder guns had been supplied with 12 pounder balls.

Battle of Bunker Hill on 17th June 1775 in the American Revolutionary War: picture by John Fawkes
A second British attack was launched along the length of the American entrenchments and was again driven back with heavy loss.

General Artemas Ward, American Commander: Battle of Bunker Hill on 17th June 1775 in the American Revolutionary War
A final attack was made, concentrating on the redoubt and centre of the American position. The American ammunition was all but exhausted and this final assault carried the redoubt, forcing the Americans to retreat and leave the peninsula. They were not vigorously pursued.
Casualties: The British suffered some 1,150 killed and wounded, or nearly half of the force engaged. The American casualties were estimated at 450 killed and wounded.
Follow-up: The British took over the Bunker and Breed’s Hill positions and fortified them, holding them until they evacuated Boston at the end of the year. The battle was the first action for the American Continental Army and showed how much work there was to be done to mould it into an effective army. While most of the soldiers in the entrenched works fought tenaciously, the intended reinforcements on Bunker Hill refused to advance to the support of their comrades. In addition, there was confusion between the American officers as to precedence and who could give orders to whom.
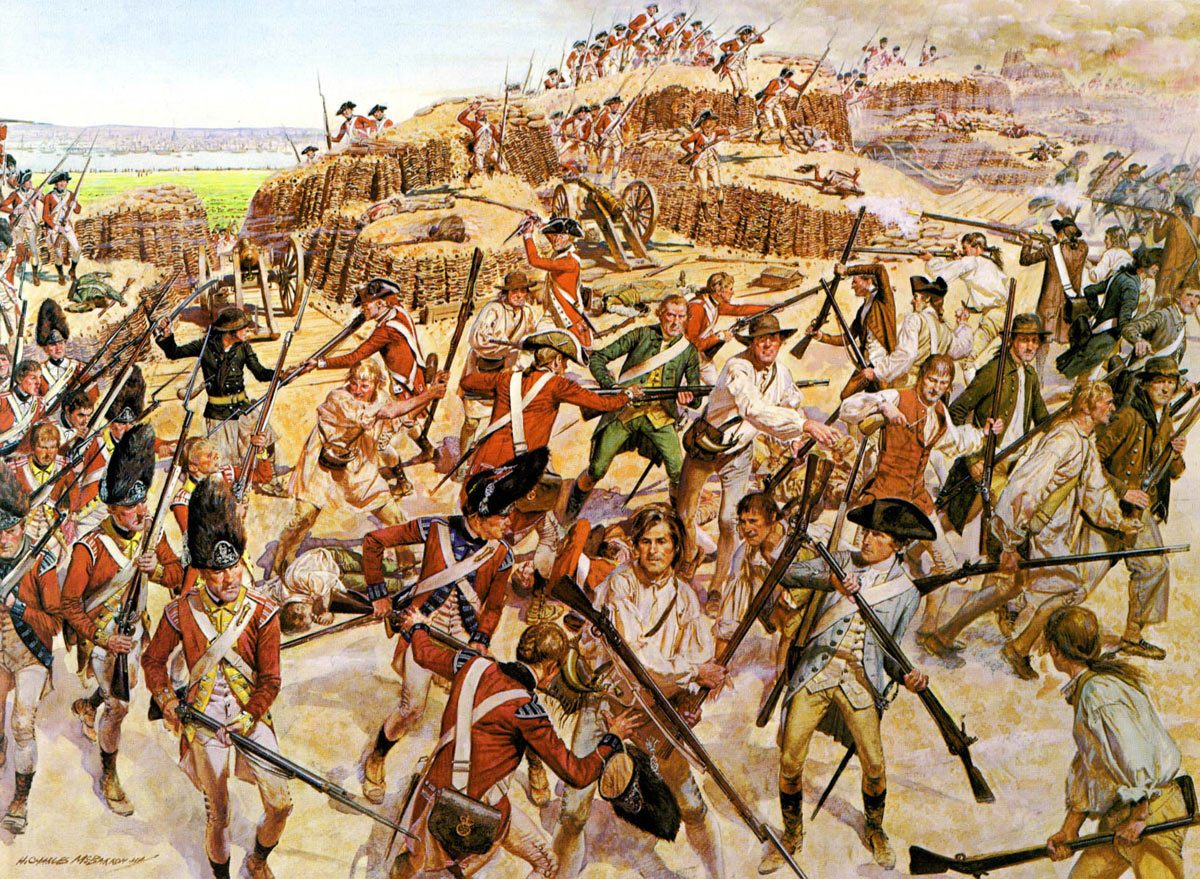
British Attack on Breed’s Hill: Battle of Bunker Hill on 17th June 1775 in the American Revolutionary War
The battle had several lessons for the British. The senior officers had little idea how to conduct a battle with any degree of sophistication. Howe learnt his mistake in making a frontal assault. At every subsequent battle, where possible, he carried out flanking assaults. The British troops were in disciplined and disorganised. The guns for which the wrong ammunition was provided were almost certainly battalion weapons manned by foot rather than Royal Artillery.
For both sides, Bunker Hill was the start of a journey in military education.
Anecdotes from the Battle of Bunker Hill:
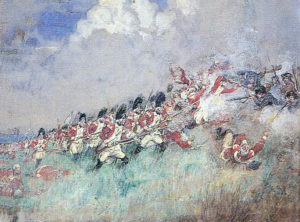
- The illustration of the line of grenadiers given below is misleading. It is likely that the soldiers could not be brought to press the attack properly, until the final assault, for which they were ordered to leave their packs and to advance without firing.
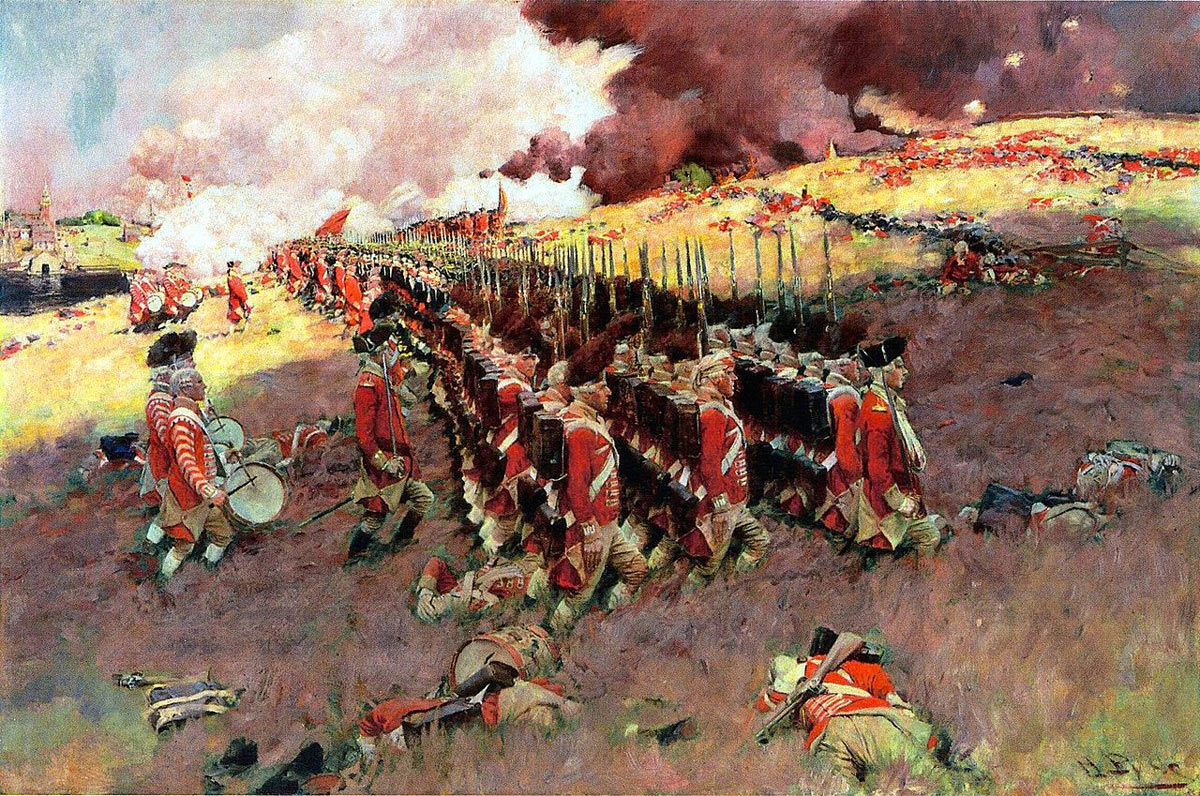
British Grenadiers at the Battle of Bunker Hill on 17th June 1775 in the American Revolutionary War: picture by Howard Pyle
- It is unlikely that the British troops were capable of drill of the precision suggested by the picture or even the smart turnout illustrated.
- The use of the flank companies (grenadiers and light infantry) is a suggestion that these companies may have been the only sections of the battalions considered reliable.
- It is an understandable feature of accounts of the American Revolution that the British forces are portrayed as more competent and disciplined than in fact they were. One of the causes of discontent in New England prior to the war was the indiscipline and oppressive behaviour of British regular troops.
Death of Major John Pitcairn of the British Marines at the Battle of Bunker Hill on 17th June 1775 in the American Revolutionary War: picture by Charles Henry Granger
- Major John Pitcairn of the British Marines was killed at the Battle of Bunker Hill as he prepared to lead his men up the hill in support of the army companies. Major Pitcairn commanded the advance guard at the Battle of Lexington and Concord and is said to have fired the first shots of the war with his pistols on Lexington Green. The fatally wounding of Major Pitcairn is shown in the John Trumbull picture at the head of this site. Pitcairn falls into the arms of his son, also an officer in the Marines. Pitcairn died of his wounded in Boston after the battle.
-
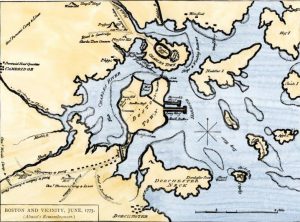
Map of Boston Harbour: Battle of Bunker Hill on 17th June 1775 in the American Revolutionary War
The American commander, Artemas Ward, from Shrewsbury, Massachusetts, was an active militia officer in the French and Indian War. Subsequently outspoken against British rule, Ward’s militia commission was revoked by the Governor of Massachusetts. Ward’s militia regiment resigned en masse from Royal service and Ward was appointed commander of the Massachusetts militia by the colony’s newly elected Committee for Public Safety.
- General Israel Putnam, from Mortlake, Connecticut, and known as ‘Old Put’, was a veteran of the French and Indian War, taking part in the disastrous attack on Fort Ticonderoga in 1758 and being shipwrecked during the British capture of Havana in 1762. Putnam was captured by Mohawk Indians in 1758 and being ritually burnt alive when the fire was extinguished by a rain storm and a French officer insisted on his release. Putnam suffered further burn injuries when firing on the enemy from a burning roof. With the outbreak of the American Revolutionary War, Putnam was appointed major-general and second in command of the Americans on Breeds Hill. Putnam is reputed to have killed the last wolf in Connecticut in 1743.
43rd Regiment at the Battle of Bunker Hill on 17th June 1775 in the American Revolutionary War
- Dr Joseph Warren, a Boston physician, was killed at the Battle of Bunker Hill and his death was the subject for John Trumbull’s picture (see above). Warren was a leading revolutionary in Boston. He was appointed major-general of militia by the Massachusetts Provincial Congress, but chose to serve at Bunker Hill as a private, acknowledging his lack of military experience. Warren’s death is said to have galvanized the American colonies in support of the revolution.
References:
- History of the British Army by Sir John Fortescue
- The War of the Revolution by Christopher Ward
The previous battle of the American Revolutionary War is the Battle of Lexington and Concord
The nrxt battle of the American Revolutionary War is the Battle of Quebec 1775
Return to the American Revolutionary War index