Frederick’s victory on 3rd November 1760 over the Austrian and Saxon Army of Marshal Daun that brought the end of the Seven Years War in sight
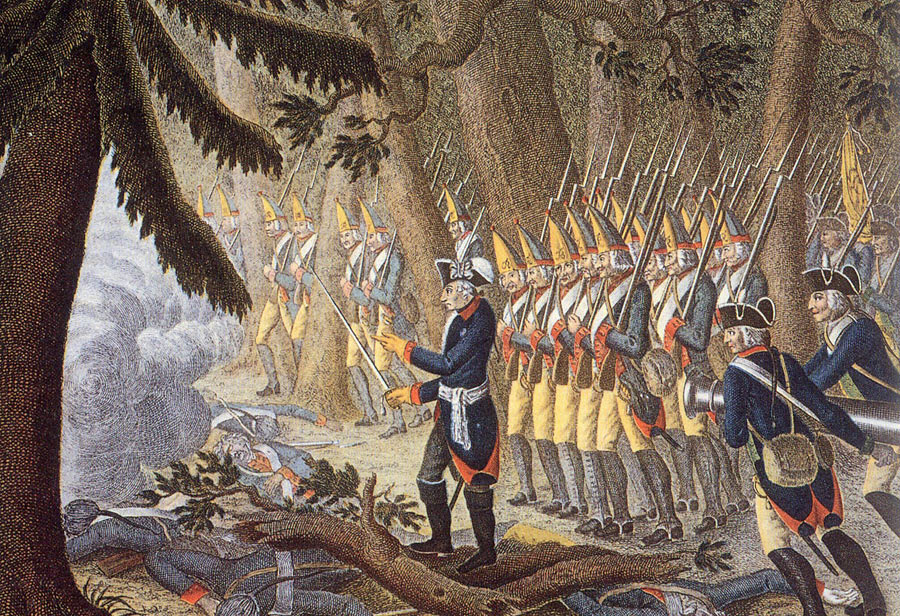
Frederick the Great leads his Grenadier Battalions to the attack at the Battle of Torgau on 3rd November 1760 in the Seven Years War
The previous battle in the Seven Years War is the Battle of Liegnitz
The next battle in the Seven Years War is the Battle of Burkersdorf
Battle: Torgau
Date of the Battle of Torgau: 3rd November 1760
Place of the Battle of Torgau: At the town of Torgau in Saxony on the west bank of the Elbe River to the North of Dresden.
War: The Seven Years War.
Contestants at the Battle of Torgau: Prussians against an Imperial Austrian Army comprising the various nationalities that made up the Austrian Army (Austrians, Hungarians, Bohemians, Silesians, Croats, Italians and Moravians) with a Saxon contingent.
Generals at the Battle of Torgau: King Frederick II of Prussia, known as Frederick the Great, commanding the Prussian Army against Marshal Daun commanding the Austrian and Saxon Army.
Size of the Armies at the Battle of Torgau: Prussians: 35,000 infantry, 13,500 cavalry and 309 guns. Austrians: 42,000 infantry, 10,000 cavalry and 275 guns.
Winner of the Battle of Torgau: The Prussians, albeit with very heavy losses.
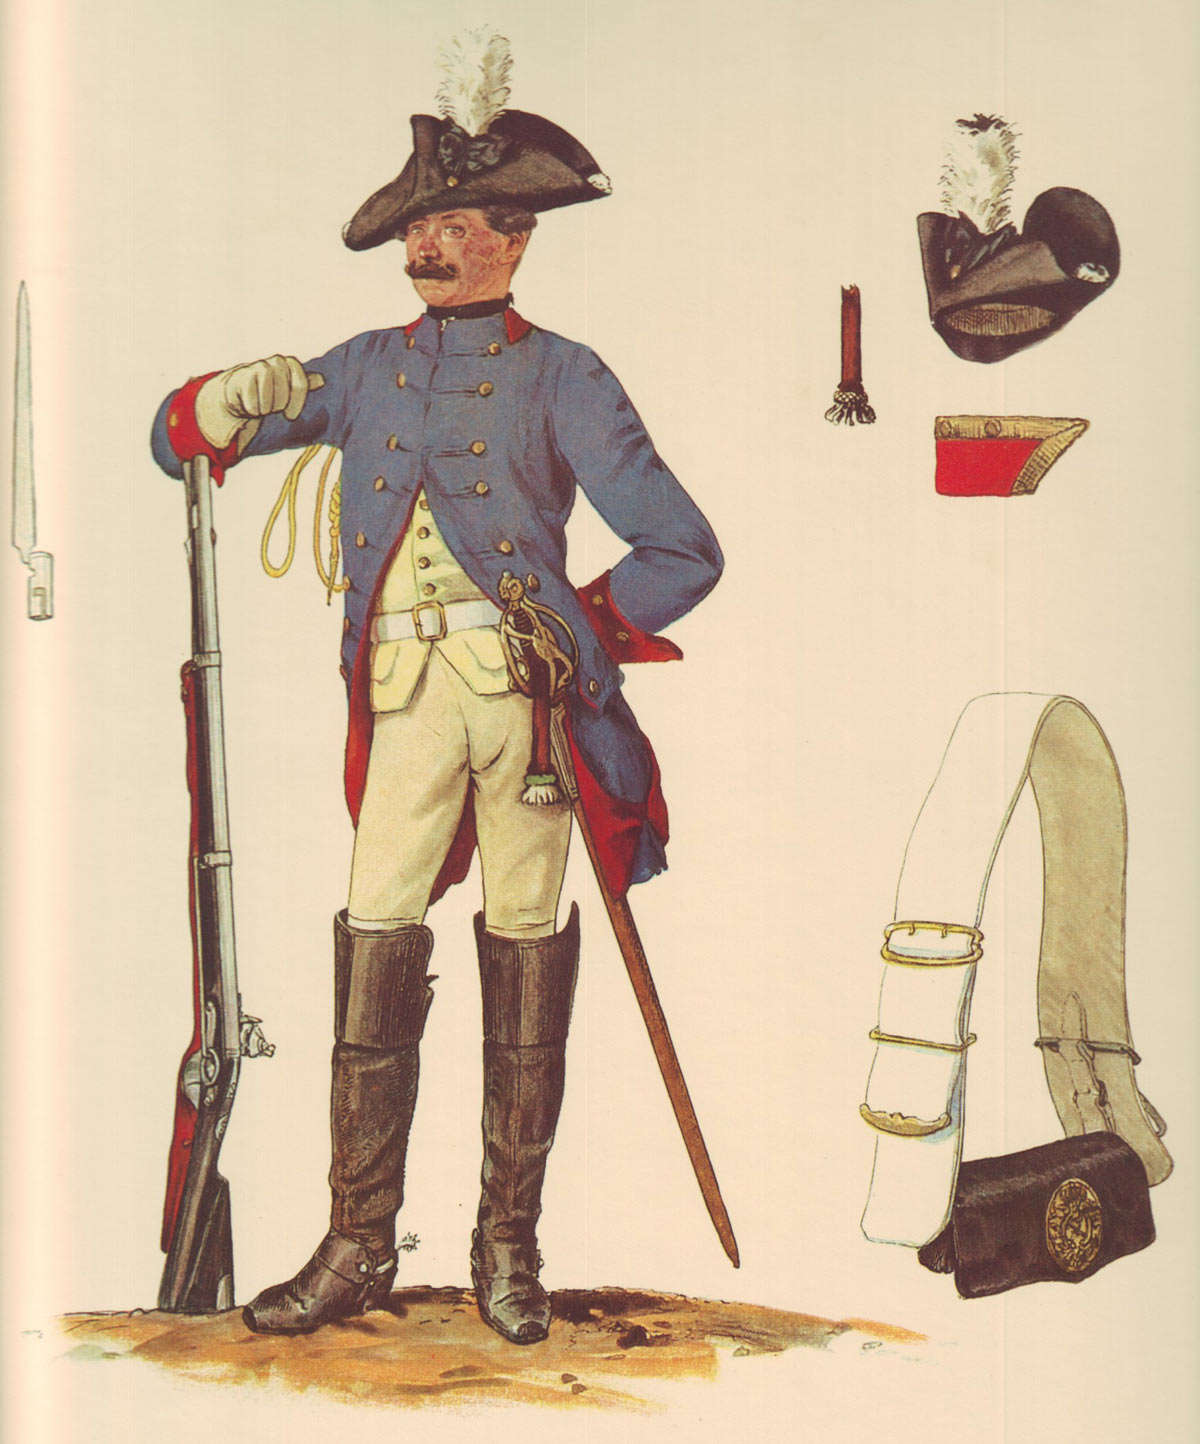
Prussian Dragoner-Regiment von
Plettenberg No 8: picture by Adolph Menzel as part of his series of pictures ‘Die Armee Friedrichs des Grossen in ihrer Uniformierung’
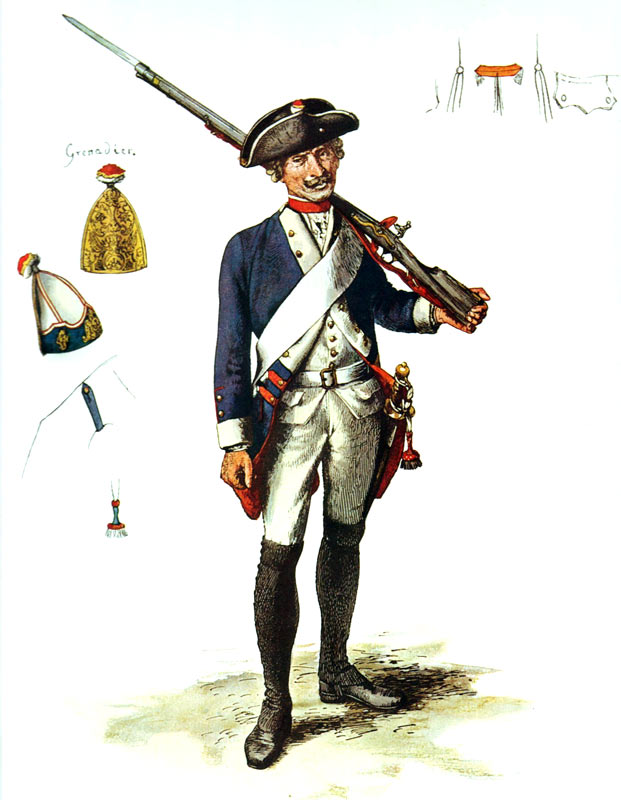
Uniforms and equipment: The Prussian infantry and artillery wore a dark blue coat turned back at the lapels, cuffs and skirts with britches and black thigh length gaiters. From cross belts hung an ammunition pouch, bayonet and ‘hanger’ or small sword. Headgear for the line companies was the tricorne hat with the receding front corner bound with white lace. Grenadiers wore the distinctive mitre cap with the brass plate at the front. Fusilier Infantry Regiments and gunners wore the smaller version of the grenadier cap.
The infantry carried the musket as their main weapon. The single shot musket could be loaded and fired by a well trained soldier between 3 and 4 times a minute. During the course of his wars Frederick introduced the iron ramrod and then the reversible ramrod which increased the efficiency of his infantry, the wooden ramrod being liable to break in the stress of battle.
The Prussian infantry regiment was based on the cantonment, with soldier joining their local regiment. Soldiers were released for key agricultural times such as sewing and harvesting. In the autumn reviews were conducted of all regiments to check that each regiment was up to the required standard. Each year certain regiments were selected to conduct the review at Potsdam under the eye of the King. Officers whose soldiers were considered by Frederick not to be of a sufficient standard were subjected to a public tongue lashing and in extreme cases dismissed on the spot.
Prussian Pioneer Regiment No 49: picture by Adolph Menzel as part of his series of pictures ‘Die Armee Friedrichs des Grossen in ihrer Uniformierung’
The efficiency of the Prussian regiments at drill enabled them to move around the battlefield with a speed and manoeuvrability that no other European Army could equal.
Heavy cavalry of the period comprised cuirassiers, whose troopers wore steel breastplates, and dragoons. The main form of light cavalry were the regiments of hussars. The Austrian hussars were Hungarian and the genuine article while the hussars of other armies were given the same dress as Hungarian hussars and expected to perform to similar standards.
The Prussian cuirassiers wore a white coat, steel cuirass, white britches and thigh boots. The headgear was the tricorne hat. Dragoons wore a light blue coat. Weapons were a heavy cavalry sword and single shot flintlock carbine.
The light cavalry arm was provided by the Prussian Hussar regiments. Frederick found the Prussian Hussars as inadequate for their role as the heavy cavalry regiments. Following Mollwitz and in particular after the First Silesian War the hussars were re-organised and re-trained to provide a first class scouting and light cavalry service. Frederick found in Colonel von Zieten the ideal officer to implement the improvements in the hussar regiments. The Prussian Hussars wore the traditional hussar dress worn by the original Hungarian Hussars of tunic, britches, dolman (slung jacket), busby (fur hat) with bag, sabretache (leather wallet on straps) and curved sword.
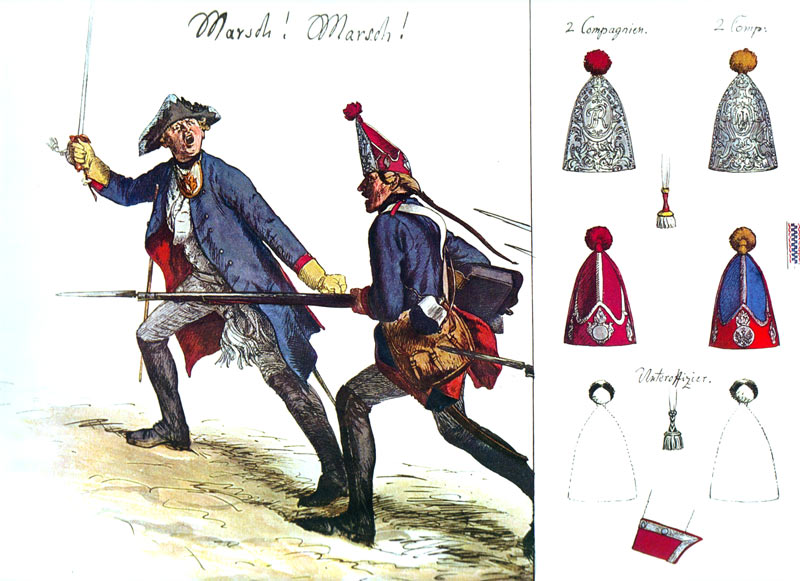
Prussian Königsbergsches Grenadier-Bataillon No 4: picture by Adolph Menzel as part of his series of pictures ‘Die Armee Friedrichs des Grossen in ihrer Uniformierung’
The Austrian infantry wore white coats with lapels, cuffs and skirts turned back showing the regimental lining colour. Headgear was the tricorne hat for line infantry and bearskin cap for grenadiers. The infantry weapons were musket, bayonet and hanger small sword. Heavy cavalry wore white coats and hats as for the infantry and were armed with a heavy sword and carbine. The Austrian army contained a large number of irregular units such as the Pandours from the Balkans who wore their ethnic dress without uniformity. Hungarian Hussars provided the light cavalry arm. These Hussars were dressed as described for the Prussian Hussars, were considered to be little more than bandits but were highly effective in all the roles required of light cavalry.
Frederick the Great on the night before the Battle of Torgau on 3rd November 1760: picture by Bernhard Rhode
The artillery of each army was equipped with a range of muzzle loading guns. The Prussian Artillery was considerably more efficient at manoeuvring on the battle field. In the changes implemented by Frederick after the First Silesian War horse artillery was introduced to support the Prussian cavalry.
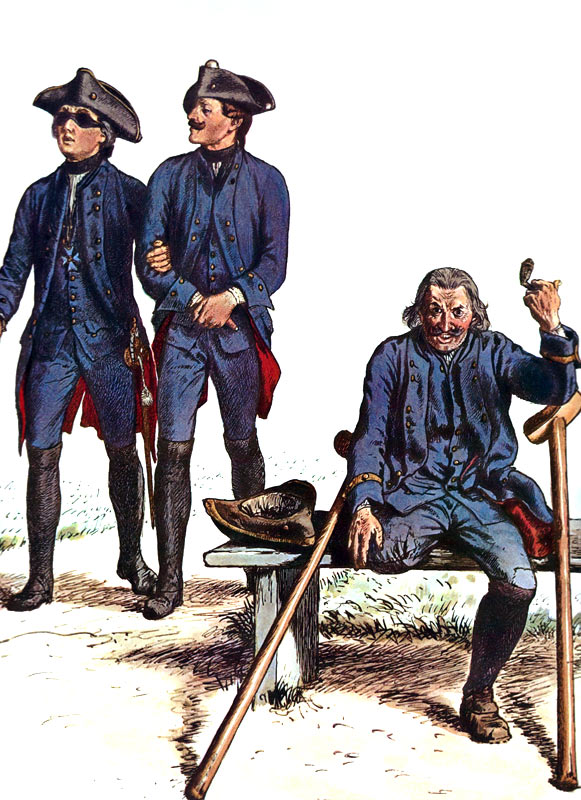
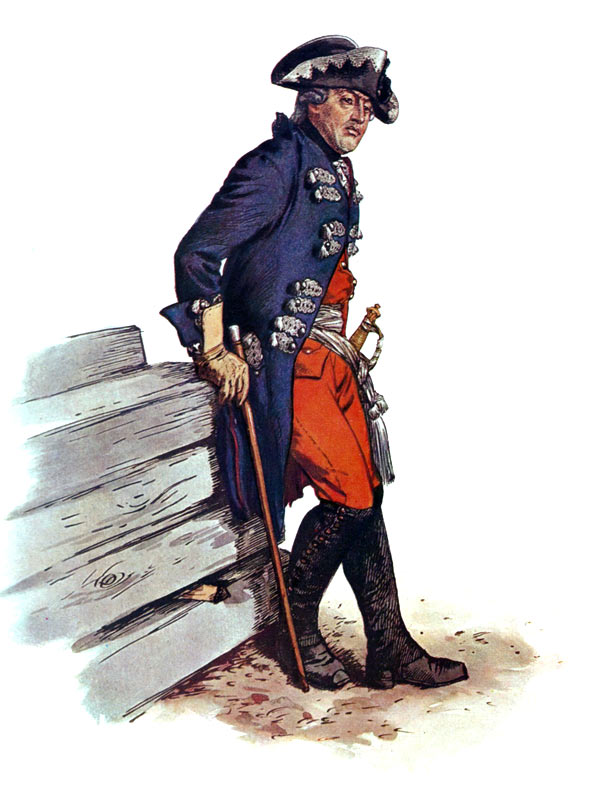
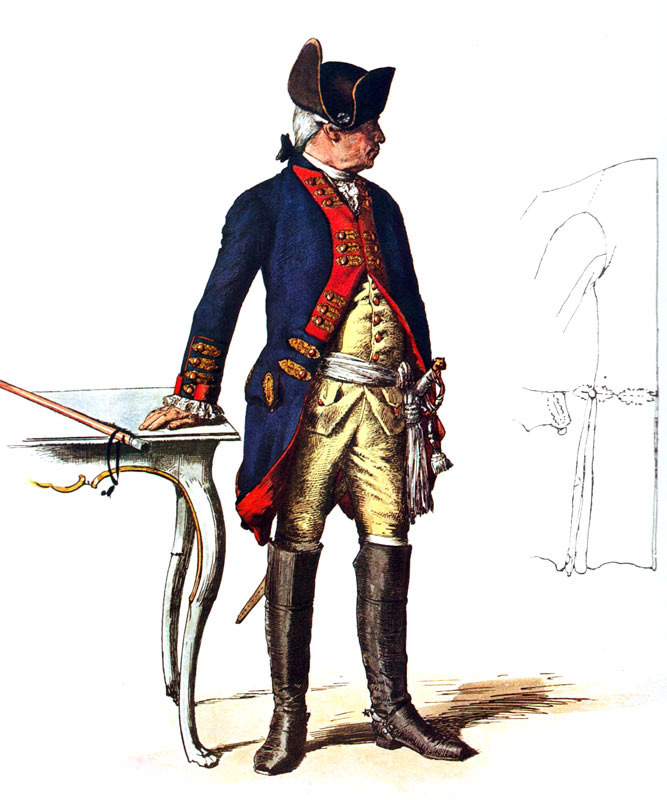
Prussian Invalid Corps (the officer on the left wears the ‘Pour le Mérite’): picture by Adolph Menzel as part of his series of pictures ‘Die Armee Friedrichs des Grossen in ihrer Uniformierung’
Background to the Battle of Torgau:
Following Frederick’s and his Prussian army’s successful battle at Liegnitz on 15th August 1760 the Russians withdrew across the Oder River enabling Frederick to direct his brother Henry to leave a small corps to watch the Russians and bring the remainder of his troops to join Frederick’s army facing Marshal Daun and his Austrian army.
Frederick manoeuvred until his army was positioned in the area of Schweidnitz, threatening Daun’s communications with Hapsburg territory.
In October 1760 the Russian general Chernyshev launched an incursion across the Oder River with the purpose of capturing Berlin, the capital of Prussia. The first attack on the city was beaten off with the assistance of Prussian troops hurried to Berlin from Saxony and Pomerania. A force of 16,000 Austrians commanded by General Lacy joined the Russians and in the face of such odds the Governor of Berlin surrendered the city to the Russians on 9th October 1760.
Frederick marched out of Southern Silesia on 6th October 1760 heading for the border between Silesia and Brandenburg. On receiving this news the Russians and Austrians precipitately left the city.
The Russians withdrew to Frankfurt am Oder while Lacy headed for Saxony. Daun left Lower Silesia and marched to join Lacy, intending to implement a powerful concentration of Austrian troops.
The Reichsarmée of 30,000 men was proposing to join Daun on the west bank of the Elbe River but in the event the Reichsarmée lost its nerve and hurried away to Leipzig.
On 2nd November 1760 Frederick received the news that Daun’s Austrian army had assembled at Torgau on the Elbe River to the North of Dresden.
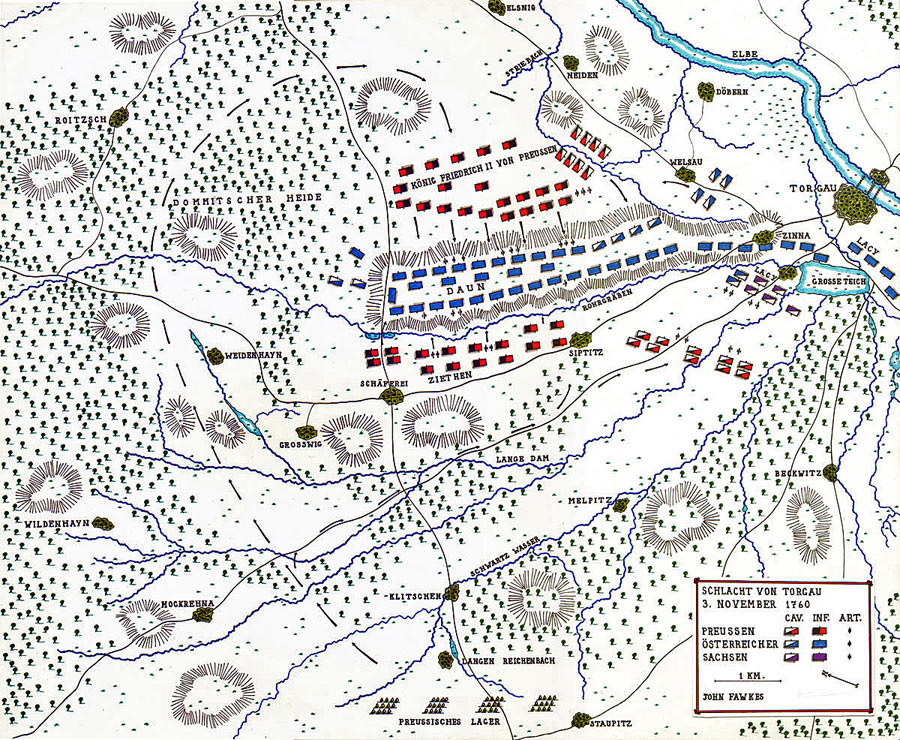
Map of the Battle of Torgau 3rd November 1760 in the Seven Years War: map by by John Fawkes
Account of the Battle of Torgau:
Torgau was an important defensive position on the west bank of the Elbe. The Prussians were fully familiar with the camp as it had been successfully held by Prince Henry in 1759 and in 1760 the Prussian General Hülsen had held the camp against the Reichsarmée.
The ridge where the Austrians were positioned was highly defensible. It stretched from a point overlooking the town of Torgau on the Elbe River running west for about 3 kilometres. Covering the area between the east end of the ridge and the town of Torgau was a large lake, called the Grosse Teich. Along the south front of the Torgau ridge ran a drainage ditch called the Rohrgraben. The area surrounding the ridge was heavily forested.
Frederick decided upon a wide outflanking move around the Austrian right wing and an attack from the woods on the far side of the Torgau ridge. A diversionary assault would be conducted by a force of 11,000 infantry and 7,000 cavalry commanded by General Zieten against the south side of the ridge and against the Austrian and Saxon troops positioned around the Grosse Teich.
The Austrians held the Torgau ridge with a line of infantry battalions and a second line supported by strong batteries of artillery. At the eastern end of the ridge strong forces of cavalry covered the infantry’s flank.
Frederick intended to lead three columns of Prussians through the Dommitscher Heide (woods) to the West of the Austrian positions to bring them to the rear of Daun’s army. The three columns comprised 24,000 infantry and 6,500 cavalry.
Frederick, commanding the first column of Prussian infantry, set off through the woods at 6am on 3rd November 1760, followed by the second column also substantially of infantry and commanded by General Hülsen. The third column comprising the main body of cavalry was commanded by Prinz Georg Ludwig von Holstein-Gottorp and followed on; a little late due to the commander having dawdled over his breakfast, so it is reported.
At the main road to Torgau General Zieten’s corps turned right and marched up the road towards the front of Daun’s positions. Frederick’s three columns continued across country in the wide sweep through the forests around the Austrian right flank to attack Daun’s rear.
Somewhere near Weidenhayn at around noon Frederick’s columns encountered the light troops of the Austrian General Ried. The sound of firing could be heard in the main Austrian positions and Croats came in to Daun with news of the engagement in the woods. Daun was alerted that Frederick was marching round to his rear and began to re-arrange his troops into a rectangular box formation with a front facing in each direction.
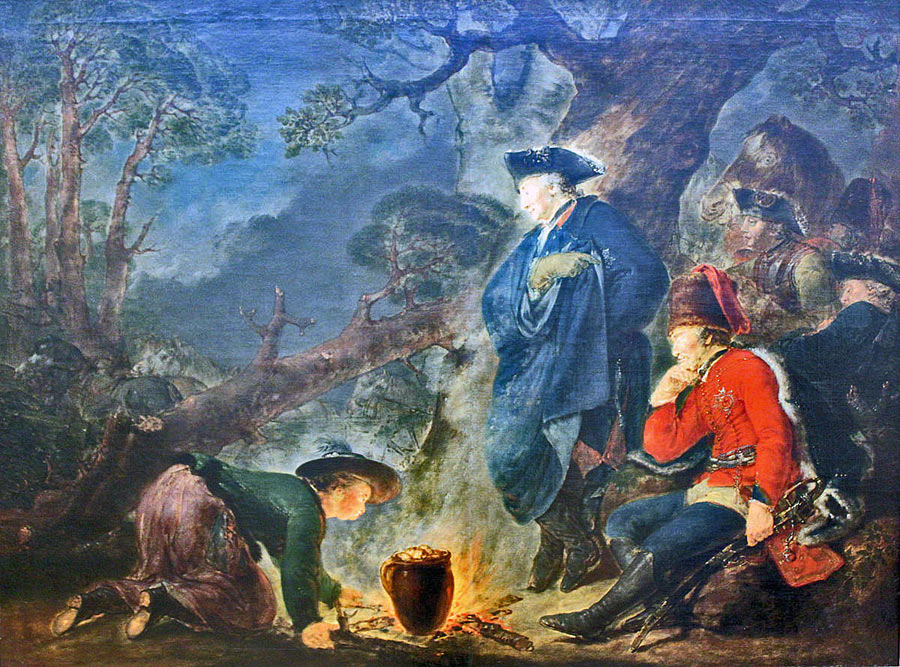
Frederick the Great on the night before the Battle of Torgau on 3rd November 1760 in the Seven Years War: picture by Bernhard Rhode
The Prussian march was further delayed by incorrect information given to Frederick by the senior forester of the area who directed the King’s column onto the track to Elsnig instead of the one leading to Neiden. Frederick’s column ended up on the track allocated to Hülsen’s troops who had to be diverted. Holstein’s cavalry was far in the rear as a result of his delay in beginning the march.
Frederick intended to march to the far end of the Austrian line and attack the flank lying on the Elbe River. Arriving at Daun’s positions Frederick saw that the Austrian river flank was covered by powerful artillery batteries and a strong force of cavalry. Frederick decided to change his plan and attack the Austrian left. This entailed a re-arrangement of his troops, advancing his rear battalions so that they became the van.
As Frederick’s column prepared for the attack the Prussians could hear the sounds of an artillery bombardment. This led Frederick to believe that Zieten had begun his assault on the far side of the Austrian positions. Frederick decided to attack the Austrian line without waiting for Hülsen and Holstein.
At 2pm Frederick ordered the first assault by 10 battalions of grenadiers, his leading units and the cream of the Prussian infantry. The grenadiers cleared the Strie-Bach and emerged from the woods into the heaviest artillery bombardment veterans on either side had experienced. The 10 battalions were decimated, two thirds killed or wounded within minutes.
The Austrians followed up this advantage with a counter-attack by three infantry regiments.
Frederick committed a further 16 battalions to the attack, adding the leading battalions of Hülsen’s column as they came up. The Prussian infantry advanced onto the edge of the plateau where the Austrian positions stood but were unable to stand the concentrated Austrian artillery fire and fell back into the woods.
Prussian cavalry then attacked the Austrian positions. The Schmettau Cuirassiers, the Bayreuth Dragoons and the Jung-Platen Dragoons cut into the Austrian line but were driven back. The rest of Württemburg’s cavalry moved east of the Zeitschken-Graben and attacked the Austrian cavalry positioned there. After an initial success they were repelled by a counter-attack led by General Carl O’Donnell.
The Prussian attack directed by Frederick foundered between 4 and 5pm. The Prussian casualties were appalling. At around this time Frederick himself was struck by a musket bullet. He slumped from his horse but was held by his adjutant Berenhorst. Lowered to the ground it was found that the king had been struck by a spent round that had not penetrated his clothing, although inflicting a blow sufficient enough to render him unconscious. Frederick was assisted from the battlefield in the belief that his army had been heavily defeated. Frederick was taken to the village of Elsnig where he spent the night in the church, after finding the local manor house full of wounded officers from both armies.
In the period following the repulse of Frederick’s repeated attacks the emphasis shifted to Zieten’s corps on the far side of the Austrian positions.
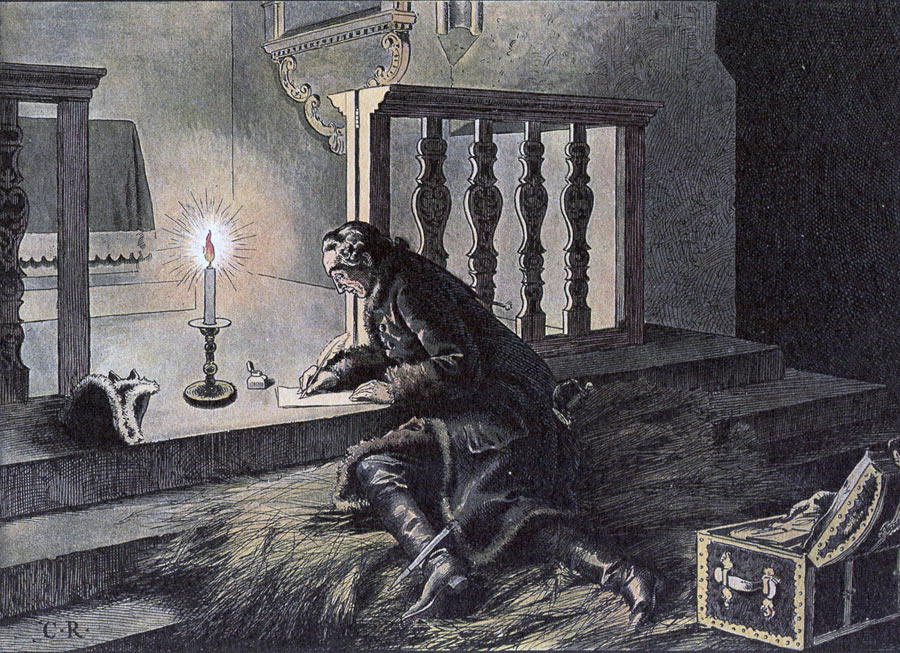
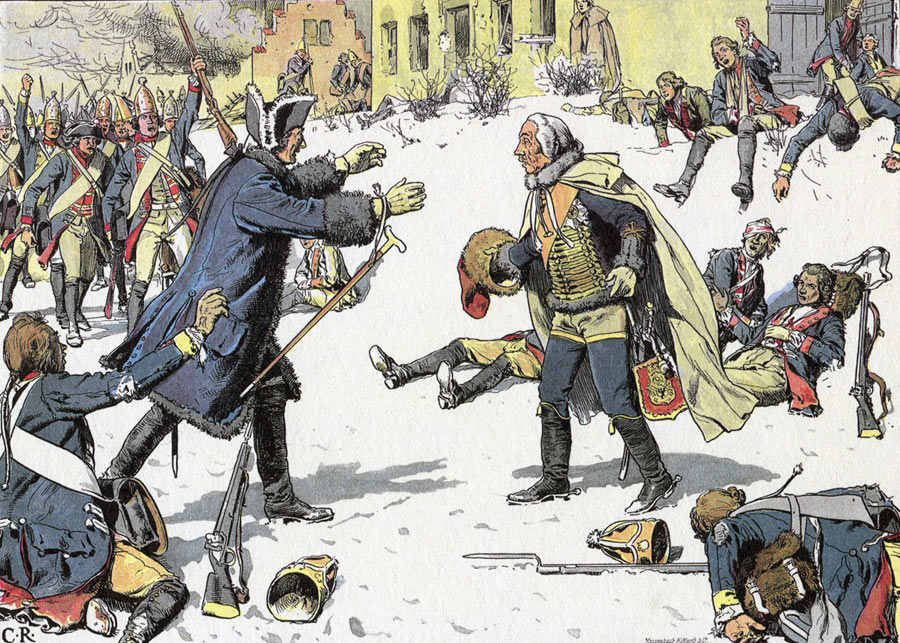
Frederick the Great in the church at Elsnig during the Battle of Torgau 3rd November 1760 in the Seven Years War: picture by Carl Röhling
After leaving the main army Zieten had not hurried his men so as to give the king sufficient time to march around the Austrian positions. Zieten’s corps emerged from the woods at around 2pm. He there found that the Austrian corps of Lacy had reached the battlefield and was drawn up by the Grosser-Teich.
Zieten exchanged artillery fire with Lacy’s guns and then decided to change his plan; disengaging from Lacy and attacking Daun’s positions further to the West.
Zieten’s infantry brigades filed to the right in turn, marched around the back of the main body and off to the left, renewing the attack around and to the West of the village of Süptitz. Initially Zieten’s men made little headway and suffered heavy casualties.
Prussian Infantry Regiment Alt-
Braunschweig No 5: picture by Adolph Menzel as part of his series of pictures ‘Die Armee Friedrichs des Grossen in
ihrer Uniformierung’
At this point in the battle two significant events took place: The first was the departure from the field of the Austrian commander, Marshal Daun. Daun suffered a severe wound to his foot during the second attack by Frederick’s infantry. Some two hours into the battle the wound became incapacitating and Daun was forced to leave the battle, losing for the Austrians the controlling influence of their army.
The second event was the discovery of a viable route for Zieten’s assault on the Austrian position. A Prussian officer riding around the Austrian positions with a message to Zieten from the king saw there were two sheep ponds below the south-west corner of the ridge with a causeway between them that was undefended. The officer reported to Lieutenant-Colonel Möllendorf of the Guard who conferred with his brigade commander, Major General von Saldern. The two officers resolved to attack across the causeway with Saldern’s Guard brigade. The attack was launched and met little resistance.
Prussian Infantry Regiment Graf Dohna No 16: picture by Adolph Menzel as part of his series of pictures ‘Die Armee Friedrichs des Grossen in ihrer Uniformierung’
On the far side of the Austrian positions it was apparent to the Prussian officers in the front line that Zieten’s attack was having an increasing impact on the Austrians. General Hülsen resolved to renew the assault using the uncommitted regiments of Schenkendorff (No 9) and Dohna (No 16) and a force of around 1,000 soldiers from several of the regiments disorganised during the unsuccessful attacks and rallied by Major Lestwitz of the Alt-Braunschweig Regiment.
The concentration of Prussians at the western end of the Austrian position attacking from North and South spelt the end of the Austrians’ ability to hold the Torgau Ridge, particularly in the absence of the guiding hand of Marshal Daun. General O’Donnell, who had taken over from the wounded Daun, began the withdrawal of the Austrian army to Torgau and across the Elbe River. Numbers of disorientated soldiers, Prussian and Austrian were left wandering about in the now increasingly abandoned positions.
News of his victory was brought to Frederick at the church in Elsnig. Frederick knew that the victory was at a terrible cost to his army. His initial attack in the teeth of the Austrian artillery barrage had cost him 10 of his best grenadier battalions.
Casualties at the Battle of Torgau: Prussian losses: 16,670 men killed and wounded. Austrian losses: 8,500 men killed and wounded, 7,000 captured and 49 guns lost.
Frederick the Great greets General Zieten after the Battle of Torgau 3rd November 1760 in the Seven Years War: picture by Carl Röhling
Aftermath to the Battle of Torgau:
The battle had been far from decisive tactically as the Austrians had been able to withdraw their army across the Elbe River and fall back to Dresden.
The Prussian army remained on the field of battle for some three days before moving south. In the meantime the Austrians re-established themselves in and around Dresden. The Prussian army went into winter quarters in Saxony and Silesia.
Although a highly disappointing battle for Frederick, involving appalling losses among his best troops the effect on his enemies was much greater. The Austrian Chancellor Kaunitz, who had engineered the coalition against Frederick, despaired of recovering any part of the lost territories and began to advise a negotiated peace. The French court at Versailles equally doubted whether Frederick could be defeated.
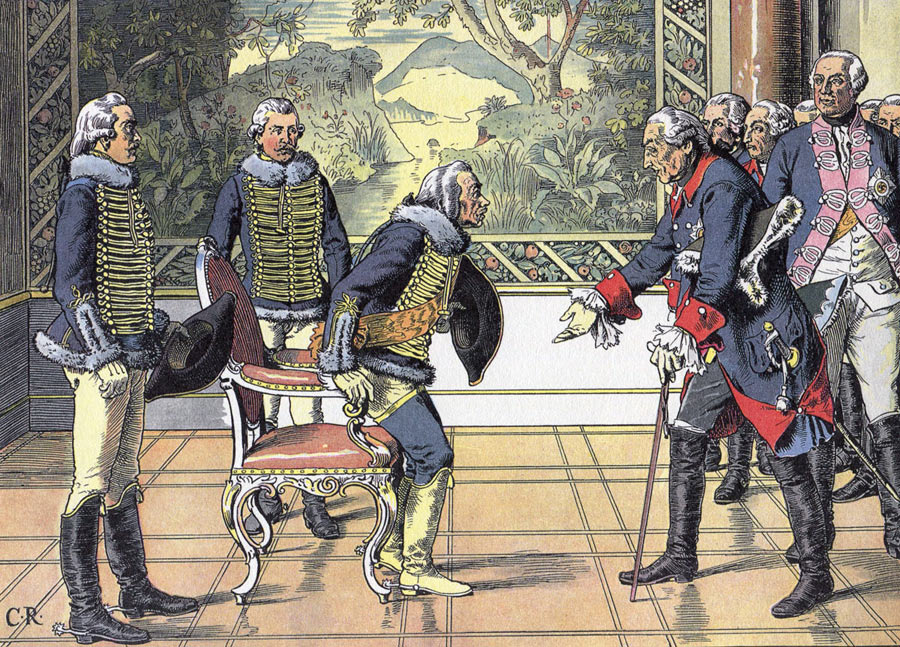
Frederick the Great greets General Zieten at Sans Souci after the Seven Years War: picture by Carl Röhling
Anecdotes from the Battle of Torgau:
- Frederick’s instructions to General von Zieten for the assault at the Battle of Torgau were given orally and in confidence with no written record made. The contents of those instructions can only be presumed from Zieten’s conduct during the battle. It would seem that Frederick intended a simultaneous assault on the Austrian positions from front and rear, at a fixed time or perhaps by some signal.
- As at the Battles of Zorndorf and Kunersdorf Frederick put himself at the disadvantage of circling to the rear of his enemy without knowing what he would find when he got there. On his arrival he found that the Austrian deployment precluded the form of attack he had planned forcing him to change his formations and launch an attack that placed his men at a grave disadvantage.
- The adjutant who helped Frederick from his horse when he was hit was Captain Georg von Berenhorst. Berenhorst investigated the King’s injury and took him to Elsnig. Berenhorst was subsequently aggrieved that Frederick was not in the slightest appreciative of his actions, feeling that he had saved the King’s life.
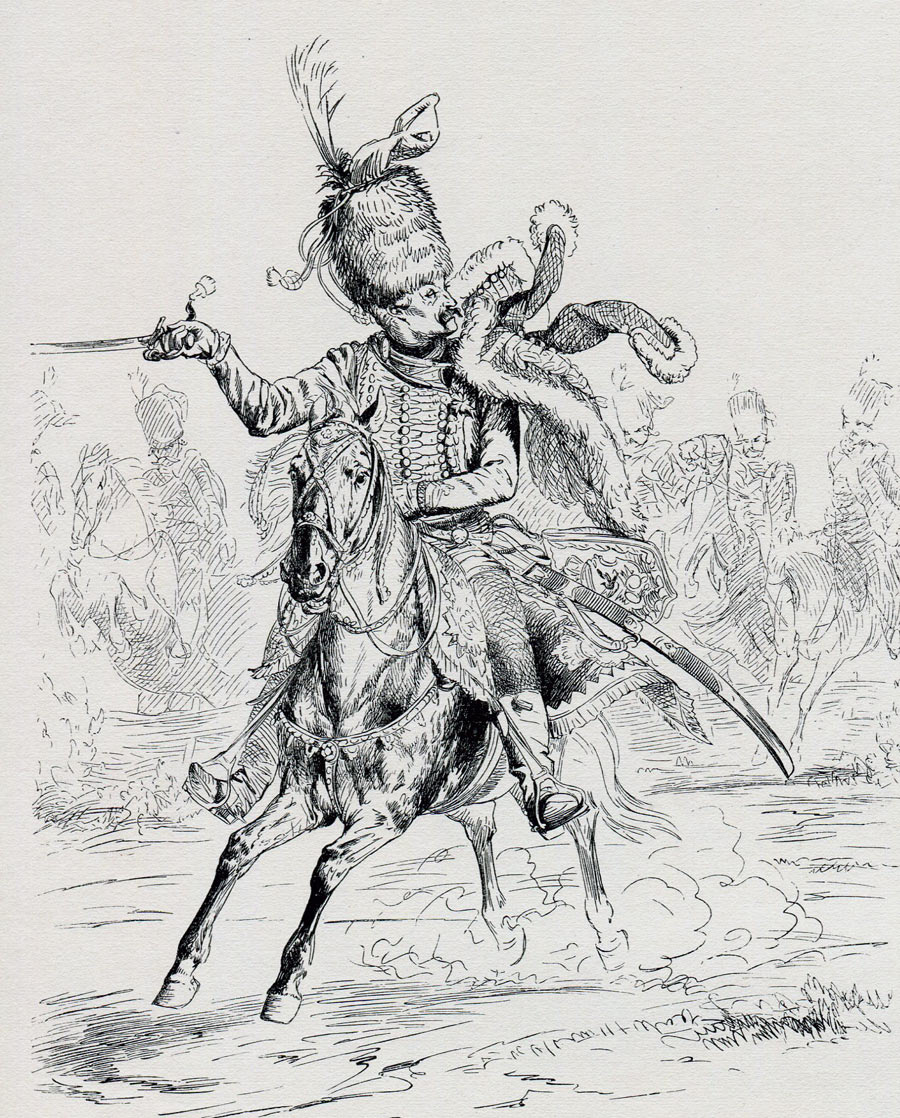
Leib Hussar Regiment No. 2 von Zieten: Battle of Torgau 3rd November 1760 in the Seven Years War: print by Adolph Menzel
- Early on 4th November 1760 Berenhorst assembled six Prussian dragoons outside Elsnig church, each bearing a captured Austrian colour to show the King that he had won the battle. Berenhorst no doubt intended the scene to be reminiscent of the aftermath to the Battle of Hohenfriedburg when the Bayreuth Dragoons paraded captured Austrian colours and standards before the King, to his obvious delight. Frederick emerged from the church and rode off without looking at the colours. For Frederick Torgau was no Hohenfriedburg. It was a terrible and apocalyptic battle at which he had lost numbers of his best soldiers.
- In the final attack on the Austrian rear the Prussian General Hülsen, being without a horse and feeling too old to keep up with the soldiers on foot, accompanied the attack riding astride a gun.
- The Prussian Guard was put out that it was assigned to General Zieten’s force and thus not led into battle by the King. On the day after the battle Frederick visited a Guard outpost. On the excuse that the watch fire was too hot Frederick unbuttoned his coat. A bullet fell out and the soldiers could see the rips in the King’s clothing the bullet had caused. It is reported that the soldiers began to shout “You are the same Old Fritz. You share all our dangers. We shall willingly lay down our lives for you. Long live the King. Long live the King.”
- Among the Austrian generals Lacy was heavily criticised for failing to take a more active part in the battle against Zieten. After Torgau Daun felt he was no longer fit to exercise command due to his state of health and wound in the battle. The obvious successor to Daun was General Loudoun but General Lacy refused to serve under Loudoun. The result was that Daun was forced to continue in command.
References for the Battle of Torgau:
- Frederick the Great by Thomas Carlyle
- Frederick the Great by Christopher Duffy
- The Army of Frederick the Great by Christopher Duffy
- The Army of Maria Theresa by Christopher Duffy
The previous battle in the Seven Years War is the Battle of Liegnitz
The next battle in the Seven Years War is the Battle of Burkersdorf