British Battles

You are here: Home / English Civil War / Battle of Dunbar

Battle of Dunbar

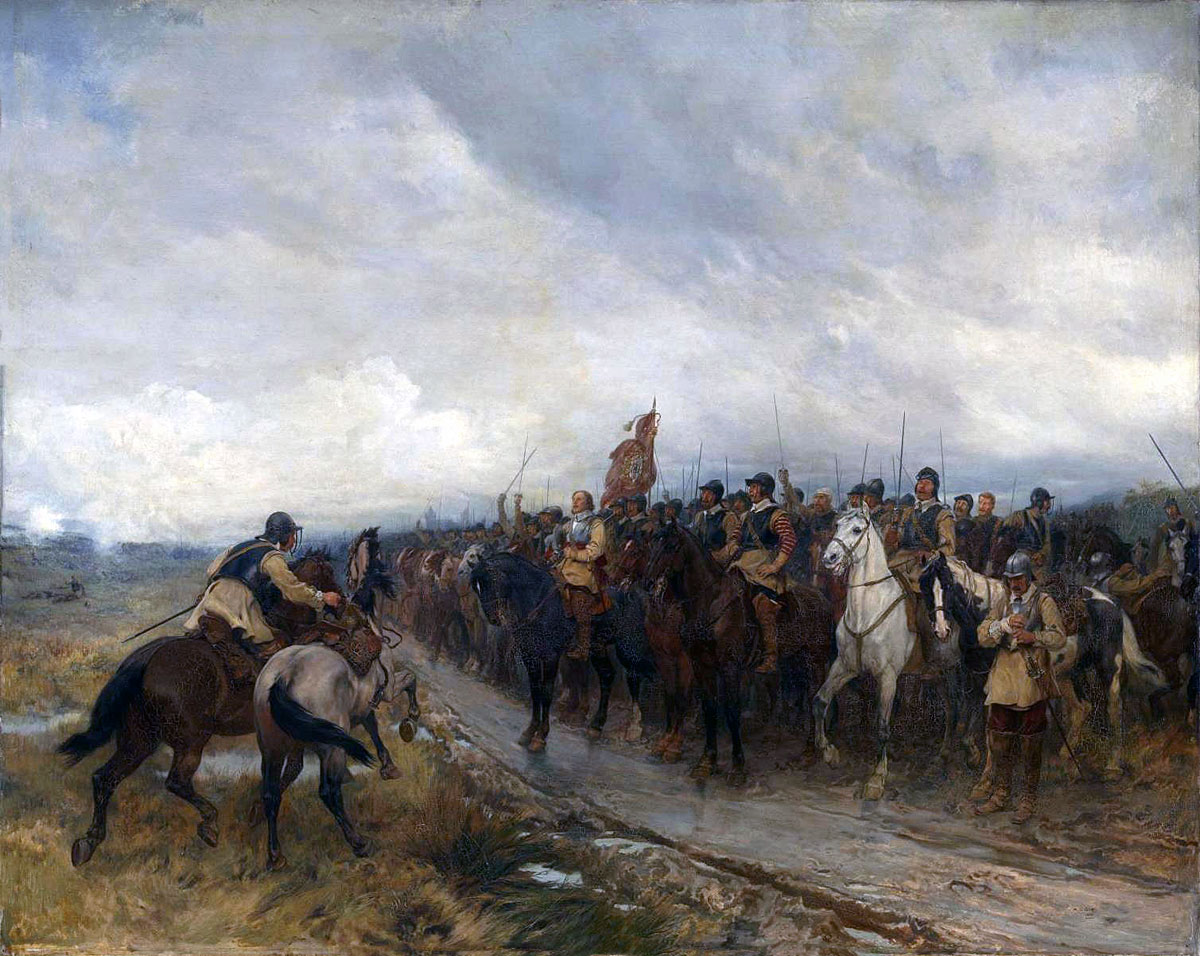
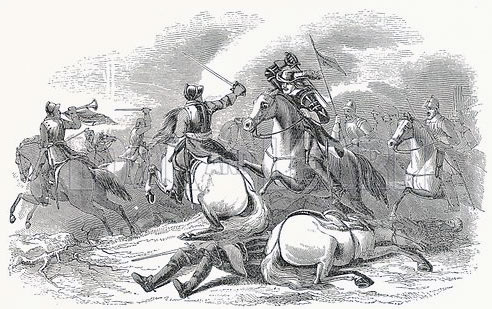
Cromwell’s overwhelming defeat of the Scottish Covenanters fighting for King Charles II on 3rd September 1650 in the English Civil War

Cromwell at the Battle of Dunbar on 3rd September 1650: picture by Andrew Carrick Gow

The previous battle in the English Civil War is the Siege of Basing House

The next battle in the English Civil War is the Battle of Worcester

To the English Civil War index


War: English Civil War.

Date of the Battle of Dunbar: 3rd September 1650

Place of the Battle of Dunbar: On the south-east coast of Scotland.

Combatants at the Battle of Dunbar: English Parliamentary Army against the Scottish Covenanting Army

Oliver Cromwell: the Battle of Dunbar on 3rd September 1650: picture by Samuel Cooper

Commanders at the Battle of Dunbar: Captain-General Oliver Cromwell against Lieutenant-General Sir David Leslie.

Size of the armies at the Battle of Dunbar: The English army numbered around 11,000 men.

The Scottish army numbered around 23,000 men.

Uniforms, arms and equipment at the Battle of Dunbar: See this section in the Battle of Edgehill.

Lieutenant-General Sir David Leslie Earl of Leven: Battle of Dunbar on 3rd September 1650
Lieutenant-General Sir David Leslie: Scottish Commander at Battle of Dunbar on 3rd September 1650

The Scottish regiments at the Battle of Dunbar were:

Horse: Lord Levens’, Major-General Sir Robert Montgomerie’s, Colonel Sir John Browne’s Midlothian, Charles Arnot’s of Fernie, Colonel Craige’s, Colonel Archibald Strachan’s, the Master of Forbes’s, Colonel Scott’s, Sir James Halkett’s, James Campbell, Lord Mauchline’s, George Lord Brechin’s, Arthur Erskine’s of Scotscraig, Sir Robert Adair’s of Balamena, John Earl of Cassilis’s, Robert Halkett’s, Gilbert Kerr’s, Adjutant-General Bickerton’s.

Foot: Life Guards, Foot Guards, Towers’, Duffus’s, Kirkness’s, Lieutenant-General Lumsden’s of Menstrie, Lindsay’s of Pitscottie, Campbell’s of Lawers, Innes’s, Sir John Haldane’s of Gleneagles, Tallifield’s, John Maclellan, Lord Kirkcudbright’s, Lindsay’s of Edzell, Hugh Master of Lovat’s, George Buchanan’s of that Ilk, Sir Alexander Stuart’s, General Wemyss’s, the general of the artillery, Louis Home’s of Wedderburn, Freeland’s.

The English regiments at the Battle of Dunbar were:

Horse: The Lord General’s (Cromwell’s) 663 men, the Major-General’s (Lambert’s) 663 men, Lieutenant-General of the Horse (Colonel Fleetwood) 663 men, Commissary-General’s (Colonel Whalley) 663 men, Colonel Liburn’s 663 men, Colonel Hacker’s 663 men, Colonel O’Key’s dragoons, later horse 663 men. A total of 5,415 men.

Foot: the Lord’s General’s (Lieutenant-Colonel Goffe’s) 1,307 men, Colonel Pride’s 1,307 men, Major-General Bright’s 1,307 men, Maliverer’s 1,307 men, Sir Charles Fairfax’s 1,307 men, Daniel’s 1,307, and Monk’s comprising five companies of Sir Arthur Heselrig’s 550 men and five companies of Fenwick’s 550 men: 10,349 men in all.

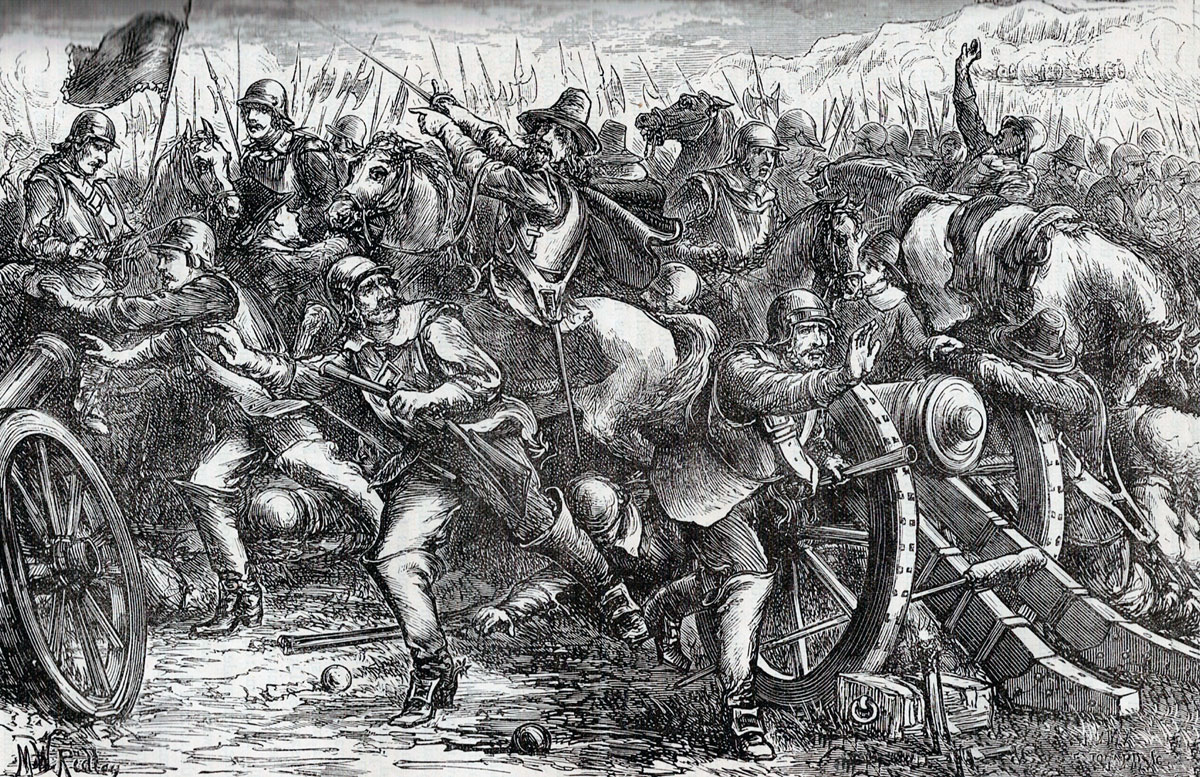
The English artillery train comprised 960 men.

Winner of the Battle of Dunbar: Cromwell’s Parliamentary New Model Army resoundingly defeated the Scottish army.

Events leading to the Battle of Dunbar:

Following the initial phase of the English Civil War King Charles I was tried and executed on 30th January 1649.

King Charles I’s son and heir Charles Stewart was in exile in Holland.

Although it had fought against Kind Charles I in the Civil War, The Scottish Covenanter Government declared Charles Stewart to be king in succession to his father and invited him to Scotland to resume the war against Parliament.

Before Charles was permitted to come to Scotland, he was required by the Scottish Covenanter Government to enter into the Treaty of Breda in Holland by which he bound himself to endorse the Covenant and to enforce it throughout his kingdoms of England, Scotland and Ireland once he was established on the throne. Charles signed the Treaty of Breda on 1st May 1649

George Monk:  Battle of Dunbar on 3rd September 1650: studio of Lely
George Monk: Battle of Dunbar on 3rd September 1650: studio of Lely

Probably the Scottish Government knew that King Charles II was most unlikely to comply with the Treaty of Breda as the Covenant represented everything King Charles II found repugnant in Protestantism.

The Parliament in London quickly realised that with Charles’s arrival in Scotland it would be necessary to resume the Civil War with an invasion of Scotland.

Fairfax, Captain-General of the New Model Army, declined to command the invasion, on grounds of age and health.

He was replaced by Oliver Cromwell, recently returned from Ireland, as Captain-General of the New Model Army and commander of the invasion force.

The English army invading Scotland comprised 10,000 foot and 5,000 horse, largely from the New Model Army, supported by a naval fleet carrying supplies.

The English army entered Scotland on 22nd July 1649 and marched on Edinburgh, devastating the countryside.

Lieutenant-General Sir David Leslie assembled a powerful Scottish army to repel Cromwell.

Leslie’s Scottish army comprised 18,000 foot and 8,000 horse, of which 6,500 were from the Scottish army raised and trained on the lines of the English New Model Army.

Major-General John Lambert: Battle of Dunbar on 3rd September 1650

Cromwell reached Musselburgh to the east of Edinburgh on 28th July 1650 and the next day confronted Leslie’s army entrenched outside Edinburgh with an attack on the port of Leith.

Leslie resisted the urgings of many in his army to attack the English and after a couple of days, shortages of supplies compelled Cromwell to withdraw to Musselburgh.

Leslie’s Scottish army pressed the English closely during the retreat.

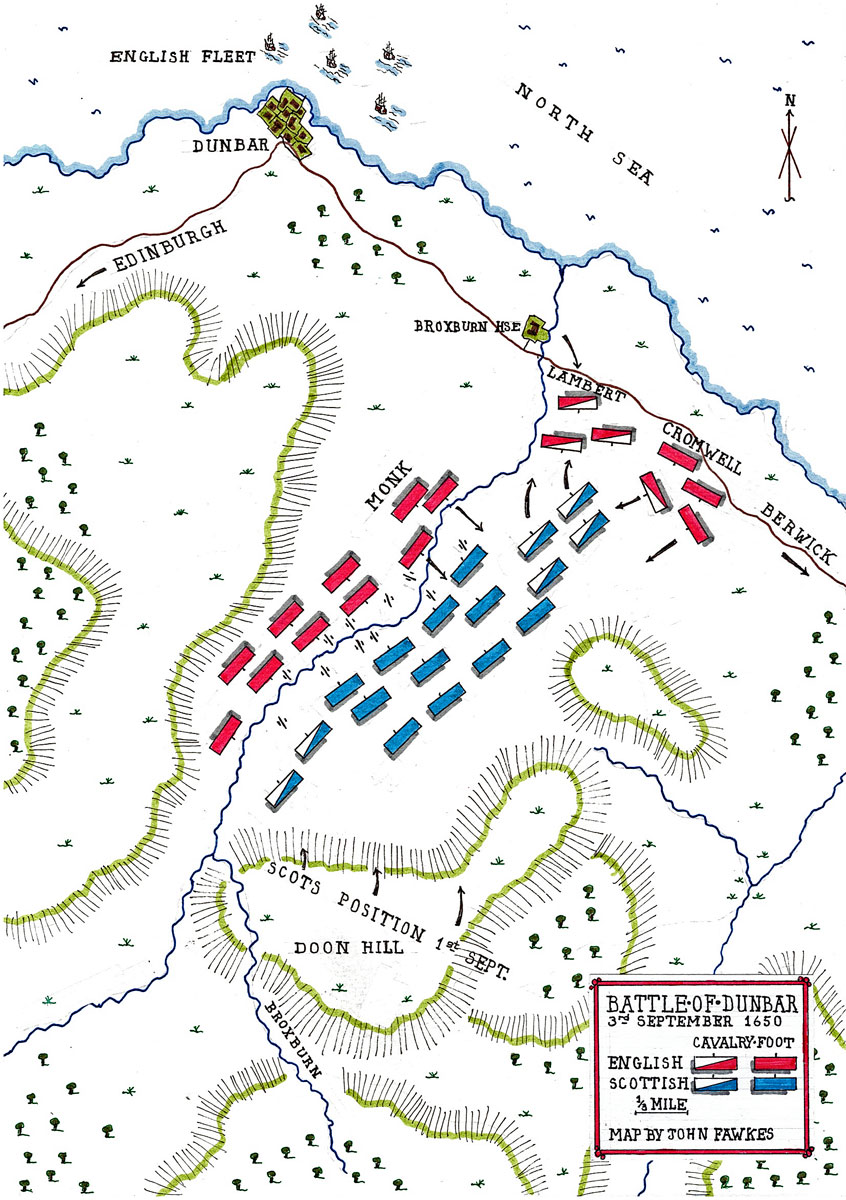
From Musselburgh, Cromwell’s army retreated to the coast at Dunbar to renew contact with his fleet, arriving on 1st September 1650.

Dysentry broke out in the English ranks and with severe losses reducing his army to 11,000 men, Cromwell felt bound to withdraw to the border and return to England.

The English army marched out on the east coast road to Berwick on the Border, but Leslie moved quickly, positioning his main force to threaten the coastal road that Cromwell was compelled to use.

To cut off Cromwell’s retreat, Leslie occupied the Cockburnspath defile, some 4 miles from Dunbar on the Berwick road, preventing the English from continuing south along the road.

The McCleans at Leith: : Battle of Dunbar on 3rd September 1650

On 2nd September 1650, Leslie’s Scottish army, still numbering some 23,000 men, occupied positions on the steep Doon Hill, overlooking the narrow coastal plain through which ran the coastal road to Berwick.

From the Doon Hill the Broxburn flowed in a deep gorge down the hillside to the coastal plain where it emerged from the gorge to be crossed by the coastal road before flowing on to Broxmoth House and into the sea.

With the substantially larger Scottish army on the steep Doon Hill inland of the coastal road and with the road itself blocked to prevent his retreat to the English border, Cromwell found himself in a difficult position, with the only apparent way of extricating his army being to embark it on the English fleet at Dunbar.

The decision-making process of the Scottish Army during the campaign is somewhat opaque.

While Sir David Leslie, an experienced soldier who had fought in the continental campaigns of the Thirty Years War, was the commanding general and enjoyed a considerable reputation, he was subject to the directions of a quixotic Scottish government controlled by the extreme Protestant Covenanters.

Although the Scottish Government acknowledged Charles II as King of England and Scotland, the Scottish authorities required Charles II to leave the army with his force of Royalists, probably militarily the most experienced solders in the Scottish army, so that the army that fought and, as they expected, defeated Cromwell comprised only those with impeccable Protestant credentials.

A powerful religious committee accompanied Leslie’s army to ensure that the conduct of its operations were fully in line with the views and requirements of the Covenanting authorities.

It seems to be the consensus among military commentators that Leslie should have kept his army on the steep-sided Doon Hill, where it was beyond the reach of Cromwell’s much weakened English army until Cromwell was forced to embark his troops on the waiting English ships, enabling an attack to be made when Cromwell was at his most vulnerable during the embarkation.

Rejecting such a course, on the evening of 2nd September 1650, Leslie ordered the Scottish army down from its positions on the top of Doon Hill into the valley of the Broxburn.

There is a school that maintains the move was directed by the powerful clerical presence in the army and that it was against Leslie’s inclinations and advice.

This is not accepted by the authorities on the battle who have it that it was Leslie’s decision to abandon the Doon Hill position.

There is little doubt that the Scottish army was keen to come down off Doon Hill and give battle to the English. The English were clearly much weakened by disease and shortages of supply. Their numbers were considerably reduced and their morale deteriorating.

Unless they were attacked, the English might escape on their fleet.

In addition, the Scots were far from comfortable in their Doon Hill position. It was cold, windswept and it began to rain heavily.

All the circumstances encouraged the Scottish army to leave Doon Hill for the coastal plain and assault the disadvantaged English army.

The Scottish army began the descent from Doon Hill during the afternoon of 2nd September 1650 and were in their new positions by 4pm.

Cromwell's attack on Leith: : Battle of Dunbar on 3rd September 1650
Cromwell’s attack on Leith: : Battle of Dunbar on 3rd September 1650

The Scottish infantry was positioned along the Broxburn, flowing down from Doon Hill across the coastal plain to the sea.

In its hilly section the Broxburn ran through a deep gorge. As it came into flatter ground on the coastal plain it emerged from the gorge and its banks became shallow and easily negotiated.

In their new positions much of the Scottish infantry was still confronted by the steep gorge which made access to the English army positioned on the far bank extremely difficult.

In addition, the lower section of Doon Hill comprised a spur which hemmed in the right flank of the Scottish infantry severely hindering deployment into the coastal plain.

The Scottish cavalry was positioned for the forthcoming battle in the conventional manner, with part of the force on each flank.

The left wing of the Scottish cavalry was hemmed in by Doon Hill, the steep gully of the Broxburn and the mass of the Scottish infantry to their right and was consequently unable to take any part in the decisive battle which took place in the open plain on the Scottish right.

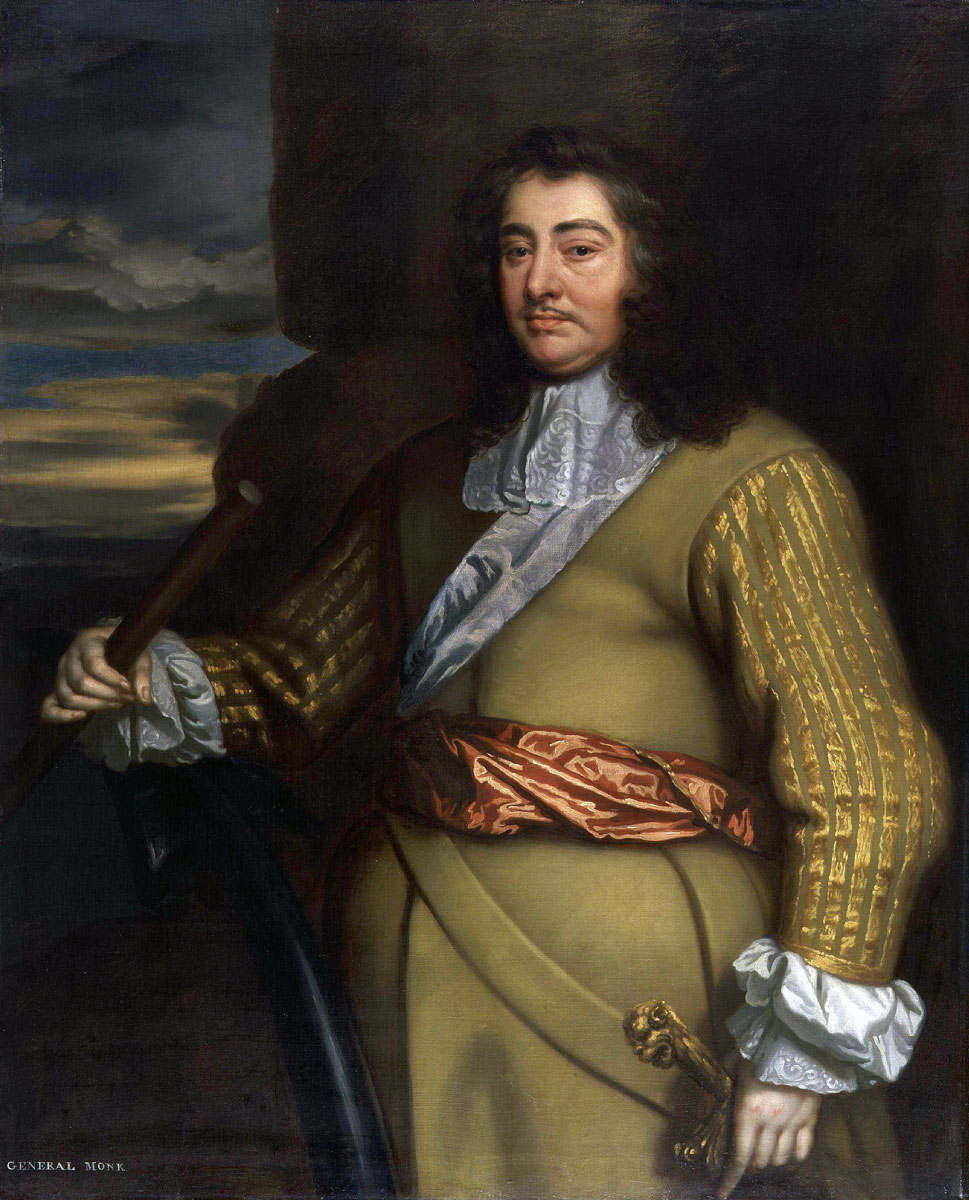
Cromwell, his major-general, Lambert and General George Monk watched the Scottish deployment down from Doon Hill to the banks of the Broxburn and agreed between them that they now had an opportunity to defeat the Scots in battle. The three generals devised a plan that was put to the other English senior officers that evening in a council of war.

Map of the Battle of Dunbar on 3rd September 1650: battle map by John Fawkes

Account of the Battle of Dunbar:

During the night of 2nd September 1650, the rain fell hard on the two armies sleeping on the battlefield.

At the prospect of battle, the morale of the English Parliamentary army was much restored after the taxing retreat from the lines around Edinburgh.

During the night, Lambert, in his role as sergeant-major-general, moved six of the eight regiments of horse and three regiments of foot to the English left flank.

Cromwell at the Battle of Dunbar on 3rd September 1650

Lambert was to lead five regiments of horse across the Broxburn by Broxmouth House and charge the horse of the Scottish right wing in their right flank.

Cromwell himself was to lead an assault around the Scottish right wing with one regiment of horse and three regiments of foot.

The rest of the Parliamentary army with the artillery was in position along the right bank of the Broxburn, opposite the lower reaches of Doon Hill, to hold any Scottish attempt to make a frontal assault.

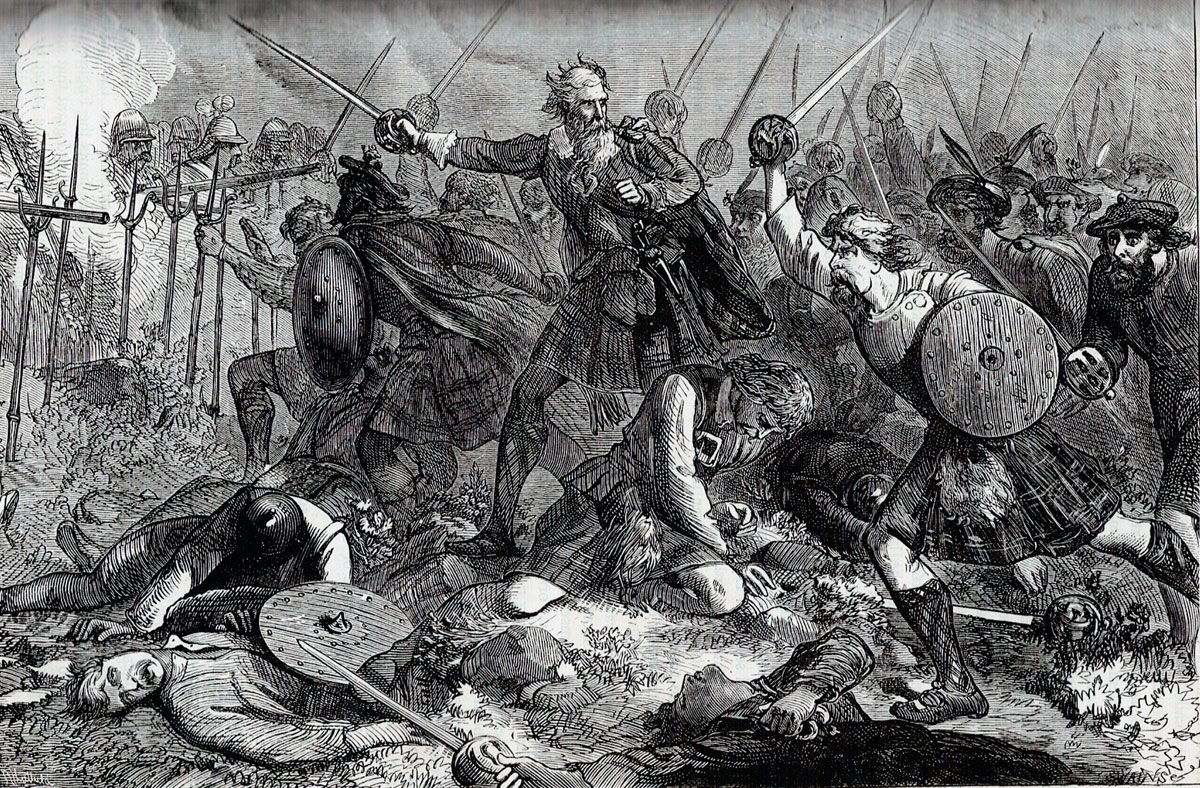
At around 4am, Lambert’s cavalry regiments crossed the Broxburn and attacked the horse regiments of the right wing of the Scottish army.

Although surprised by the sudden assault, the cavalry regiments of the Scottish right wing wheeled and met the English charge full-on.

The Scottish cavalry regiments outnumbered the English and initially pushed them back, assisted by the use of the lance, with which many of the Scottish troopers were armed.

General Monk’s infantry passed the Broxburn to the right of Lambert’s cavalry and launched an assault on the right wing of the Scottish infantry.

Again outnumbered by the Scots, Monk’s attack was repelled.

In the meantime, Cromwell’s flanking force was coming up around the Scottish right wing.

Cromwell’s infantry joined Monk’s attack, one of his regiments moving around the Scottish line and taking the Scots in flank.

Cavalry at the Battle of Dunbar on 3rd September 1650: picture by WRS Stott

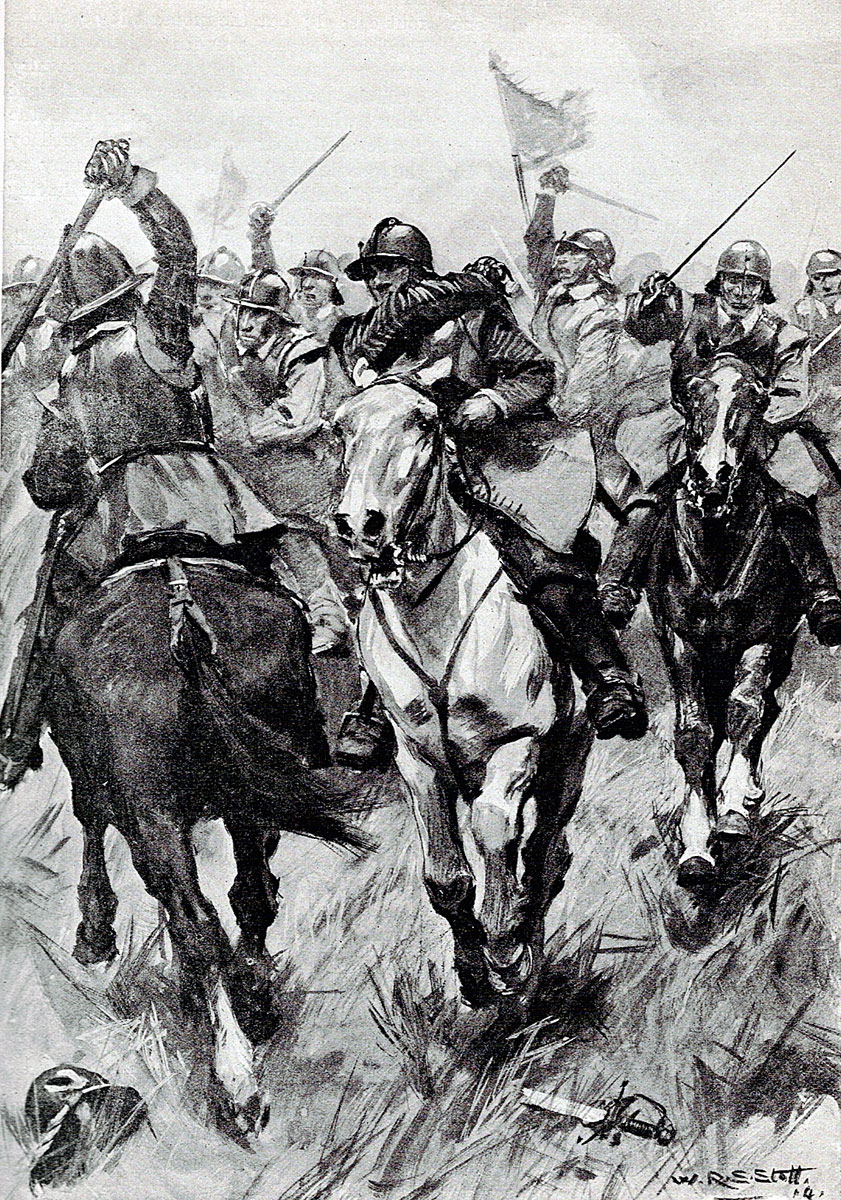
Cromwell launched his single regiment of horse into the flank of the Scottish cavalry while Lambert renewed his assault from the front.

Under the pressure of Lambert’s charge combined with Cromwell’s flank attack the Scottish horse began to break and retreat.

As in the cavalry battle, the attack by Cromwell’s three regiments of foot was sufficient to turn the tide against the Scottish foot attacked by Monk. The foot of the Scottish right wing were driven back and broke in confusion.

The main mass of the Scottish army began a headlong retreat across the Broxburn to escape from the pursuing English horse and foot.

Battle of Dunbar on 3rd September 1650

Some of the Scottish soldiers ran off up Doon Hill where they were pursued and cut down.

A few of the regiments of the Scottish left wing left the battlefield in good order and crossed the Broxburn, marching off towards Edinburgh,

Cromwell ordered a halt in the pursuit so that his officers might reform their disordered regiments.

The Parliamentary troops are reported as singing the 117th Psalm.

O praise the LORD, all ye nations:
praise him, all ye people.
For his merciful kindness is great toward us:
and the truth of the LORD endureth for ever.
Praise ye the LORD.

Re-organised the English cavalry pursued the main mass of the fleeing Scots army as far as Haddington.

Battle of Dunbar on 3rd September 1650: contemporary plan in the Ashmolean Museum, Oxford

Casualties at the Battle of Dunbar:

3,000 Scots were killed in the Battle of Dunbar, with 10,000 taken prisoner by the English. The English also captured the whole of the Scottish artillery, their baggage train and 200 colours.

Dunbar medal issued by Parliament to commemorate the Battle of Dunbar on 3rd September 1650

English casualties were around 300 killed.

Follow-up to the Battle of Dunbar:

Following the Battle of Dunbar, Cromwell marched to Edinburgh, capturing the city, other than Edinburgh Castle, before advancing in pursuit of Leslie’s retreating army.

Leslie took up positions around Stirling with some 5,000 men.

Deciding that Leslie’s position was too strong to attack, Cromwell returned to Edinburgh and besieged the castle, while Lambert advanced into the West of Scotland.

Edinburgh Castle surrendered to Cromwell in mid-September 1650, leaving Cromwell’s army in command of Scotland south of the Rivers Clyde and Forth.

General Leslie and King Charles II were gathering the Royalist/Covenanter army at Stirling.

On 31st July 1651, two days before Cromwell received the surrender of Perth, Charles’s army set off from Stirling for the English border and his incursion into England which would end with the Battle of Worcester.

On 6th August 1651 Cromwell set off in pursuit with his army.

Anecdotes and traditions from the Battle of Dunbar:

Lieutenant-Colonel John Okey: Battle of Dunbar on 3rd September 1650
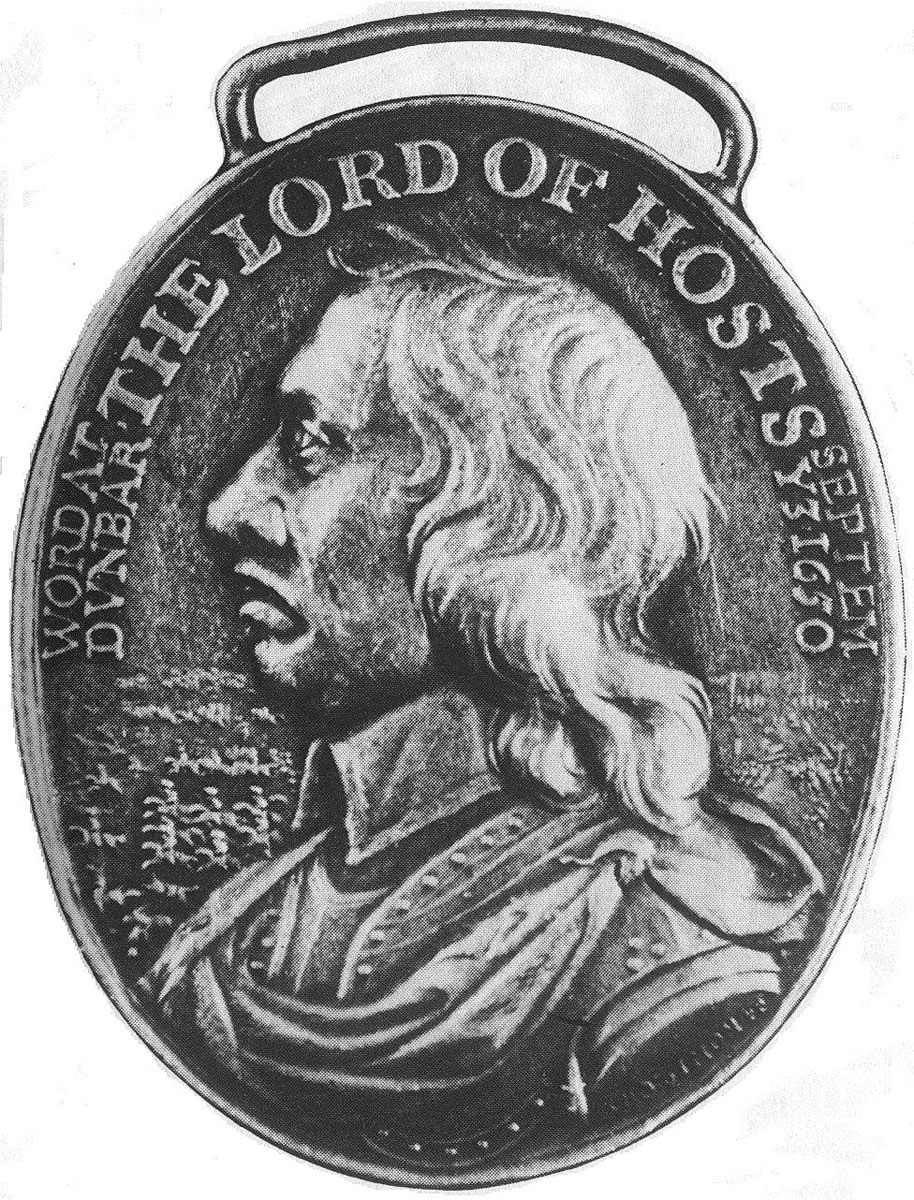
  • Following the Battle of Dunbar, the English Parliament issued a commemorative medal, with the effigy of Oliver Cromwell, the victorious general, in spite of his protests. The medal and a financial gratuity were issued to every soldier who fought in the campaign in the English army.
  • Of the Scots captured at the Battle of Dunbar, some 5,000 were marched south escorted by a cavalry escort commanded by Sir Arthur Hesilrig. The Scots prisoners were given no food for 5 days, until they reached Morpeth. The English troops beat the prisoners and robbed them of clothing and valuables. Many prisoners died on the march. Of the survivors, 200 were transported to Virginia in America as indentured servants for the colonists, the earliest form of slavery in the American colonies.
  • George Monk took a prominent part in the Battle of Dunbar. A royalist officer who changed sides in the Civil War, Cromwell resolved to give him his own regiment in the New Model Army. The regiment selected objected to having an ex-royalist as a colonel, so Cromwell took five companies each from the regiments of Fenwick and Heselrige to form a new regiment for Monk. On the Restoration of King Charles II in 1660, Monk marched his regiment from Scotland to support the new king. He crossed the border at Coldstream and his regiment joined the new royal army as the Coldstream Guards. Monk was appointed Duke of Albemarle.
  • Colonel Okey, whose New Model Army regiment of dragoons fought at the Battle of Dunbar, was executed after the Restoration of King Charles II as one of the regicides of King Charles I.

References for the Battle of Dunbar:

British Battles by Grant.

History of the British Army by Fortescue Volume 1

Battles in Britain by William Seymour

The previous battle in the English Civil War is the Siege of Basing House

The next battle in the English Civil War is the Battle of Worcester

To the English Civil War index


Search BritishBattles.com

Follow / Like Us

Follow us on Facebook Follow us on Pinterest  Follow us on RSS Follow us on Twitter

Other Pages

  • Home
  • Contact Us
  • Privacy
  • News Blog
  • Museums

The BritishBattles Podcast

If you are too busy to read the site, why not download a podcast of an individual battle and listen on the move! Visit our dedicated Podcast page or visit Podbean below.

Britishbattles on Podbean

Follow @Britishbattles


Wars Prior to 1700

  • Wars of Roman Britain
  • Battle of Medway
  • Danish Wars
  • Battle of Ashdown
  • Norman Conquest
  • Battle of Stamford Bridge
  • Battle of Hastings
  • Barons’ War
  • Battle of the Standard
  • Battle of Lewes
  • Battle of Evesham
  • Scottish Wars of Independence
  • Battle of Stirling Bridge
  • Battle of Falkirk
  • Battle of Bannockburn
  • Battle of Dupplin Moor
  • Battle of Halidon Hill
  • 100 Years War
  • Battle of Sluys
  • Battle of Morlaix
  • Battle of Auberoche
  • Battle of Caen
  • Battle of Creçy
  • Siege of Calais
  • Battle of Neville’s Cross
  • Battle of La Roche-Derrien
  • Battle of Winchelsea
  • Battle of Mauron
  • Battle of Poitiers
  • Battle of Cocherel
  • Battle of Auray
  • Battle of Najera
  • Battle of La Rochelle
  • Battle of Otterburn
  • Battle of Homildon Hill
  • Battle of Shrewsbury
  • Siege of Harfleur
  • Battle of Agincourt
  • Battle of Baugé
  • Battle of Cravant
  • Battle of Verneuil
  • Siege of Orléans
  • Battle of the Herrings
  • Battle of Patay
  • Battle of Formigny
  • Battle of Castillon
  • Wars of the Roses
  • First Battle of St Albans
  • Battle of Blore Heath
  • Battle of Northampton
  • Battle of Wakefield 1460
  • Battle of Mortimer’s Cross
  • Second Battle of St Albans
  • Battle of Towton
  • Battle of Barnet
  • Battle of Tewkesbury
  • Battle of Bosworth Field
  • Anglo Scottish War
  • Battle of Flodden
  • Battle of Pinkie
  • The Spanish War
  • The Spanish Armada
  • English Civil War
  • Battle of Edgehill
  • Battle of Seacroft Moor
  • Battle of Stratton
  • Battle of Wakefield 1643
  • Battle of Chalgrove
  • Battle of Adwalton Moor
  • Battle of Lansdown Hill
  • Battle of Roundway Down
  • Storming of Bristol
  • First Battle of Newbury
  • Battle of Cheriton
  • Battle of Cropredy Bridge
  • Battle of Marston Moor
  • Battle of Lostwithiel
  • Second Battle of Newbury
  • Battle of Naseby
  • Siege of Basing House
  • Battle of Dunbar
  • Battle of Worcester

Wars of 1700

  • War of the Spanish Succession
  • Battle of Blenheim
  • Battle of Ramillies
  • Battle of Oudenarde
  • Battle of Malplaquet
  • King George’s War (Austrian Succession)
  • Battle of Dettingen
  • Battle of Fontenoy
  • Battle of Rocoux
  • Battle of Lauffeldt
  • Jacobite Rebellion
  • Battle of Prestonpans
  • Battle of Falkirk
  • Battle of Culloden
  • Frederick the Great Wars
  • First Silesian War
  • Battle of Mollwitz
  • Battle of Chotusitz
  • Second Silesian War
  • Battle of Hohenfriedberg
  • Battle of Soor
  • Battle of Kesselsdorf
  • Seven Years War
  • Battle of Lobositz
  • Battle of Prague
  • Battle of Kolin
  • Battle of Rossbach
  • Battle of Leuthen
  • Battle of Zorndorf
  • Battle of Hochkirch
  • Battle of Kunersdorf
  • Battle of Liegnitz
  • Battle of Torgau
  • Battle of Burkersdorf
  • Battle of Minden
  • Battle of Emsdorf
  • Battle of Warburg
  • Battle of Kloster Kamp
  • Battle of Vellinghausen
  • Battle of Wilhelmstahl
  • Capture of Manila
  • Capture of Havana
  • Anglo-French Wars in India
  • Siege of Arcot
  • Battle of Arni
  • Battle of Kaveripauk
  • Battle of Plassey
  • French and Indian War
  • Battle of Monongahela 1755 – Braddock’s Defeat
  • Braddock’s Defeat: Part 1
  • Braddock’s Defeat: Part 2
  • Braddock’s Defeat: Part 3
  • Braddock’s Defeat: Part 4
  • Braddock’s Defeat: Part 5
  • Braddock’s Defeat: Part 6
  • Braddock’s Defeat: Part 7
  • Braddock’s Defeat: Part 8
  • Braddock’s Defeat: Part 9
  • Braddock’s Defeat: Part 10
  • Braddock’s Defeat: Part 11
  • Battle of Ticonderoga 1758
  • Capture of Louisburg 1758
  • Battle of Quebec 1759
  • American Revolutionary War
  • Battle of Lexington and Concord
  • Battle of Bunker Hill
  • Battle of Quebec 1775
  • Battle of Sullivan’s Island
  • Battle of Long Island
  • Battle of Harlem Heights
  • Battle of White Plains
  • Battle of Fort Washington
  • Battle of Trenton
  • Battle of Princeton
  • Battle of Ticonderoga 1777
  • Battle of Hubbardton
  • Battle of Bennington
  • Battle of Brandywine Creek
  • Battle of Freeman’s Farm
  • Battle of Paoli
  • Battle of Germantown
  • Battle of Saratoga
  • Battle of Monmouth
  • Siege of Savannah
  • Siege of Charleston
  • Battle of Camden
  • Battle of King’s Mountain
  • Battle of Cowpens
  • Battle of Guilford Courthouse
  • Battle of Yorktown
  • Siege of Gibraltar
  • Battle of Cape St Vincent 1780
  • Anglo-Mysore Wars
  • Storming of Seringapatam

Wars of 1800

  • Second Mahratta War
  • Battle of Assaye
  • Battle of Laswaree
  • Peninsular War
  • Battle of Roliça
  • Battle of Vimeiro
  • Battle of Sahagun
  • Battle of Benavente
  • Battle of Cacabelos
  • Battle of Corunna
  • Battle of the Douro
  • Battle of Talavera
  • Battle of the River Coa
  • Battle of Busaco
  • Battle of Barrosa
  • Battle of Campo Maior
  • Battle of Redinha or Pombal
  • Battle of Sabugal
  • Battle of Fuentes de Oñoro
  • Battle of Albuera
  • Battle of Usagre
  • Battle of El Bodon
  • Battle of Arroyo Molinos
  • Storming of Ciudad Rodrigo
  • Storming of Badajoz
  • Battle of Villagarcia
  • Battle of Almaraz
  • Battle of Salamanca
  • Battle of Garcia Hernandez
  • Battle of Majadahonda
  • Attack on Burgos
  • Retreat from Burgos
  • Battle of Morales de Toro
  • Battle of San Millan and Osma
  • Battle of Vitoria
  • Storming of San Sebastian
  • Battle of the Pyrenees
  • Battle of San Marcial
  • Battle of the Bidassoa
  • Battle of the Nivelle
  • Battle of the Nive
  • Battle of St Pierre
  • Battle of Orthez
  • Battle of Tarbes
  • Battle of Toulouse
  • Sortie from Bayonne
  • Napoleonic Wars
  • Battle of Cape St Vincent 1797
  • Battle of the Nile
  • Battle of Alexandria
  • Battle of Copenhagen
  • Battle of Trafalgar
  • Battle of Maida
  • Battle of Quatre Bras
  • Battle of Waterloo
  • First Afghan War
  • Battle of Ghuznee
  • Battle of Kabul and the retreat to Gandamak
  • Siege of Jellalabad
  • Battle of Kabul 1842
  • First Sikh War
  • Battle of Moodkee
  • Battle of Ferozeshah
  • Battle of Aliwal
  • Battle of Sobraon
  • Second Sikh War
  • Battle of Ramnagar
  • Battle of Chillianwallah
  • Battle of Goojerat
  • Crimean War
  • Battle of The Alma
  • Battle of Balaclava
  • Battle of Inkerman
  • Siege of Sevastopol
  • Indian Mutiny
  • Siege of Delhi
  • American Civil War
  • First Battle of Bull Run
  • Battle of Shiloh
  • Battle of Antietam
  • Battle of Fredericksburg
  • Battle of Chancellorsville
  • Abyssinian War
  • Battle of Magdala
  • Second Afghan War
  • Battle of Ali Masjid
  • Battle of Peiwar Kotal
  • Battle of Futtehabad
  • Battle of Charasiab
  • Battle of Kabul 1879
  • Battle of Ahmed Khel
  • Battle of Maiwand
  • Battle of Kandahar
  • Zulu War
  • Battle of Isandlwana
  • Battle of Rorke’s Drift
  • Battle of Khambula
  • Battle of Gingindlovu
  • Battle of Ulundi
  • War in Egypt and Sudan
  • Battle of Tel-el-Kebir
  • Battle of El Teb
  • Battle of Tamai
  • Battle of Abu Klea
  • Battle of Atbara
  • Battle of Omdurman
  • First Boer War
  • Battle of Laing’s Nek
  • Battle of Majuba Hill
  • Great Boer War
  • Battle of Talana Hill
  • Battle of Elandslaagte
  • Battle of Ladysmith
  • Battle of Belmont
  • Battle of Graspan
  • Battle of Modder River
  • Battle of Stormberg
  • Battle of Magersfontein
  • Battle of Colenso
  • Battle of Spion Kop
  • Battle of Val Krantz
  • Battle of Pieters
  • Battle of Paardeberg
  • Siege of Mafeking
  • Siege of Kimberley
  • Siege of Ladysmith
  • North-West Frontier of India
  • Black Mountain Expedition 1888
  • Black Mountain Expedition 1891
  • Waziristan 1894
  • Siege and Relief of Chitral
  • Malakand Rising 1897
  • Malakand Field Force 1897
  • Mohmand Field Force 1897
  • Tirah 1897

Wars of 1900

  • First World War
  • British Expeditionary Force (BEF)
  • Battle of Mons
  • Battle of Mons (2nd Day): Elouges
  • Battle of Landrecies
  • Battle of Le Cateau
  • Battle of Le Grand Fayt
  • Battle of Étreux
  • Battle of Heligoland Bight
  • Battle of Néry
  • Battle of Villers Cottérêts
  • Battle of the Marne
  • Battle of the Aisne
  • Texel Action
  • Battle of Coronel
  • Battle of the Falkland Islands
  • Battle of the Dogger Bank
  • Gallipoli Part I : Naval Attack on the Dardanelles
  • Gallipoli Part II: Land attack on Gallipoli Peninsular
  • Gallipoli Part III: ANZAC landing on 25th April 1915
  • Gallipoli Part IV: First landings at Cape Helles and Y Beach on 25th April 1915
  • Battle of Jutland Part I: Opposing fleets
  • Battle of Jutland Part II: Opening Battle Cruiser action on 31st May 1916
  • Battle of Jutland Part III: Clash between British and German Battle Fleets during the evening 31st May 1916
  • Battle of Jutland Part IV: Night Action 31st May to 1st June 1916
  • Battle of Jutland Part V: Casualties and Aftermath
  • Home


Copyright © 2025 · Chalfont Web Design

MENU
  • Wars Prior to 1700
    • Wars of Roman Britain
      • Battle of Medway
    • Danish Wars
      • Battle of Ashdown
    • Norman Conquest
      • Battle of Stamford Bridge
      • Battle of Hastings
    • Barons’ War
      • Battle of the Standard
      • Battle of Lewes
      • Battle of Evesham
    • Scottish Wars of Independence
      • Battle of Stirling Bridge
      • Battle of Falkirk
      • Battle of Bannockburn
      • Battle of Dupplin Moor
      • Battle of Halidon Hill
    • 100 Years War
      • Battle of Sluys
      • Battle of Morlaix
      • Battle of Auberoche
      • Battle of Caen
      • Battle of Creçy
      • Siege of Calais
      • Battle of Neville’s Cross
      • Battle of La Roche-Derrien
      • Battle of Winchelsea
      • Battle of Mauron
      • Battle of Poitiers
      • Battle of Cocherel
      • Battle of Auray
      • Battle of Najera
      • Battle of La Rochelle
      • Battle of Otterburn
      • Battle of Homildon Hill
      • Battle of Shrewsbury
      • Siege of Harfleur
      • Battle of Agincourt
      • Battle of Baugé
      • Battle of Cravant
      • Battle of Verneuil
      • Siege of Orléans
      • Battle of the Herrings
      • Battle of Patay
      • Battle of Formigny
      • Battle of Castillon
    • Wars of the Roses
      • First Battle of St Albans
      • Battle of Blore Heath
      • Battle of Northampton
      • Battle of Wakefield 1460
      • Battle of Mortimer’s Cross
      • Second Battle of St Albans
      • Battle of Towton
      • Battle of Barnet
      • Battle of Tewkesbury
      • Battle of Bosworth Field
    • Anglo Scottish War
      • Battle of Flodden
      • Battle of Pinkie
    • The Spanish War
      • The Spanish Armada
    • English Civil War
      • Battle of Edgehill
      • Battle of Seacroft Moor
      • Battle of Stratton
      • Battle of Wakefield 1643
      • Battle of Chalgrove
      • Battle of Adwalton Moor
      • Battle of Lansdown Hill
      • Battle of Roundway Down
      • Storming of Bristol
      • First Battle of Newbury
      • Battle of Cheriton
      • Battle of Cropredy Bridge
      • Battle of Marston Moor
      • Battle of Lostwithiel
      • Second Battle of Newbury
      • Battle of Naseby
      • Siege of Basing House
      • Battle of Dunbar
      • Battle of Worcester
  • Wars of 1700
    • War of the Spanish Succession
      • Battle of Blenheim
      • Battle of Ramillies
      • Battle of Oudenarde
      • Battle of Malplaquet
    • King George’s War (Austrian Succession)
      • Battle of Dettingen
      • Battle of Fontenoy
      • Battle of Rocoux
      • Battle of Lauffeldt
    • Jacobite Rebellion
      • Battle of Prestonpans
      • Battle of Falkirk
      • Battle of Culloden
    • Frederick the Great Wars
    • First Silesian War
      • Battle of Mollwitz
      • Battle of Chotusitz
    • Second Silesian War
      • Battle of Hohenfriedberg
      • Battle of Soor
      • Battle of Kesselsdorf
    • Seven Years War
      • Battle of Lobositz
      • Battle of Prague
      • Battle of Kolin
      • Battle of Rossbach
      • Battle of Leuthen
      • Battle of Zorndorf
      • Battle of Hochkirch
      • Battle of Kunersdorf
      • Battle of Liegnitz
      • Battle of Torgau
      • Battle of Burkersdorf
      • Battle of Minden
      • Battle of Emsdorf
      • Battle of Warburg
      • Battle of Kloster Kamp
      • Battle of Vellinghausen
      • Battle of Wilhelmstahl
      • Capture of Manila
      • Capture of Havana
    • Anglo-French Wars in India
      • Siege of Arcot
      • Battle of Arni
      • Battle of Kaveripauk
      • Battle of Plassey
    • French and Indian War
      • Battle of Monongahela 1755 – Braddock’s Defeat
      • General Braddock’s Defeat on the Monongahela in 1755 I
      • Braddock’s Defeat: Part 2
      • Braddock’s Defeat: Part 3
      • Braddock’s Defeat: Part 4
      • Braddock’s Defeat: Part 5
      • Braddock’s Defeat: Part 6
      • Braddock’s Defeat: Part 7
      • Braddock’s Defeat: Part 8
      • Braddock’s Defeat: Part 9
      • Braddock’s Defeat: Part 10
      • Battle of Ticonderoga 1758
      • Capture of Louisburg 1758
      • Battle of Quebec 1759
    • American Revolutionary War
      • Battle of Lexington and Concord
      • Battle of Bunker Hill
      • Battle of Quebec 1775
      • Battle of Sullivan’s Island
      • Battle of Long Island
      • Battle of Harlem Heights
      • Battle of White Plains
      • Battle of Fort Washington
      • Battle of Trenton
      • Battle of Princeton
      • Battle of Ticonderoga 1777
      • Battle of Hubbardton
      • Battle of Bennington
      • Battle of Brandywine Creek
      • Battle of Freeman’s Farm
      • Battle of Paoli
      • Battle of Germantown
      • Battle of Saratoga
      • Battle of Monmouth
      • Siege of Savannah
      • Siege of Charleston
      • Battle of Camden
      • Battle of King’s Mountain
      • Battle of Cowpens
      • Battle of Guilford Courthouse
      • Battle of Yorktown
      • Siege of Gibraltar
      • Battle of Cape St Vincent 1780
    • Anglo-Mysore Wars
      • Storming of Seringapatam
  • Wars of 1800
    • Second Mahratta War
      • Battle of Assaye
      • Battle of Laswaree
    • Peninsular War
      • Battle of Roliça
      • Battle of Vimeiro
      • Battle of Sahagun
      • Battle of Benavente
      • Battle of Cacabelos
      • Battle of Corunna
      • Battle of the Douro
      • Battle of Talavera
      • Battle of the River Coa
      • Battle of Busaco
      • Battle of Barrosa
      • Battle of Campo Maior
      • Battle of Redinha or Pombal
      • Battle of Sabugal
      • Battle of Fuentes de Oñoro
      • Battle of Albuera
      • Battle of Usagre
      • Battle of El Bodon
      • Battle of Arroyo Molinos
      • Storming of Ciudad Rodrigo
      • Storming of Badajoz
      • Battle of Villagarcia
      • Battle of Almaraz
      • Battle of Salamanca
      • Battle of Garcia Hernandez
      • Battle of Majadahonda
      • Attack on Burgos
      • Retreat from Burgos
      • Battle of Morales de Toro
      • Battle of San Millan and Osma
      • Battle of Vitoria
      • Storming of San Sebastian
      • Battle of the Pyrenees
      • Battle of San Marcial
      • Battle of the Bidassoa
      • Battle of the Nivelle
      • Battle of the Nive
      • Battle of St Pierre
      • Battle of Orthez
      • Battle of Tarbes
      • Battle of Toulouse
      • Sortie from Bayonne
    • Napoleonic Wars
      • Battle of Cape St Vincent 1797
      • Battle of the Nile
      • Battle of Alexandria
      • Battle of Copenhagen
      • Battle of Trafalgar
      • Battle of Maida
      • Battle of Quatre Bras
      • Battle of Waterloo
    • First Afghan War
      • Battle of Ghuznee
      • Battle of Kabul and the retreat to Gandamak
      • Siege of Jellalabad
      • Battle of Kabul 1842
    • First Sikh War
      • Battle of Moodkee
      • Battle of Ferozeshah
      • Battle of Aliwal
      • Battle of Sobraon
    • Second Sikh War
      • Battle of Ramnagar
      • Battle of Chillianwallah
      • Battle of Goojerat
    • Crimean War
      • Battle of The Alma
      • Battle of Balaclava
      • Battle of Inkerman
      • Siege of Sevastopol
      • Indian Mutiny
      • Siege of Delhi
    • American Civil War
      • First Battle of Bull Run
      • Battle of Shiloh
      • Battle of Antietam
      • Battle of Fredericksburg
      • Battle of Chancellorsville
    • Abyssinian War
      • Battle of Magdala
    • Second Afghan War
      • Battle of Ali Masjid
      • Battle of Peiwar Kotal
      • Battle of Futtehabad
      • Battle of Charasiab
      • Battle of Kabul 1879
      • Battle of Ahmed Khel
      • Battle of Maiwand
      • Battle of Kandahar
    • Zulu War
      • Battle of Isandlwana
      • Battle of Rorke’s Drift
      • Battle of Khambula
      • Battle of Gingindlovu
      • Battle of Ulundi
    • War in Egypt and Sudan
      • Battle of Tel-el-Kebir
      • Battle of El Teb
      • Battle of Tamai
      • Battle of Abu Klea
      • Battle of Atbara
      • Battle of Omdurman
    • First Boer War
      • Battle of Laing’s Nek
      • Battle of Majuba Hill
    • Great Boer War
      • Battle of Talana Hill
      • Battle of Elandslaagte
      • Battle of Ladysmith
      • Battle of Belmont
      • Battle of Graspan
      • Battle of Modder River
      • Battle of Stormberg
      • Battle of Magersfontein
      • Battle of Colenso
      • Battle of Spion Kop
      • Battle of Val Krantz
      • Battle of Pieters
      • Battle of Paardeberg
      • Siege of Mafeking
      • Siege of Kimberley
      • Siege of Ladysmith
    • North-West Frontier of India
      • Black Mountain Expedition 1888
      • Black Mountain Expedition 1891
      • Waziristan 1894
      • Siege and Relief of Chitral
      • Malakand Rising 1897
      • Malakand Field Force 1897
      • Mohmand Field Force 1897
      • Tirah 1897
  • Wars of 1900
    • First World War
      • British Expeditionary Force (BEF)
      • Battle of Mons
      • Battle of Mons (2nd Day): Elouges
      • Battle of Landrecies
      • Battle of Le Cateau
      • Battle of Le Grand Fayt
      • Battle of Étreux
      • Battle of Heligoland Bight
      • Battle of Néry
      • Battle of Villers Cottérêts
      • Battle of the Marne
      • Battle of the Aisne
      • Texel Action
      • Battle of Coronel
      • Battle of the Falkland Islands
      • Battle of the Dogger Bank
      • Gallipoli Part I: Naval Attack on the Dardanelles
      • Gallipoli Part II: Genesis of the land attack on the Gallipoli Peninsula
      • Gallipoli Part III: ANZAC landing on 25th April 1915
      • Gallipoli Part IV: First landings at Cape Helles and Y Beach on 25th April 1915
      • Battle of Jutland Part I: Opposing fleets
      • Battle of Jutland Part II: Opening Battle Cruiser action on 31st May 1916
      • Battle of Jutland Part III: Clash between British and German Battle Fleets during the evening 31st May 1916
      • Battle of Jutland Part IV: Night Action 31st May to 1st June 1916
      • Battle of Jutland Part V: Casualties and Aftermath
  • British Battles