The second defeat of the Mahdist insurgents under Osman Digna, fought in the Sudan on 13th March 1884

10th Hussars charging with native spears: Battle of Tamai on 13th March 1884 in the Sudanese War: picture by Orlando Norie
The previous battle of the War in Egypt and the Sudan is the Battle of El Teb
The next battle of the War in Egypt and the Sudan is the Battle of Abu Klea
To the War in Egypt and the Sudan index
Battle: Tamai.
War: Sudan Campaign.
Date of the Battle of Tamai: 13th March 1884.
Place of the Battle of Tamai: The East of the Sudan near the Red Sea coast.
Combatants at the Battle of Tamai: A British Army against the Sudanese Jihadists in revolt against the Khedive; mostly Hadendoa tribesmen.
Commanders at the Battle of Tamai: Major General Graham against the Mahdi’s lieutenant, Osman Digna.
The corner of the British Square at the Battle of Tamai on 13th March 1884 in the Sudanese War
Size of the armies at the Battle of Tamai: British: 3,342 infantry, gunners and sappers, 864 cavalry and 28 guns. The size of the Mahdist army is unknown but was probably in the region of 8,000 tribesmen and defected Egyptian troops.
Uniforms, arms and equipment at the Battle of Tamai: The British infantry were armed with the Martini Henry single shot breech loading rifle and bayonet. The English infantry wore khaki drill. The Highlanders wore grey jackets and kilts. All wore pith helmets. The cavalry were armed with sword and carbine.
Osman Digna’s Mahdist army had, at the Battle of El Teb, lost many of the rifles and guns captured from the Khedive’s Egyptian troops. Following El Teb more Sudanese tribesmen joined his army to fight the infidel British. These new recruits carried their traditional weapons of spears, swords and knives. The British knew that the next battle would be fought, not with long range rifle and gun fire, but in the traditional Sudanese manner of charges on foot armed with these weapons.
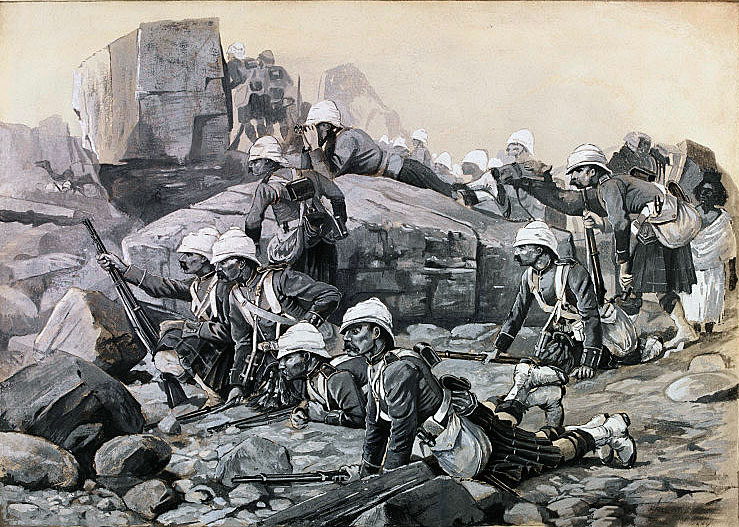
Reconnaissance patrol of Gordon Highlanders: Battle of Tamai on 13th March 1884 in the Sudanese War: picture by Melton Pryor
Winner of the Battle of Tamai: The British force.

King’s Royal Rifle Corps on exercise in England: Battle of Tamai on 13th March 1884 in the Sudanese War: picture by Orlando Norie
British Regiments at the Battle of Tamai:
10th Hussars
19th Hussars
Mounted Infantry
Royal Artillery with six 7 pounders, ten mountain guns and four 9-centimetre Krupp guns.
Naval Brigade; 162 men with two 9 pounders, six Gatling and Gardiner guns.
1st Battalion Black Watch
3rd Battalion King’s Royal Rifle Corps
1st Battalion Gordon Highlanders
2nd Battalion Royal Irish Fusiliers
1st Battalion York and Lancaster Regiment
Royal Marine Light Infantry
Royal Engineers
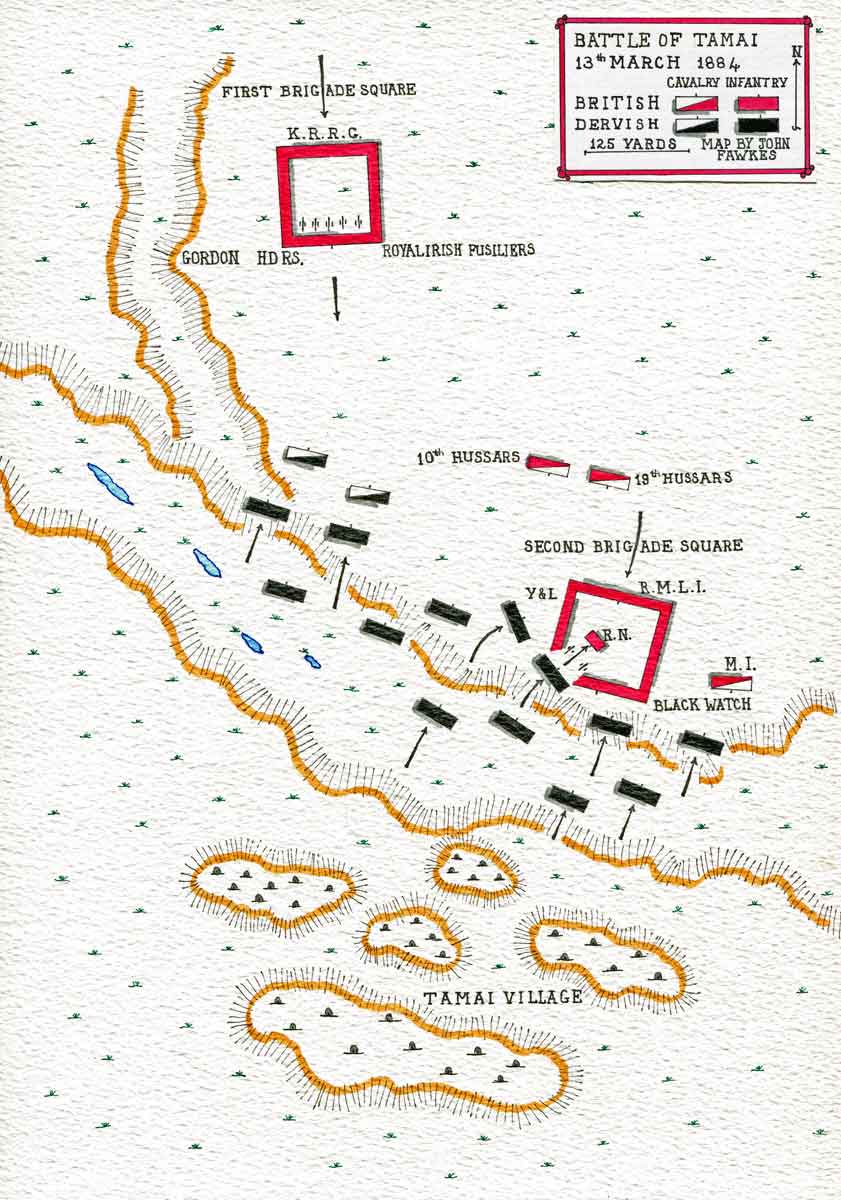
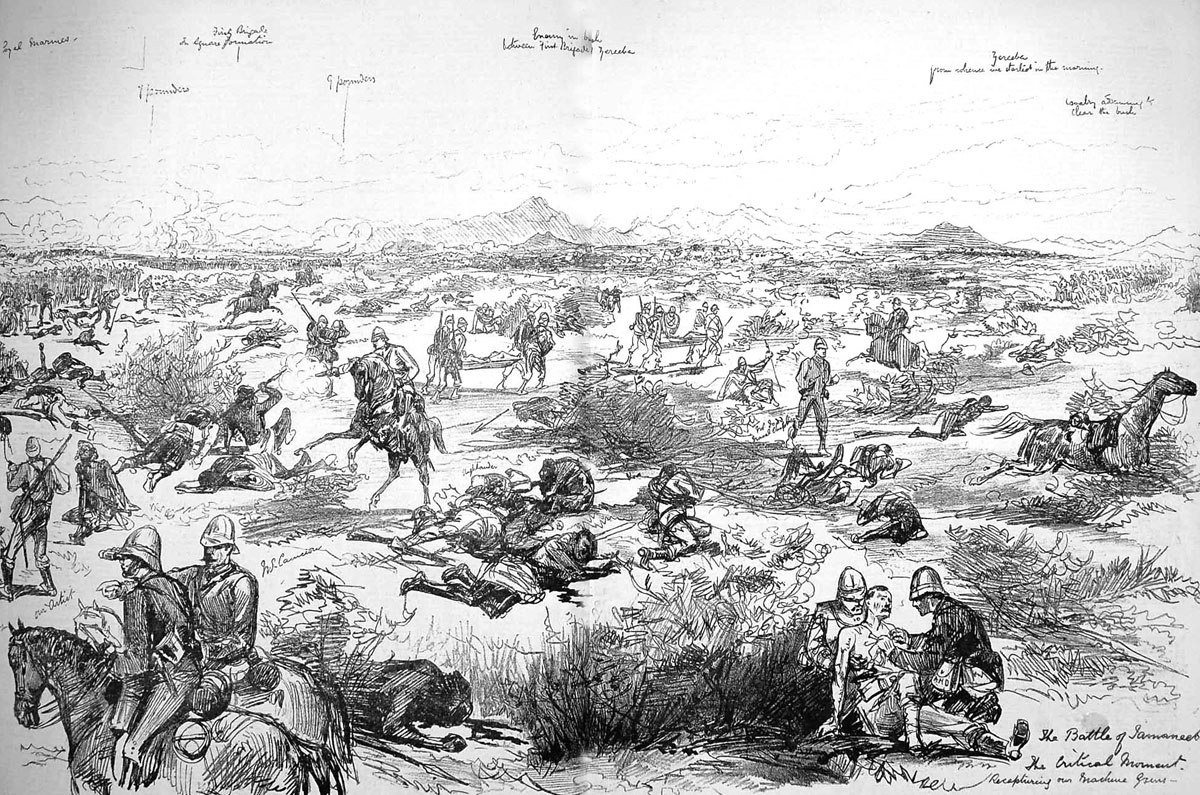
Map of the Battle of Tamai on 13th March 1884 in the Sudanese War: map by John Fawkes
Account of the Battle of Tamai:
Following the Battle of El Teb, it had been the expectation of the British commander, Major General Graham, that the Sudanese in rebellion against the Khedive under Osman Digna would capitulate and surrender the guns and rifles they had taken from the Egyptian army troops they had defeated in battle or captured from surrendered garrisons. Graham was mistaken. Osman Digna sent a number of defiant and threatening messages that made it clear that he fully intended to continue the revolt in the name of the Mahdi.
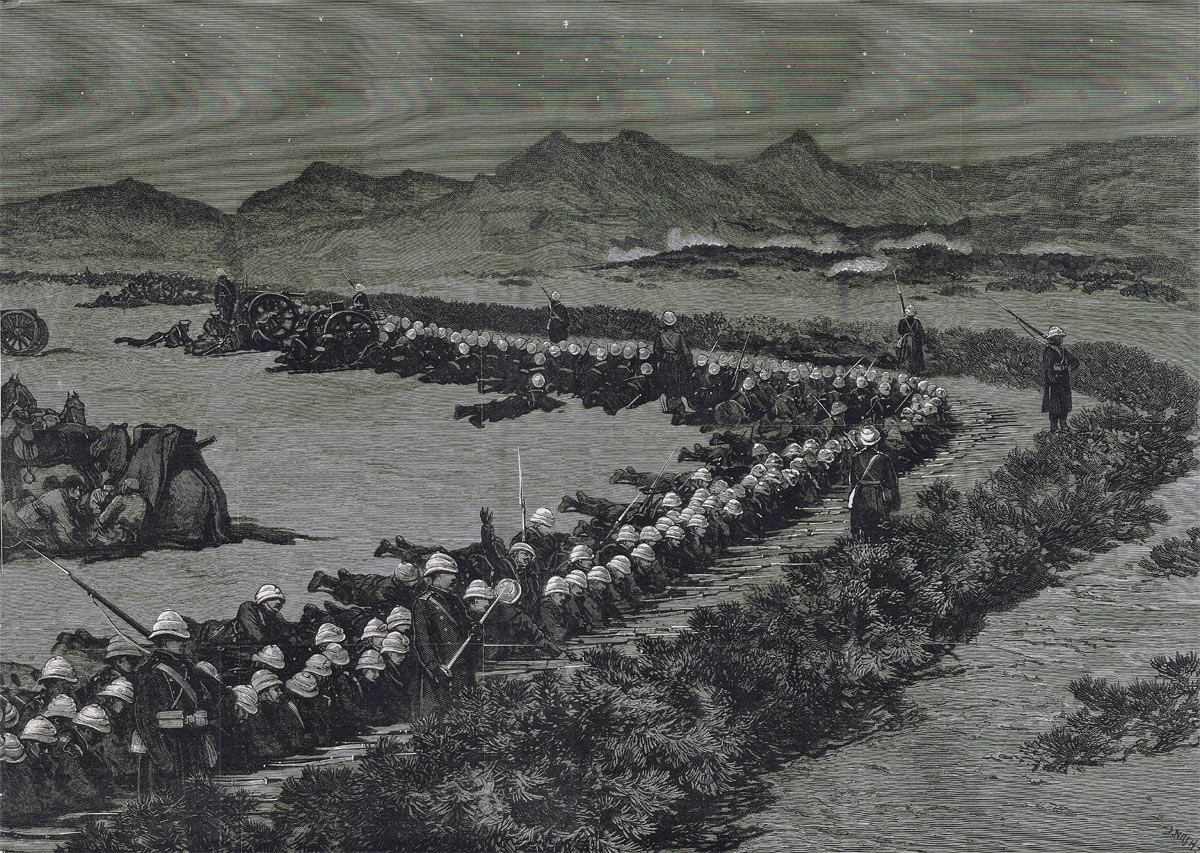
General Graham’s force in the zeriba on the night before the Battle of Tamai on 13th March 1884 in the Sudanese War
General Charles Gordon, now in Khartoum, urged General Graham to continue his operations against Osman Digna.
General Graham and Admiral Hewitt were forced to abandon the plan to withdraw the British force to Egypt and, instead, to advance inland from Suakin to attack Osman Digna’s camp at Tamai.
The first step was to dispatch the Black Watch to occupy a zeriba (a thorn branch enclosure), built inland by Baker Pasha earlier in the year for his Egyptian troops, subsequently annihilated by Osman Digna, which lay within a few miles of the Sudanese camp.
Battle of Tamai on 13th March 1884 in the Sudanese War: drawing by Melton Pryor
On 12th March 1884, the rest of General Graham’s force marched into the zeriba to join the Black Watch. During that night, the British troops were kept on edge by a desultory rifle fire from a group of around 150 skirmishers, who circled the zeriba. The most prominent targets were the British hospital wagons, so those mainly harassed by the fire were the medical staff.
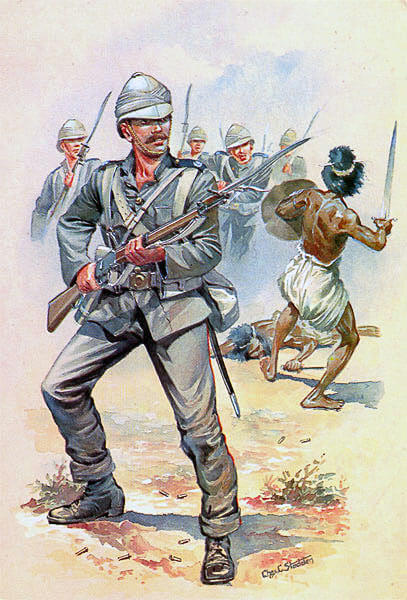
Royal Marine Light Infantry at the Battle of Tamai on 13th March 1884 in the Sudanese War: picture by Charles Stadden
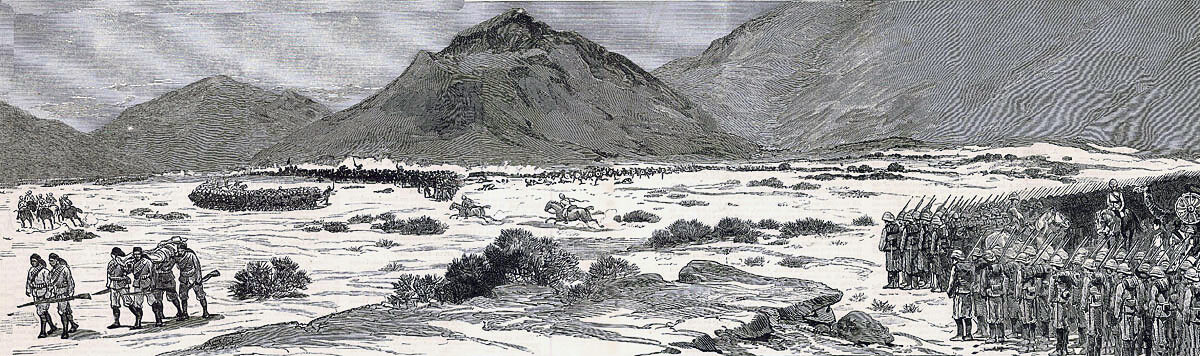
At 8am on 13th March 1884, the British force paraded for the advance to attack Osman Digna’s camp, some two miles distant.
Two brigade squares were formed with the Second Brigade leading and the First Brigade marching on a path behind and to the right of the Second Brigade.
The leading Second Brigade, commanded by General Davis, comprised 1st Black Watch, 2nd York and Lancaster Regiment, the Royal Marine Light Infantry detachment and the Royal Naval Brigade with Gardiner and Gatling guns. The First Brigade comprised 1st Gordon Highlanders, 2nd Royal Irish Fusiliers and 3rd King’s Royal Rifle Corps and was commanded by Colonel Redvers Buller. General Graham and his staff accompanied the leading Second Brigade.
The British cavalry, after reconnoitring the Sudanese positions, fell back behind the Second Brigade.
The Mahdists could be seen ahead of the squares, skirmishers to the front and the main force in the camp to the rear. The going for the British troops was difficult, the route dotted with thorn bushes and intersected by gullies containing dry water courses.
Two squadrons of British cavalry moved forward on the left and engaged the Mahdists with dismounted rifle fire, until, under threat of being overrun, they withdrew.
Two British Brigade Squares at the Battle of Tamai on 13th March 1884 in the Sudanese War: two newspaper correspondents are riding from the rear square to the leading square
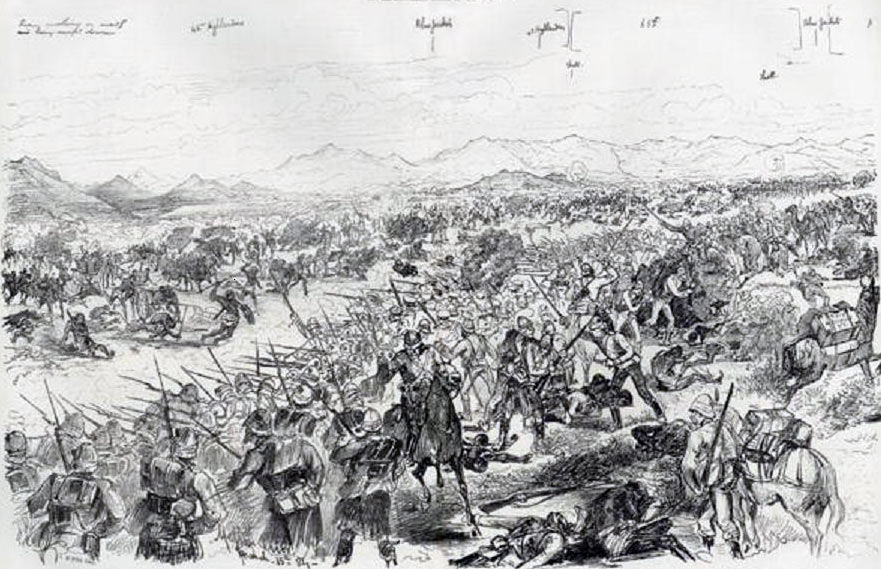
The Second Brigade came into contact with the Mahdists and fire was opened, the brigade square continuing to advance. The brigade then found itself on the edge of a wide deep gully. The sides of the square were subjected to repeated and increasingly threatening rushes by the Mahdists. The fire discipline of the troops began to deteriorate. Smoke from the rifle fire with the dust from the dry plain, stirred up by the numbers of men moving about, made visibility increasingly difficult. The front face of the brigade square moved down into the ravine, but the men forming the sides of the square failed to conform fully to the movement, so that the continuity of the square was broken and it began to disintegrate.
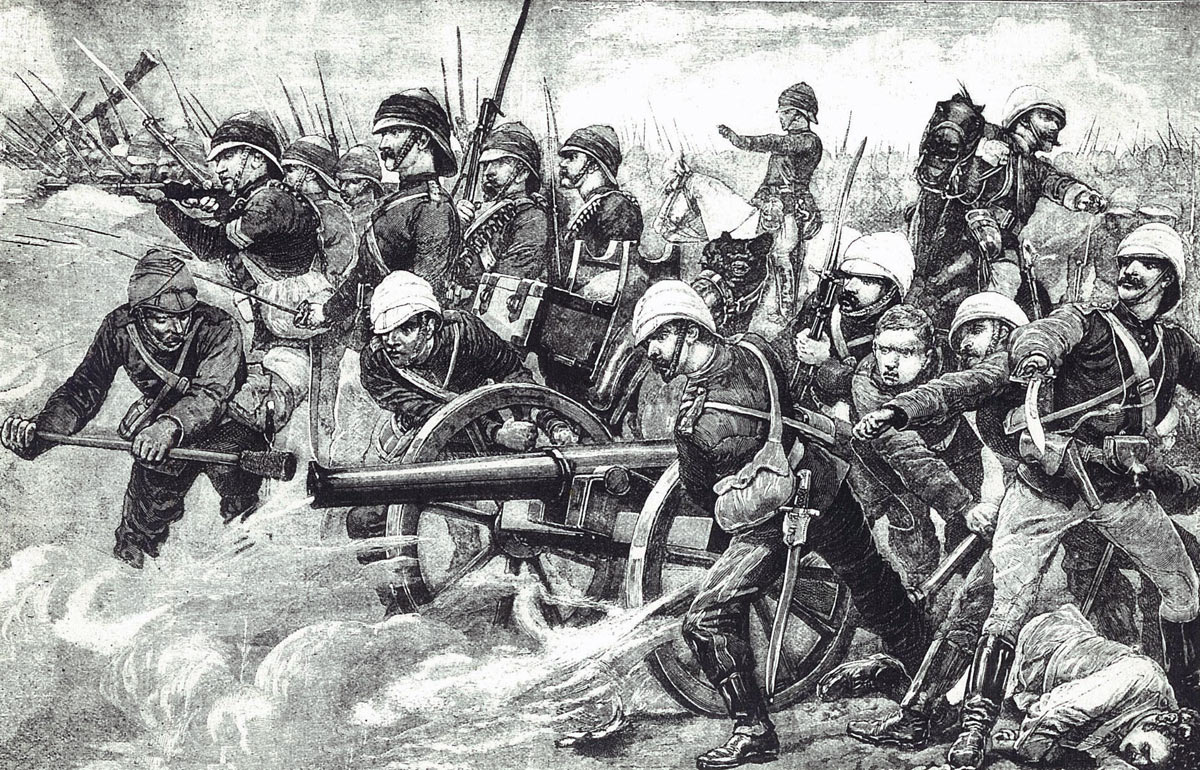
British Second Brigade Square under heavy attack at the Battle of Tamai on 13th March 1884 in the Sudanese War
The Mahdists launched an attack on the right face of the square, comprising 2nd York and Lancaster, which halted to give fire, while the front face of the square continued to advance. The York and Lancaster fell back on the Royal Marine Light Infantry and the two battalions became intertwined and disordered. The Black Watch, forming the front, were thrown into confusion and retreated into the square. The brigade was forced to withdraw, pressed hard by the attacking tribesmen. Three Royal Navy guns had to be abandoned and casualties mounted. The tribesmen captured several Gatling and Gardiner guns.
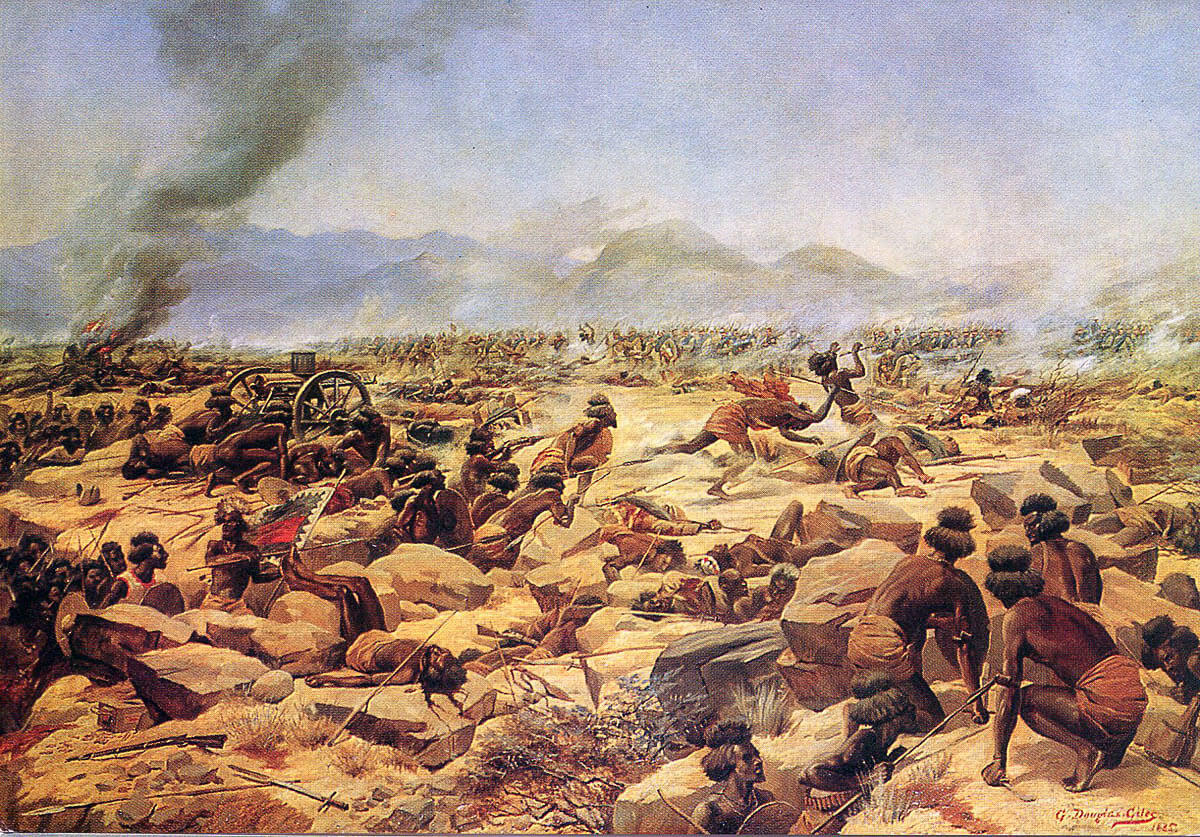
Mahdists with the captured Gatling and Gardiner guns at the Battle of Tamai on 13th March 1884 in the Sudanese War: picture by Douglas Giles
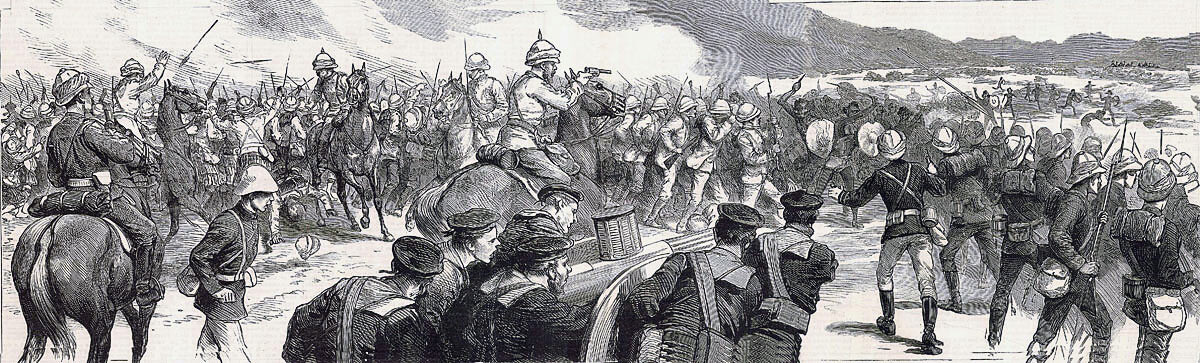
Colonel Buller’s First Brigade now came up on the right of the Second Brigade, to the lip of the ravine. Not until now engaged and in good order, Buller’s battalions opened a heavy fire on the Mahdist tribesmen. The Second Brigade was reformed by General Graham and his staff, fresh supplies of ammunition being brought forward. The brigade, with the Black Watch taking the lead, moved back to engage the Mahdists at the edge of the ravine, retaking the abandoned guns.
A party of tribesmen launched an attack from concealed positions in a neighbouring gully, but were shot down by the British troops, now well in hand.
The two brigades opened a heavy fire on the Mahdists, as they withdrew across the ravine and up the far bank.
With the First Brigade providing supporting fire, the Second Brigade stormed across the ravine. The brigades reformed on the far bank of the ravine and moved into the valley to occupy Osman Digna’s camp.
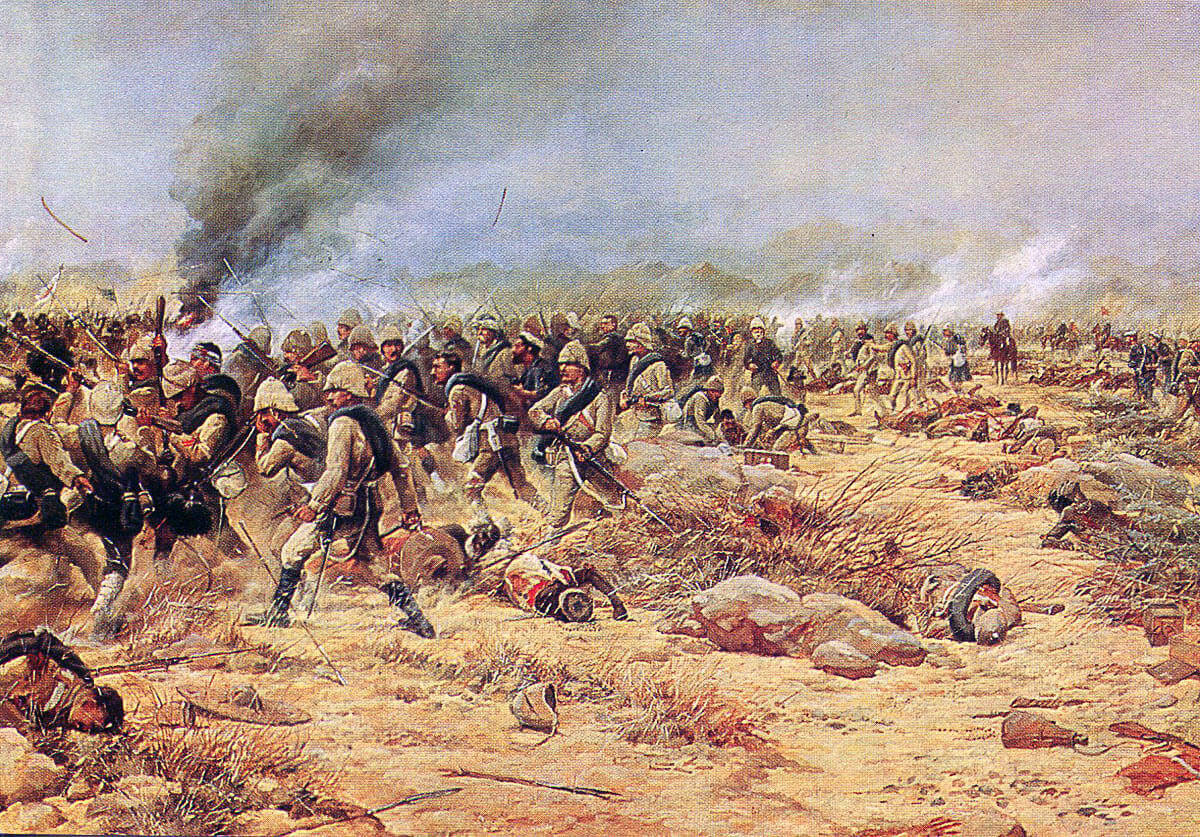
1st York and Lancaster and 1st Black Watch rallying for the counter-attack at the Battle of Tamai on 13th March 1884 in the Sudanese War: picture by Douglas Giles
The Mahdists continued to resist the advance, but were finally dispersed by artillery fire. The battle was over, leaving Osman Digna’s camp in British hands, to be burnt by Colonel Buller’s brigade.
Casualties at the Battle of Tamai: British casualties were 6 officers and 105 non-commissioned ranks killed and 8 officers and 103 non-commissioned ranks wounded. British estimates put the Sudanese dead at 2,000. The number of wounded was unknown.
After the Battle of Tamai on 13th March 1884 in the Sudanese War: picture by Melton Pryor
Follow-up to the Battle of Tamai: It was General Graham’s intention to follow up his two successes, at El Teb and Tamai, by sending his cavalry across country to Berber on the Nile, but he was ordered by the British Government to disembark his force and return to Egypt, leaving a garrison in Suakin.
Graham’s force had one last action with Osman Digna’s tribesmen at Tamanieb before leaving the Sudan for Egypt.
General Gordon was left to manage the deteriorating situation in the Sudan with only Egyptian resources.
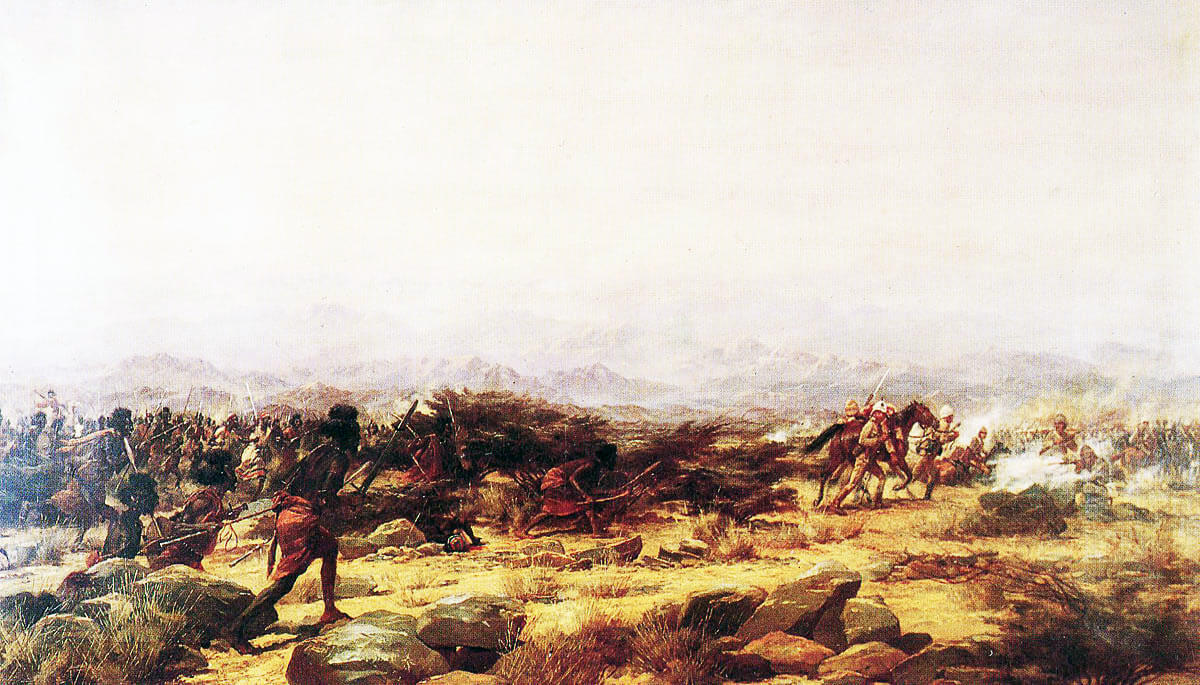
‘An incident at the Battle of Tamai, Eastern Sudan, March 13, 1884’: picture showing Lieutenant Tarling winning the VC by rescuing Private Morley of the Mounted Infantry: picture by Major Godfrey Douglas Giles
Anecdotes and traditions from the Battle of Tamai:
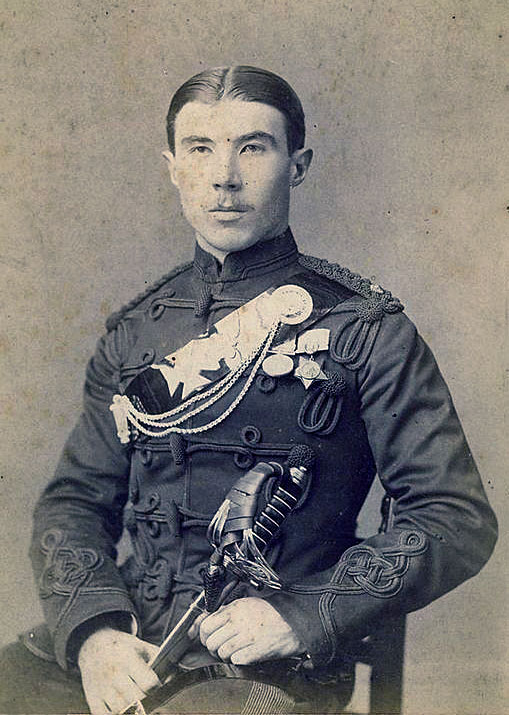
Lieutenant Scrope Marling KRRC
- Two Victoria Crosses were awarded for the Battle of Tamai: one to Lieutenant Scroope Marling of 3rd King’s Royal Rifle Corps, serving with the Mounted Infantry, for rescuing a private soldier who was wounded and dismounted during the attack. The second VC went to Private Edwards of the Black Watch for vigorously defending the mules he was in charge of and assisting his gun team to bring their gun into action.
- Winston Churchill, in his book ‘the River War’, recalled that at the Battle of Tamai a reporter cried out ‘the battle is lost’. The commanding officer of the Hussars called out ‘How can you say that? The 10th Hussars are here.’
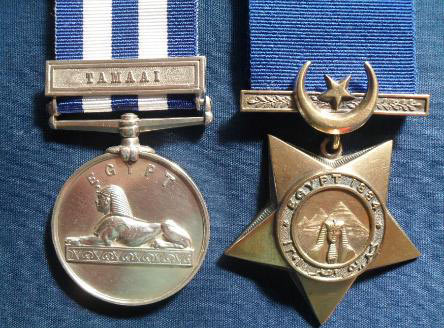
Campaign Medals for the Battle of Tamai: For the Sudan campaign, the British troops received the Egypt medal that had been issued for the Tel-el-Kebir campaign in 1882, but without the date. Where troops already had the Egypt 1882 medal they received an additional clasp ‘Tamai’ for that medal. In the same way, the Khedive Star was issued to those soldiers that did not already have it.
References:
War on the Nile by Michael Barthorp.
British Battles by Grant.
History of British Cavalry Volume 3: 1872-1898 by the Marquess of Anglesey
The previous battle of the War in Egypt and the Sudan is the Battle of El Teb
The next battle of the War in Egypt and the Sudan is the Battle of Abu Klea
To the War in Egypt and the Sudan index