Frederick the Great’s iconic victory over the Austrian and Saxon Army
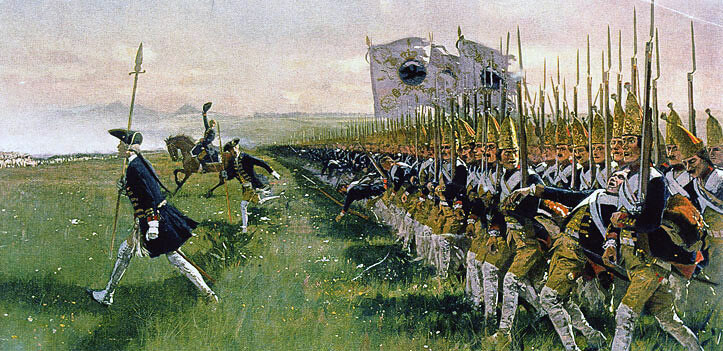
Attack of the Prussian Infantry at the Battle of Hohenfriedberg 4th June 1745 in the Second Silesian War: picture by Carl Röchling
The previous battle in the First Silesian War is the Battle of Chotusitz
The next battle in the Second Silesian War is the Battle of Soor
To the Second Silesian War index
Battle: Hohenfriedburg
Date of the Battle of Hohenfriedburg: 4th June 1745.
Place of the Battle of Hohenfriedburg: In central Silesia near the town of Schweidnitz.
War: The Second Silesian War.
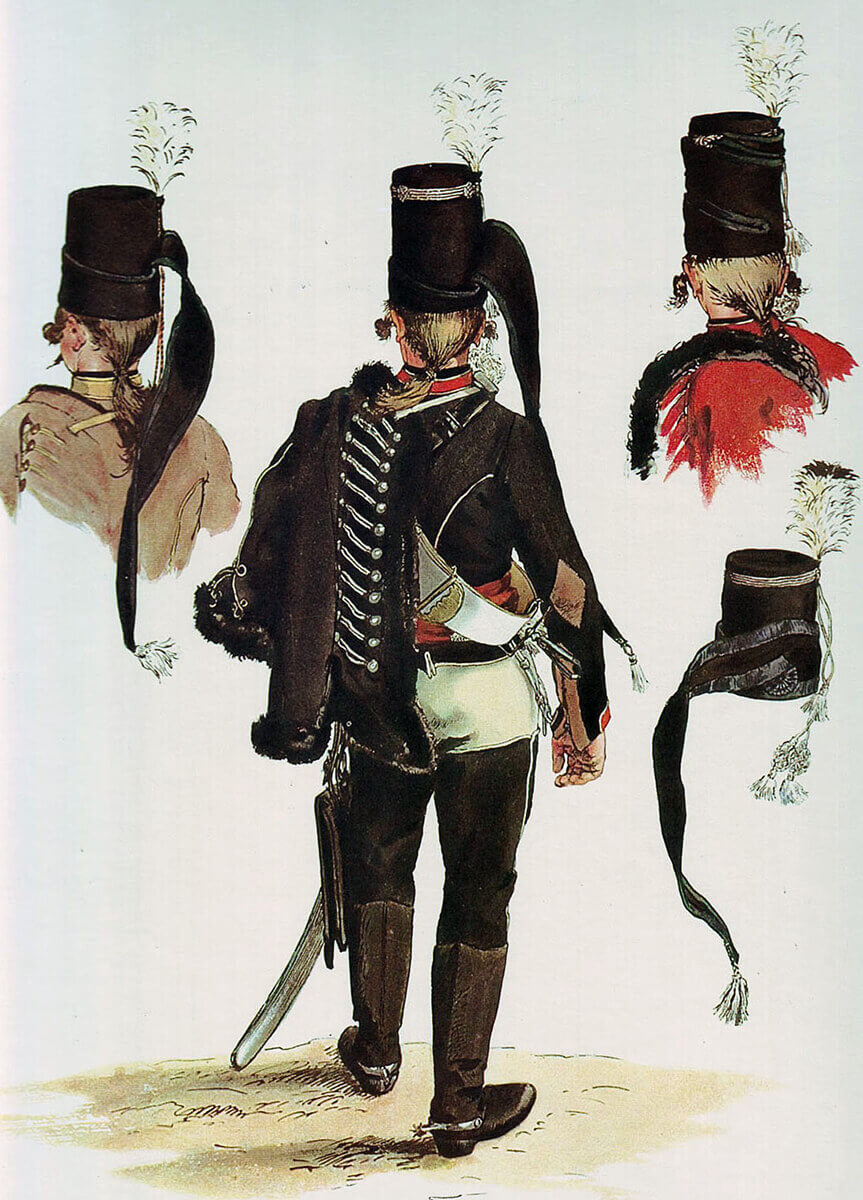
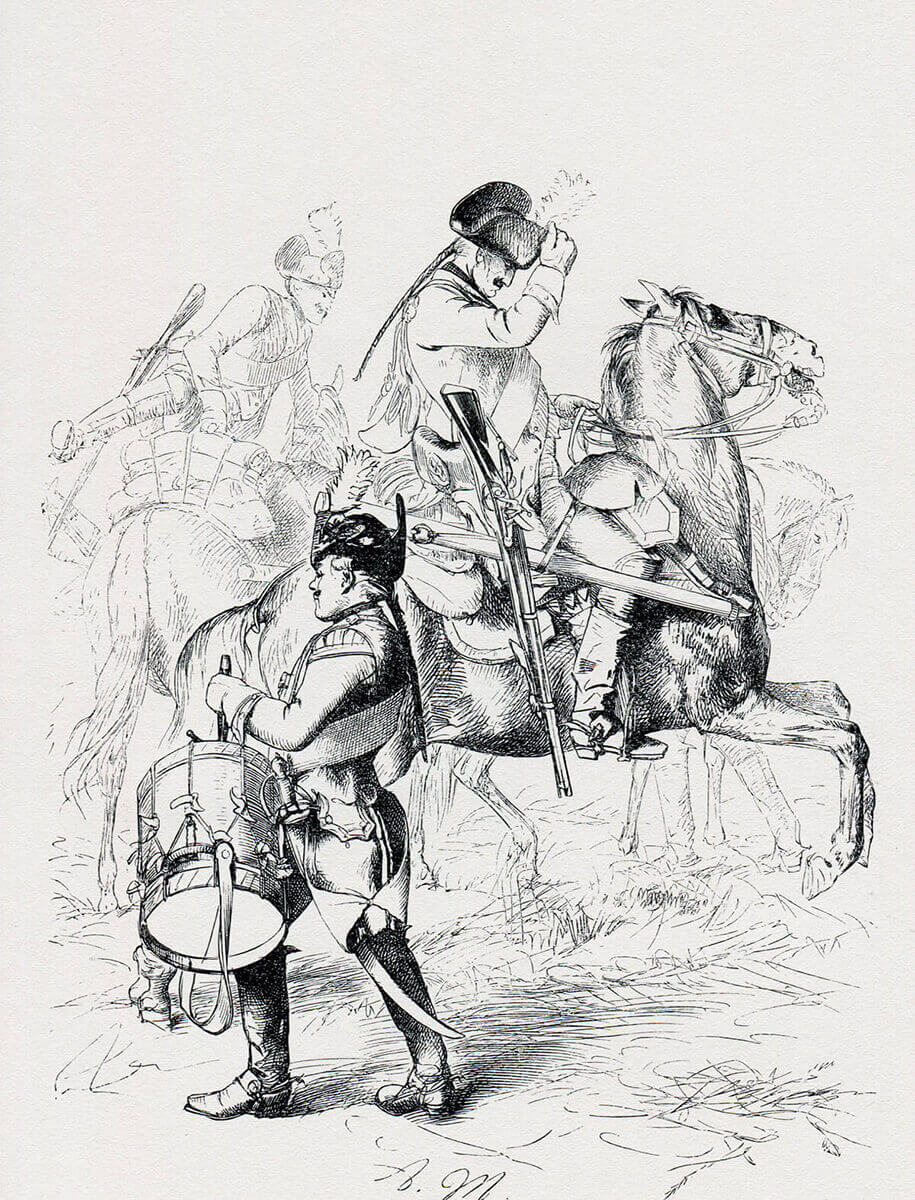
Prussian Husaren-Regiment von Ruesch No 5: Battle of Hohenfriedberg 4th June 1745 in the Second Silesian War: picture by Adolph Menzel
Contestants at the Battle of Hohenfriedburg: Prussians against the Imperial Austrian Army comprising the various nationalities that made up the Austrian Army (Austrians, Hungarians, Bohemians, Silesians, Croats, Italians and Moravians) and the Saxons.
Generals at the Battle of Hohenfriedburg: King Frederick II of Prussia commanded the Prussian Army against Prince Charles of Lorraine, the brother-in-law of the Empress Maria Theresa, commanding the Austrian Army with the Duke of Weissenfels commanding the Saxon Army.
Size of the Armies at the Battle of Hohenfriedburg: The Prussian Army comprised 42,000 infantry, 14,500 heavy cavalry, 2,300 hussars and 192 guns. Prince Charles’ army comprised 40,000 Austrians, 19,000 Saxons and 122 guns.
Winner of the Battle of Hohenfriedburg: The Prussians decisively.
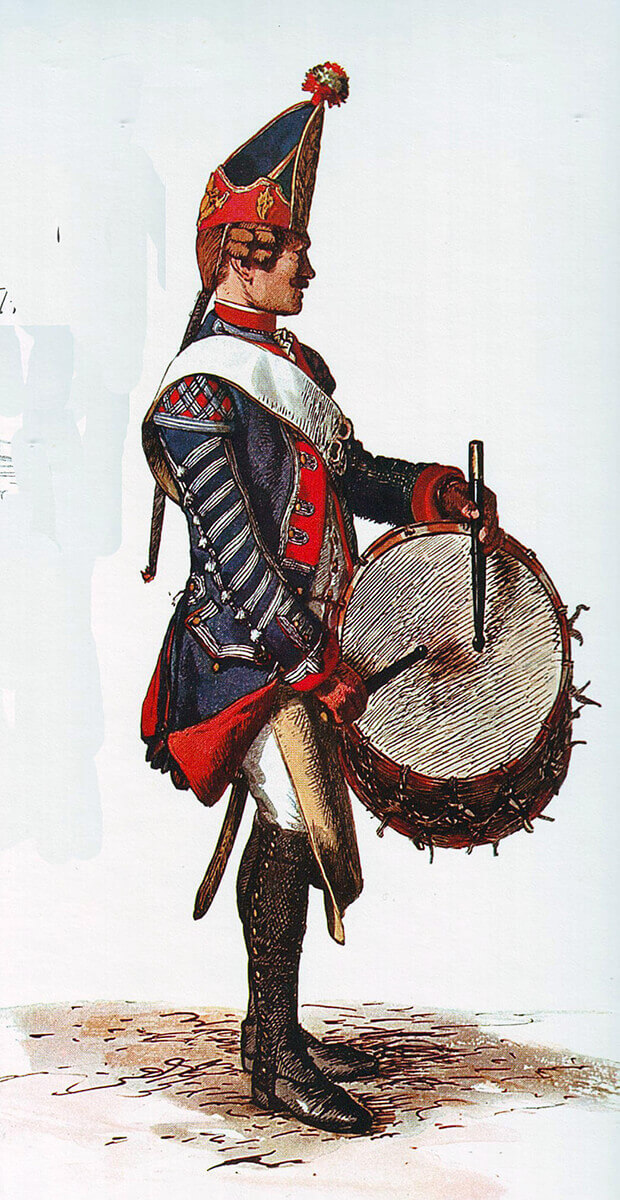
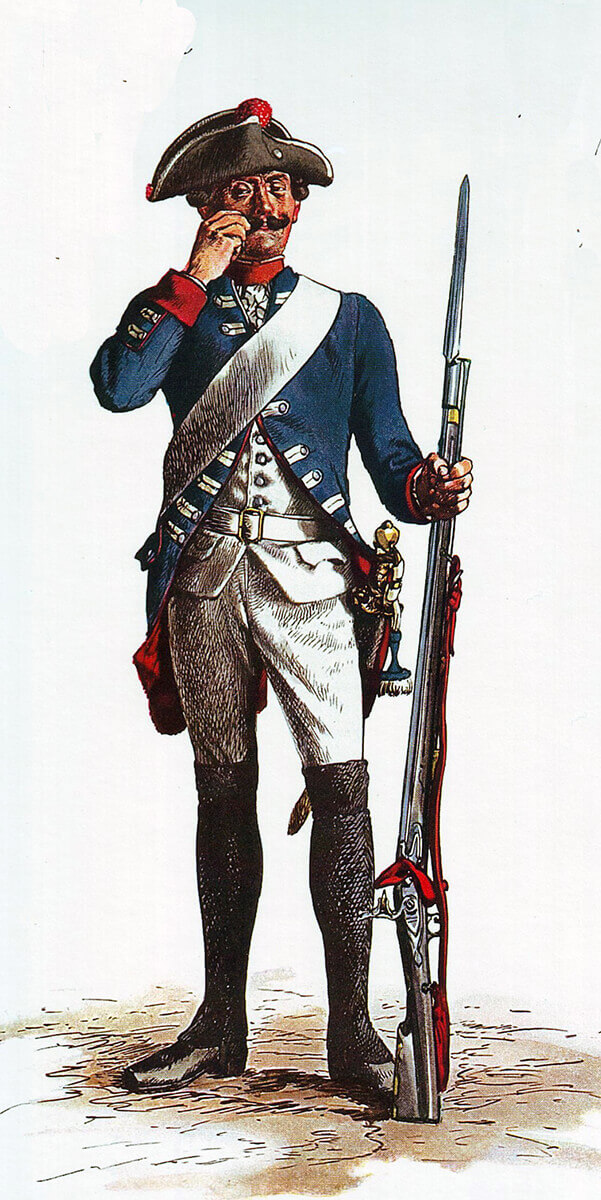
Uniforms and equipment at the Battle of Hohenfriedburg: The Prussian infantry and artillery wore a dark blue coat turned back at the lapels, cuffs and skirts, britches and white thigh length gaiters. From cross belts hung an ammunition pouch, bayonet and ‘hanger’ or small sword. Headgear for the line companies was the tricorne hat with the receding front corner bound with white lace. Grenadiers wore the distinctive mitre cap with the brass plate at the front. Fusilier Infantry Regiments and gunners wore the smaller version of the grenadier cap.
The infantry carried the musket as their main weapon. The single shot musket could be loaded and fired by a well trained soldier between 3 and 4 times a minute. During the course of his wars Frederick introduced the iron ramrod and then the reversible ramrod which increased the efficiency of his infantry, the wooden ramrod being liable to break in the stress of battle.
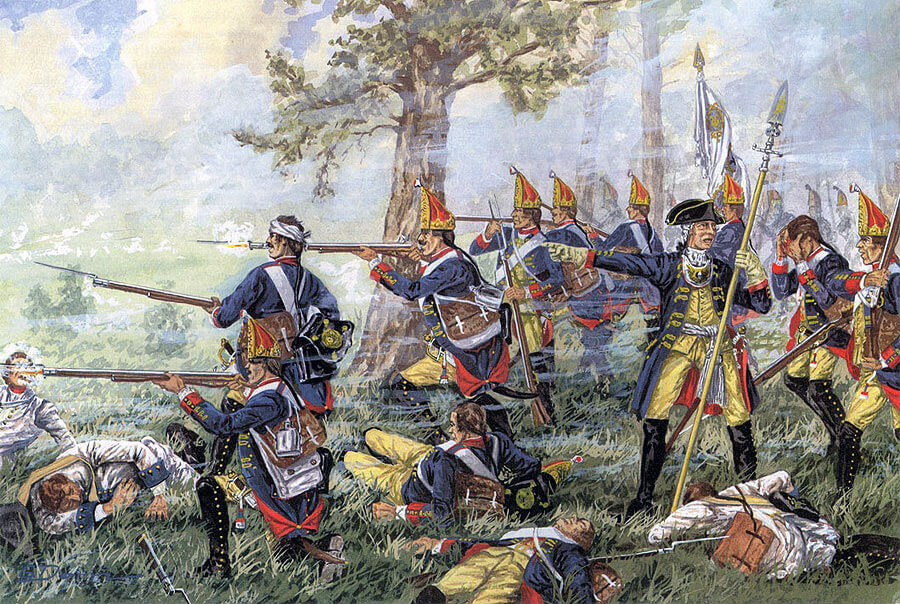
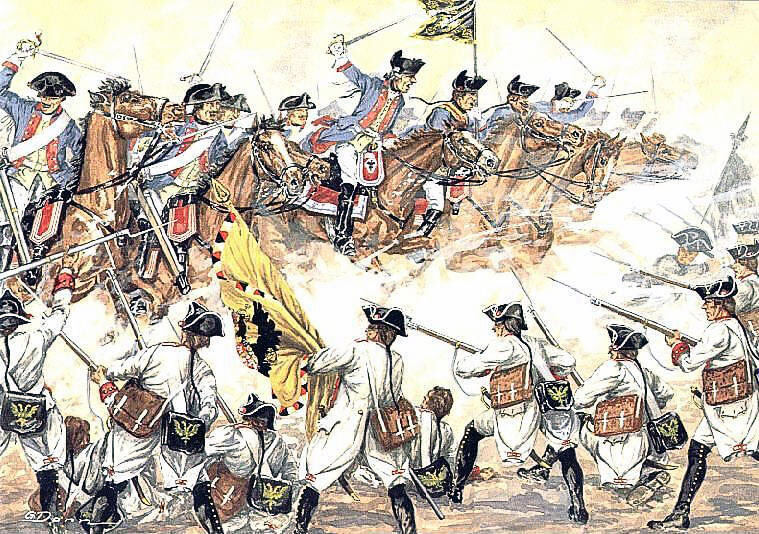
Grenadier Guard Battalion of Einsiedel No. 6 at the Battle of Hohenfriedberg 4th June 1745: Battle of Hohenfriedberg 4th June 1745 in the Second Silesian War: picture by Gemälde von Gϋnter Dorn.
The Prussian infantry regiment was based on the cantonment, with soldier joining their local regiment. Soldiers were released for key agricultural times such as sewing and harvesting. In the autumn reviews were conducted of all regiments to check that each regiment was up to the required standard. Each year certain regiments were selected to conduct the review at Potsdam under the eye of the King. Officers whose soldiers were considered by Frederick not to be of a sufficient standard were subjected to a public tongue lashing and in extreme cases dismissed on the spot.
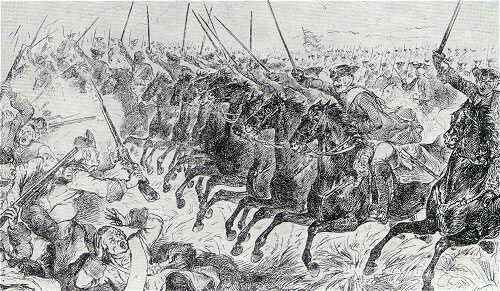
Charge of the Bayreuth Dragoons at the Battle of Hohenfriedberg 4th June 1745 in the Second Silesian War:
The efficiency of the Prussian regiments at drill enabled them to move around the battlefield with a speed and manoeuvrability that no other European Army could equal.
Heavy cavalry of the period comprised cuirassiers, whose troopers wore steel breastplates, and dragoons. The main form of light cavalry were the regiments of hussars. The Austrian hussars were Hungarian and the genuine article while the hussars of other armies were given the same dress as Hungarian hussars and expected to perform to similar standards.
The Prussian cuirassiers wore a white coat, steel cuirass, white britches and thigh boots. The headgear was the tricorne hat. Dragoons wore a light blue coat. Weapons were a heavy cavalry sword and single shot flintlock carbine.
Charge of the Bayreuth Dragoons at the Battle of Hohenfriedberg 4th June 1745 in the Second Silesian War
The light cavalry arm was provided by the Prussian Hussar regiments. Frederick found the Prussian Hussars as inadequate for their role as the heavy cavalry regiments. Following the Battle of Mollwitz and in particular after the First Silesian War the hussars were re-organised and re-trained to provide a first class scouting and light cavalry service. Frederick found in Colonel von Zieten the ideal officer to implement the improvements in the hussar regiments. The Prussian Hussars wore the traditional hussar dress worn by the original Hungarian Hussars of tunic, britches, dolman (slung jacket), busby (fur hat) with bag, sabretache (leather wallet on straps) and curved sword.
The Austrian infantry wore white coats with lapels, cuffs and skirts turned back showing the regimental lining colour. Headgear was the tricorne hat for line infantry and bearskin cap for grenadiers. The infantry weapons were musket, bayonet and hanger small sword. Heavy cavalry wore white coats and hats as for the infantry and were armed with a heavy sword and carbine. The Austrian army contained a large number of irregular units such as the Pandours from the Balkans who wore their ethnic dress without uniformity. Hungarian Hussars provided the light cavalry arm. These Hussars were dressed as described for the Prussian Hussars, were considered to be little more than bandits but were highly effective in all the roles required of light cavalry.
The artillery of each army was equipped with a range of muzzle loading guns. The Prussian Artillery was considerably more efficient at manoeuvring on the battle field. In the changes implemented by Frederick after the First Silesian War horse artillery was introduced to support the Prussian cavalry.
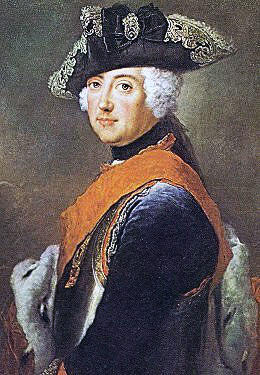
Frederick II, King of Prussia, commander of the Prussian Army at the Battle of Hohenfriedberg 4th June 1745 in the Second Silesian War
The Battle of Hohenfriedberg Background
The Prussian Army and State of the middle of the 18th Century owed its strength to the father of Frederick the Great, King Frederick William, the ‘Soldier King’. The Kingdom of Prussia comprised a number of areas scattered across Northern Germany from Minden and the tiny provinces of Jules and Berg in the West to the more compact provinces of Pomerania and East Prussia on the Baltic coast in the East. The capital of Prussia lay in the City of Berlin in the heartland of Brandenburg. During his reign Frederick William established an efficient civil state with the primary duty of supporting a large and well organised army, the bedrock of which was the Prussian Infantry. The noble families of Prussia were required to commit their sons to the army’s officer corps. Unlike the military nobility in other European states the Prussian Officer Corps was expected to devote its energies to learning its fighting trade. Regiments were reviewed on an annual basis by the King and woe betide the officers of any regiment that fell below the required standard of drill and performance.
Charge of the Bayreuth Dragoons at the Battle of Hohenfriedberg 4th June 1745 in the Second Silesian War
The Prussian Army established the technique of battlefield drill in the era of the musket. Prussian Infantry regiments could be trusted to move around the battlefield in order and at speed in a way that no other army could. Frederick the Great, while undoubtedly owing a great deal to the work his father had carried out on the army and state, brought his own unique talents to bear in improving the infantry and forging formidable assets out of the arms his father had neglected; principally the cavalry and the artillery, after the dismal performance of the Prussian cavalry at Mollwitz.
Frederick William had a reverence for the established order in Europe, holding the Emperor of Austria in particular awe. He would not have dreamt of launching Prussia on the extraordinary series of wars Frederick the Great began in 1741 by invading the Austrian province of Silesia.
Prussian Garde du Corps No 13: Battle of Hohenfriedberg 4th June 1745 in the Second Silesian War: picture by Adolph Menzel
Frederick William died on 31st May 1740 and Frederick II took the throne of the Kingdom of Prussia. On 20th October 1740 the Emperor Charles VI of Austria died leaving the imperial throne to his daughter Maria Theresa. Frederick resolved to seize the Austrian province of Silesia for Prussia.
Prosperous and partly Protestant, Silesia lay on the southern Prussian border along the banks of the river Oder. With its population of 1.5 million Frederick saw Silesia as a significant addition to the Prussian state with its 2.2 million inhabitants. But Frederick would have to fight 3 wars over 22 years with the Austro-Hungarian Empire for his prize.
In the First Silesian War (1741 to 1742) Frederick defeated the Austrians at the battles of Mollwitz and Chotusitz and made peace in the Treaty of Breslau, leaving his allies France and Bavaria to fight against the Austrians.
Frederick intended to re-enter the war against Austria when he considered the time to be right. Between 1742 and 1744 Frederick drove his army hard to overcome the inadequacies revealed by the First Silesian War. In particular he re-organised and re-trained the Prussian Cavalry and Artillery. In the autumn of 1743 the first all arms autumn manoeuvres were held.
In 1744 Frederick re-entered the war, invading Bohemia to take advantage of the absence of Austrian troops on the Rhine fighting the French. The invasion was made by way of Saxony in late August 1744. On 16th September 1744 Frederick captured Prague and the Prussians moved on to occupy more of Bohemia.
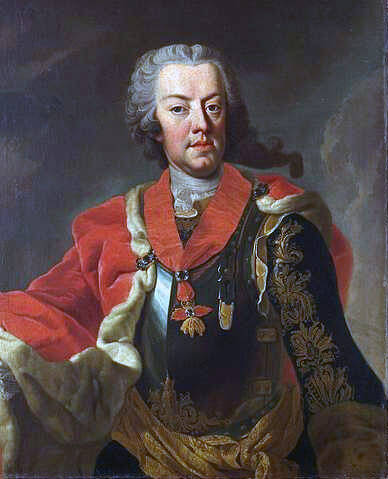
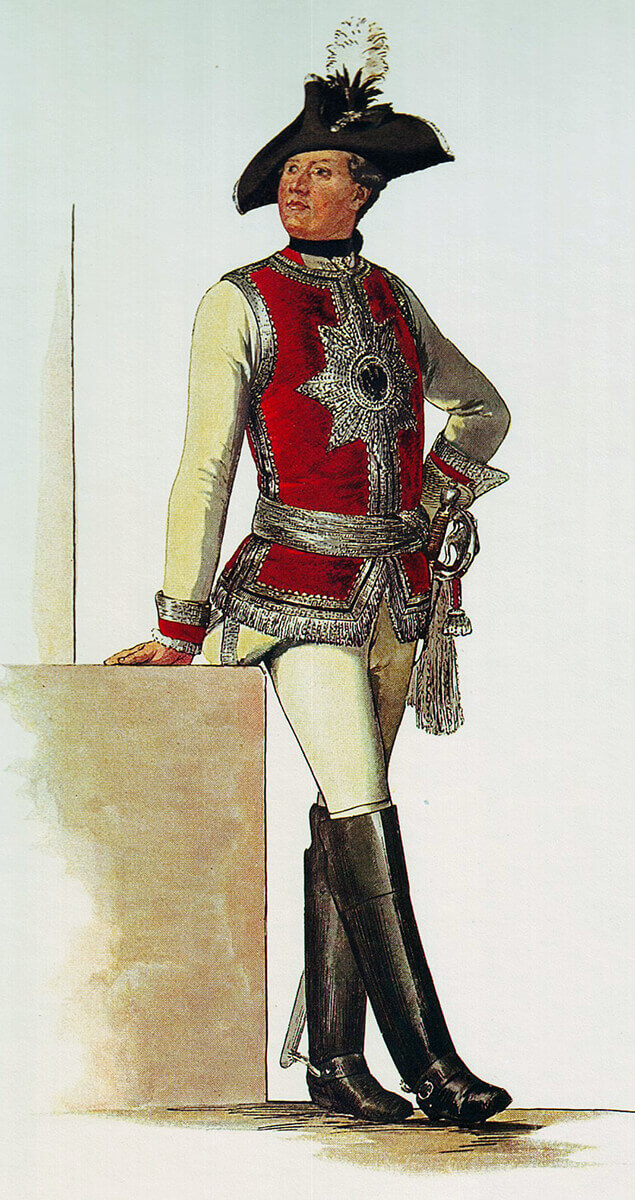
Prince Charles of Lorraine, commander of the Austrian/Saxon army at the Battle of Hohenfriedberg 4th June 1745 in the Second Silesian War
With news of Frederick’s actions Prince Charles of Lorraine brought his Austrian Army back to Bohemia to confront Frederick. The Saxons threw in their lot with the Austrians, their army moving south to join Prince Charles. Advised by the canny Marshall Traun, Prince Charles manoeuvred and re-captured Bohemian towns, but avoided outright battle with the Prussians.
Unable to bring the Austrians to battle Frederick withdrew into the area north of the Elbe while the Austrians retook more of the towns that had been lost. Frederick was forced to abandon Prague. In early December 1744 he withdrew his army into Silesia.
The campaigning of 1744 had cost the Prussian Army around 15,000 men in casualties and desertions.
In the spring of 1745 the Austrians and Saxons assembled an army of 59,000 men and in May 1745 this army invaded Silesia. Frederick assembled an army of 59,000 to meet them. Again Prince Charles avoided battle by remaining in the hills.
At this point the old art of espionage intervened. An agent of the Prussians in the Austrian headquarters informed Prince Charles that Frederick intended to retreat to Breslau on the Elbe.
Prussian troop movements appeared to confirm this information. The Austrian army moved down from the hills to follow. In fact the Prussian army was concealed in the area beyond the town of Striegau. Each day Frederick mounted the Ritter-Burg a hill outside the town and viewed the tentative Austrian/Saxon advance. In the early hours of 4th June 1745 Frederick saw that the distant Austrian cooking fires were already lit leading him to conclude that the troops were about to move.
Prussian Dragoons: Battle of Hohenfriedberg 4th June 1745 in the Second Silesian War: picture by Adolph Menzel
In the afternoon a large cloud of dust hung over the horizon denoting actual movement and in due course the Austrian/Saxon army emerged from the hills in eight columns, colours and standards flying, drums beating and trumpets blaring. Frederick later wrote sardonically that German armies seemed to be incapable of movement without such musical accompaniment.
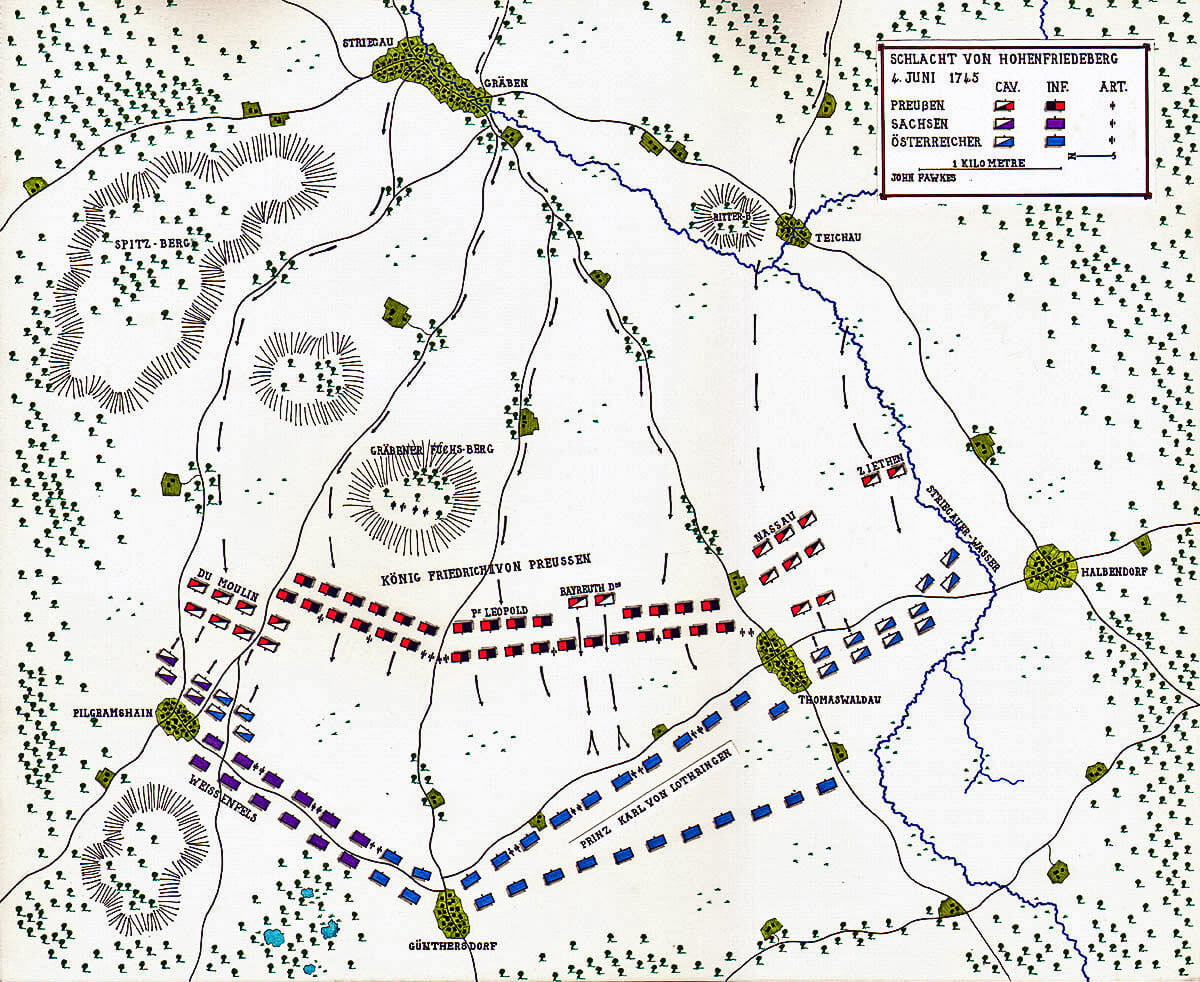
Map of the Battle of Hohenfriedberg 4th June 1745 in the Second Silesian War: map by John Fawkes
The Battle of Hohenfriedberg Account
On the evening of 3rd June 1745 the Austrians and Saxons encamped over a large area near Hohenfriedberg covering a line of some 4 miles. No attempt was made to occupy the features in advance of their camp. Frederick again gauged the Austrian/Saxon positions by the camp fires but underestimated their extent. He planned a night approach and an attack round the left flank of Prince Charles’ army. In fact the attack would fall on the left flank rather than beyond it.
The Prussian army had to cross the obstacle presented by the Striegauer-Wasser, Striegau River, before forming in the area beyond for the attack. It was a considerable undertaking to advance in a number of columns in the dark, cross a major obstacle and form for battle in the face of the enemy.
In addition the Austrians and Saxons were not only in the positions Frederick had deduced. Their troops were spread over the area immediately beyond the river and their left flank extended across the front of the village of Pilgrimshain, further than Frederick expected.
Prussian Infantry Regiment von Bornstedt No 20: Battle of Hohenfriedberg 4th June 1745 in the Second Silesian War: picture by Adolph Menzel
The Prussian advance on the leading right flank was led by Lieutenant General Du Moulin, a French Huguenot officer, with a mixed force of grenadiers and hussars. The surprised Austrians and Saxons were soon made aware of the Prussian advance by the troops scattered across the country immediately to the West of the Striegauer-Wasser.
The main bodies of Austrian and Saxon infantry, cavalry and guns moved forward to occupy positions in front of the village line of Pilgrimshain, Gϋnthersdorf, Thomaswaldau and Halbendorf, but the movement was ill-co-ordinated. There was an atmosphere of confusion and the soldiers knew their leaders had been taken by surprise.
Du Moulin’s advancing troops encountered the substantial force of Saxon and Austrian cavalry posted in front of Pilgrimshain and had to be supported by two batteries of 24 pounders and the cavalry of the Prussian right. A ferocious cavalry battle ensued. While this fight was in progress with the more numerous Prussians gaining the upper hand, the Prussian infantry crossed the Striegauer-Wasser around Gräben and came up to the Saxon infantry positioned between Pilgrimshain and Gϋnthersdorf. The Prussian infantry advanced through the Saxon cannon and musket fire and routed the Saxon infantry.
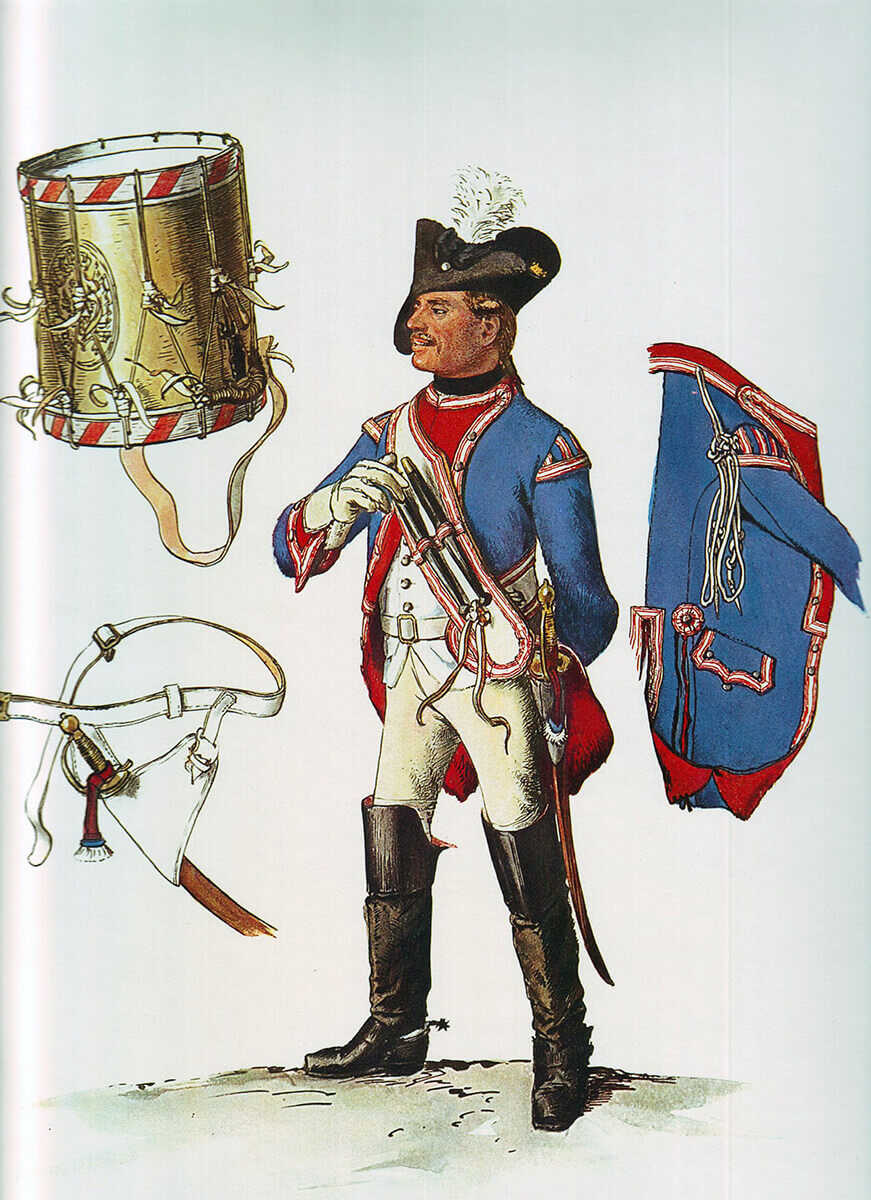
Dragoon No 5 Bayreuth: Battle of Hohenfriedberg 4th June 1745 in the Second Silesian War: picture by Adolph Menzel
Frederick now turned to deal with the Austrian infantry, coming up on the right of the defeated Saxons around the village of Gϋnthersdorf. Heavy fire was exchanged as the Austrians were pushed back by Frederick’s infantry line.
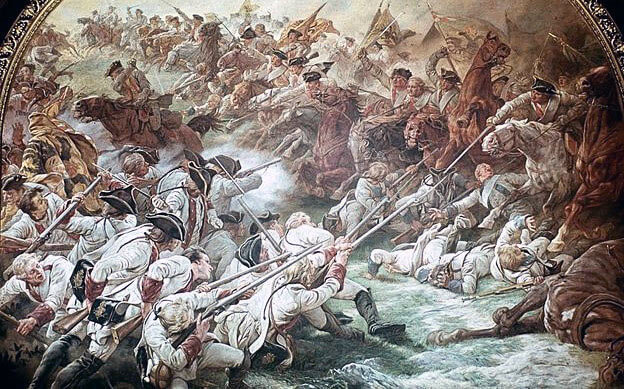
In the meantime on the Prussian left there were some critical moments for Frederick’s army. As the battle began, Lieutenant General Nassau led the heavy cavalry of the Prussian left wing across the Striegauer-Wasser by the rickety wooden country bridge in the village of Teichau. Once Nassau’s squadrons had crossed, the bridge collapsed preventing the supporting regiments from crossing.
Nassau precipitately attacked the cavalry of the Austrian right wing but was outnumbered and in danger of being overwhelmed. Major General von Zieten, whose crossing of the Striegauer-Wasser had been stymied by the bridge collapse, found a usable ford outside Teichau, crossed with his regiment of hussars and the dragoon regiment of Alt-Wϋrtemburg and charged the flank of the second line of Austrian cavalry. More Prussian cavalry came across the ford and the Austrian cavalry, coming under the additional burden of Prussian infantry fire from the village of Thomaswaldau, was defeated and dispersed.
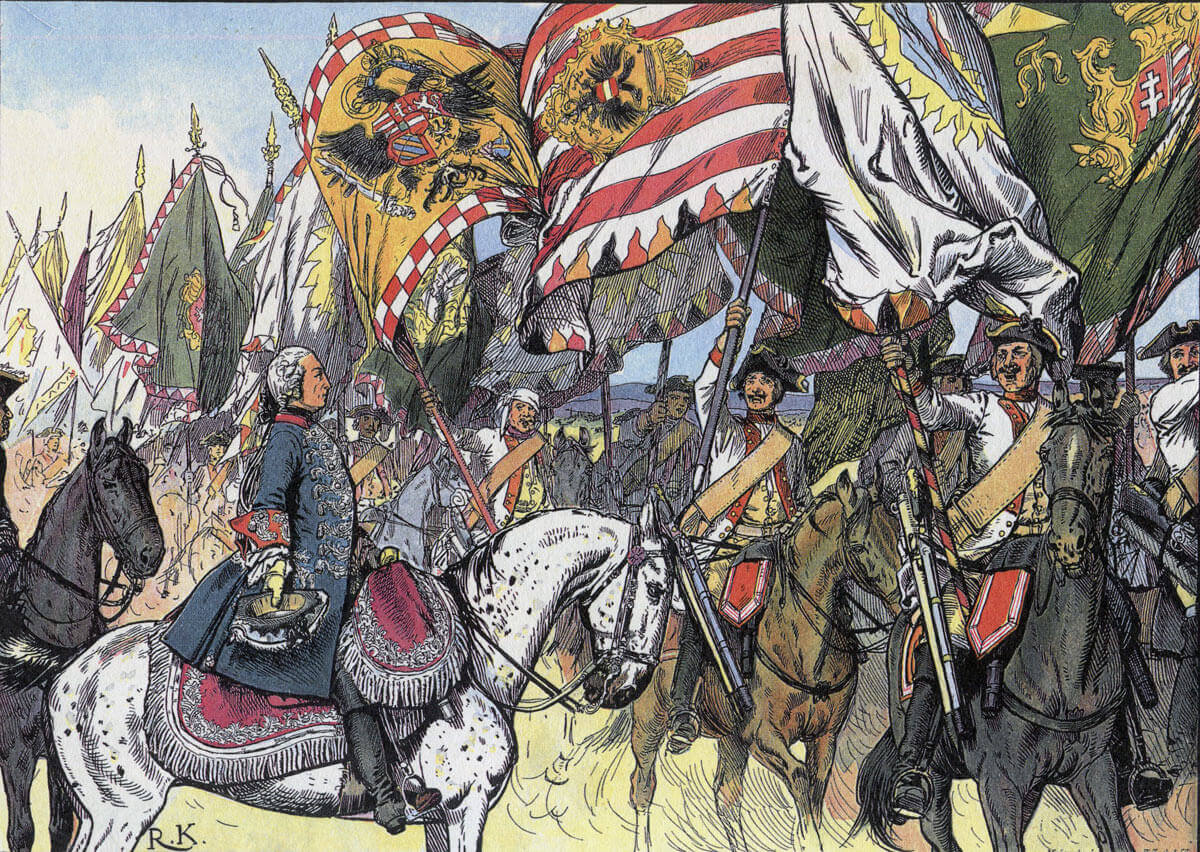
Bayreuth Dragoons parade captured Austrian colours before Frederick the Great after the Battle of Hohenfriedberg 4th June 1745 in the Second Silesian War: Picture by Richard Knötel
The final dramatic stage of the battle took place in the infantry line in the centre. The Prussian cavalry regiment, the Bayreuth Dragoons, held a position in support of the infantry, covering a gap between two brigades. Seeing an exposed party of Austrian Grenadiers the dragoons filed through the Prussian infantry, formed line and charged the Austrian infantry. The impetus of the attack took the dragoons into the main Austrian line which collapsed. Prince Charles’ army was driven from the battle field in confusion. Frederick had won a major victory.
Casualties at the Battle of Hohenfriedburg: The Austrians and Saxons suffered 13,800 casualties of whom 3,120 were killed. The Prussians suffered 4,751 casualties of whom 905 were killed.
Aftermath to the Battle of Hohenfriedburg: Controversially Frederick permitted Prince Charles to withdraw his army into Bohemia without interference. It may be that Frederick expected the Austrians to sue for peace after such a decisive defeat. However the war continued. It may be that Frederick considered that he did not have a strong enough supply chain to support a vigorous pursuit.
Prussian Infantry Regiment von Forcade No 23: Battle of Hohenfriedberg 4th June 1745 in the Second Silesian War: picture by Adolph Menzel
Anecdotes from the Battle of Hohenfriedburg:
- Before the battle Frederick instructed the Prussian cavalry not to halt in the charge to take prisoners. This was taken as a direction not to give quarter to surrendering Austrians and Saxons. This order substantially increased the number of Austrian and Saxon soldiers killed in the battle.
- The Prussian heroes of the Battle of Hohenfriedberg were the Bayreuth Dragoons. In their charge the regiment captured 67 infantry colours, 2,500 prisoners and 5 guns.
- The episode of the bridge at Teichu was potentially a disaster for the Prussians. Zieten’s biographer, his niece the Baroness von Blumenthal describes how General von Kiow crossed the bridge with the leading squadrons of his brigade, while Zieten watched with some concern as the hundreds of heavy cavalrymen pounded the rickety wooden structure. With the destruction of the bridge clearly imminent Zieten despatched his hussars along the river to find an alternative crossing. As Zieten expected, the bridge collapsed leaving Kiow stranded on the far side. Being a Prussian cavalry commander with his blood up Kiow attacked the overwhelming numbers of Austrian cavalry that confronted him and was rescued in the nick of time by Zieten and his force of hussars and dragoons that had crossed by a ford his men discovered.
- In the ensuing melee Zieten’s Hussars overwhelmed the Austrian regiments of Hohen-Embs Cuirassiers and Saxa-Gotha Dragoons. A hussar wounded and captured the Austrian General von Berlichengen. In the Imperial service the Hungarian Hussars were considered to be little more than bandits and were not permitted to fight in the cavalry line. Von Berlichengen was outraged to have been taken by hussars and roundly abused his captors. In view of Frederick’s ‘no prisoners’ order to the cavalry, Von Berlichengen was lucky not to have been cut to pieces. The outraged Prussian Hussars took the Austrian general before their king and complained bitterly at his conduct. No doubt highly amused, Frederick ticked off Von Berlichengen and made him apologise.
- After the battle Frederick took up residence in Schloss Rohnstock. The following morning the Bayreuth Dragoons paraded their captured colours into the courtyard of the Schloss with drums beating.
- Frederick said of the Bayreuth Dragoons “They are Caesars. If this was Rome they would have statues in their honour.”
- The Bayreuth Dragoons were the Prussian Dragoon Regiment Number 5. The regiment was one of two large dragoon regiments with 10 squadrons. The regiment took its name from its colonel the Markgraf Friedrich von Ansbach-Bayreuth, its only link with that area. The regiment’s peace time station was Pasewalk in Pomerania on the Baltic coast.
- The Hohenfriedberger March was composed after the battle by Frederick the Great, if tradition is correct. It became the march of the Bayreuth Dragoons.
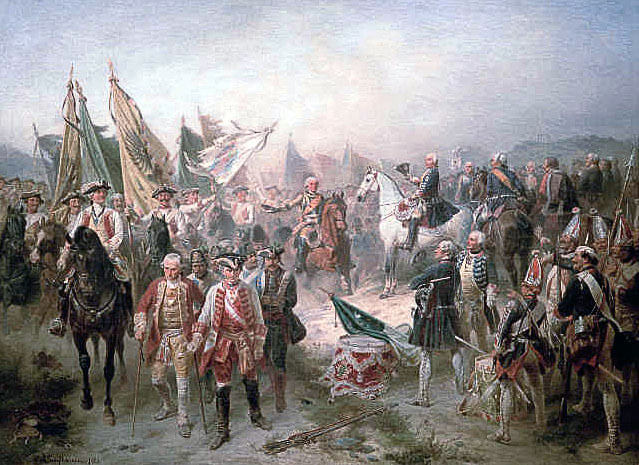
Captured Austrian and Saxon officers reviewed by Frederick the Great after the Battle of Hohenfriedberg 4th June 1745 in the Second Silesian War
- Hohenfriedberg showed the success of Frederick’s re-organisation of the Prussian army between 1742 and 1744. The Prussian infantry was as steady and effective as it had always been. The Prussian cavalry showed itself to be more than a match for the Austrian cavalry, operating with aggression and élan. The Prussian artillery provided effective support for the attack and the Prussian subordinate commanders showed themselves well able to take advantage of the opportunities that appeared so suddenly in this fluid battle. The Prussian army was at its height.
References for the Battle of Hohenfriedburg:
- Frederick the Great by Thomas Carlyle
- Frederick the Great by Christopher Duffy
- The Army of Frederick the Great by Christopher Duffy
- The Army of Maria Theresa by Christopher Duffy
The previous battle in the First Silesian War is the Battle of Chotusitz
The next battle in the Second Silesian War is the Battle of Soor
To the Second Silesian War index